You are using an out of date browser. It may not display this or other websites correctly.
You should upgrade or use an alternative browser.
You should upgrade or use an alternative browser.
- Thread starter twistedsymphony
- Start date
As far as I can tell there were only 3 panels ever made for the E29 a 2L8B, a 2L12B and a Mahjong Panel. the 2L8B and 2L12B were both available in either red or blue to match the cabinet color (so I guess 5 panels if you want to count the color differences). This cabinet came with a 2L8B.

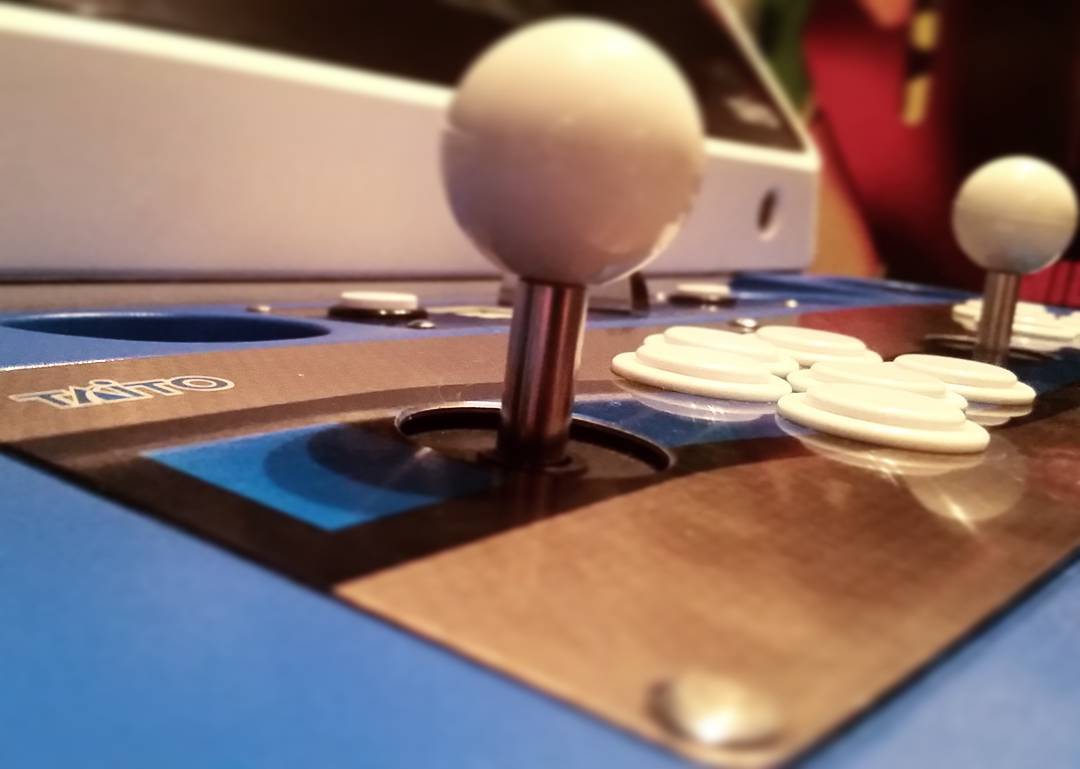
The Sticks don't actually mount to the panel but rather a sub bracket that's bolted to the top plastic of the panel from the under side. These cabs use Seimitsu LS-32 sticks with separate push on connectors for each switch. Also interesting is that the 2L8B panel used round gates while the 2L12B used square gates.

Note the oversized holes for the joysticks, this is so you can remove the panel and have it clear the ball tops. The buttons snap fit in place just like other modern panels.
It's a good thing too because when I went to disassemble them for cleaning they were pretty cruddy. I had to put one ball top in a vice to break it lose.

also interesting is that the panel uses just 1 dust washer mounted BELOW the panel, and it's over sized. here's a comparison of the oversized E29 dust washers compaired to the new ones from Seimitsu

The previous owner had thrown in a 3rd party 2L14B that is actually pretty crappy. it was bare metal, cheaply made the 7th button was on the bottom row for some reason and was useless for Player 2 because the hole was positioned such that wouldn't clear the metal panel bracket. I covered it in black vinyl and stuck some button plugs in the 7th holes but it was ugly enough that I don't even want to post a picture of it...
Thankfully, the second Egret 29 I picked up came with the 2L12B panel so as soon as I got that home I swapped that panel onto this cab (at least for the time being)
A few interesting things about these panels. First is that they're made of aluminum... so NO RUST! second is that the mounting bolts are actually PRESSED into the panel. rather than square holes for carriage bolts like the Sega panels these have 6 studs permanently pressed into the panel. Another interesting thing was that the 2L8B panel used M3.5 threaded studs while the 2L12B panel used M4 threaded studs. the start/coin panel on both machines used M3.5 (there's actually quite a bit of M3.5 sized bolts on these cabs which is very annoying because you have to special order that shit). That aftermarket 2L14B panel had no studs... no square holes either just circular holes.
For whatever reason the bottom center stud on the 2L12B panel was missing so I took an M4 carriage bolt and pressed it in with my bench vice and a deep 6mm socket

I agonized over the button colors to use. The original colors from the sales flyers and according to the parts manual is white plunger/black housing for the start buttons, black ball tops and red and orange buttons. It also specifically calls out Sanwa buttons. I decided to go with Seimitsu buttons because they have a nice boxy look to Sanwa's gentle curves and i felt it fit the cab better. I kept the black/white themed start buttons but went with all white gameplay buttons and white ball tops. My reasoning is that the control panel area on this cab is really dark due to the blue upper control box So the all white sticks and buttons would help lighten it up. I also left the stick shafts bare because the cab does have some metallic accents in the posts that hold up the header, the bare metal coin slot and the bare metal serial number plate on the front of the cab, so I felt it fit better than any colored post would.
I had originally planned to rebuild the LS-32s but after pricing out the rebuild parts it was only a few bucks less than just buying all new sticks. so that's what I did.
I'm really happy with the end result.

You can also notice here that I've got locks and keys! This cab had NONE but I managed to source a complete set of locks and a single key off of YAJ (the other keys in the photo are for my other cabs). Sadly this auction didn't include the cams for the locks. I was able to use normal oval shaped cams for everything except the monitor locks. At the moment they're just for decoration. So I'm still on the look out for those as well as a spare key. If anyone is interested they're LY-0069 locks.
The Sticks don't actually mount to the panel but rather a sub bracket that's bolted to the top plastic of the panel from the under side. These cabs use Seimitsu LS-32 sticks with separate push on connectors for each switch. Also interesting is that the 2L8B panel used round gates while the 2L12B used square gates.
Note the oversized holes for the joysticks, this is so you can remove the panel and have it clear the ball tops. The buttons snap fit in place just like other modern panels.
It's a good thing too because when I went to disassemble them for cleaning they were pretty cruddy. I had to put one ball top in a vice to break it lose.
also interesting is that the panel uses just 1 dust washer mounted BELOW the panel, and it's over sized. here's a comparison of the oversized E29 dust washers compaired to the new ones from Seimitsu
The previous owner had thrown in a 3rd party 2L14B that is actually pretty crappy. it was bare metal, cheaply made the 7th button was on the bottom row for some reason and was useless for Player 2 because the hole was positioned such that wouldn't clear the metal panel bracket. I covered it in black vinyl and stuck some button plugs in the 7th holes but it was ugly enough that I don't even want to post a picture of it...
Thankfully, the second Egret 29 I picked up came with the 2L12B panel so as soon as I got that home I swapped that panel onto this cab (at least for the time being)
A few interesting things about these panels. First is that they're made of aluminum... so NO RUST! second is that the mounting bolts are actually PRESSED into the panel. rather than square holes for carriage bolts like the Sega panels these have 6 studs permanently pressed into the panel. Another interesting thing was that the 2L8B panel used M3.5 threaded studs while the 2L12B panel used M4 threaded studs. the start/coin panel on both machines used M3.5 (there's actually quite a bit of M3.5 sized bolts on these cabs which is very annoying because you have to special order that shit). That aftermarket 2L14B panel had no studs... no square holes either just circular holes.
For whatever reason the bottom center stud on the 2L12B panel was missing so I took an M4 carriage bolt and pressed it in with my bench vice and a deep 6mm socket
I agonized over the button colors to use. The original colors from the sales flyers and according to the parts manual is white plunger/black housing for the start buttons, black ball tops and red and orange buttons. It also specifically calls out Sanwa buttons. I decided to go with Seimitsu buttons because they have a nice boxy look to Sanwa's gentle curves and i felt it fit the cab better. I kept the black/white themed start buttons but went with all white gameplay buttons and white ball tops. My reasoning is that the control panel area on this cab is really dark due to the blue upper control box So the all white sticks and buttons would help lighten it up. I also left the stick shafts bare because the cab does have some metallic accents in the posts that hold up the header, the bare metal coin slot and the bare metal serial number plate on the front of the cab, so I felt it fit better than any colored post would.
I had originally planned to rebuild the LS-32s but after pricing out the rebuild parts it was only a few bucks less than just buying all new sticks. so that's what I did.
I'm really happy with the end result.
You can also notice here that I've got locks and keys! This cab had NONE but I managed to source a complete set of locks and a single key off of YAJ (the other keys in the photo are for my other cabs). Sadly this auction didn't include the cams for the locks. I was able to use normal oval shaped cams for everything except the monitor locks. At the moment they're just for decoration. So I'm still on the look out for those as well as a spare key. If anyone is interested they're LY-0069 locks.
Last edited:
During this time I did some work on the internals as well. the AC block was filthy, and some savage had ripped the ground pin off wall plug.

This part was actually REALLY well designed, 2 Philips bolts and 1 connector and the whole thing can be removed from the cab. This allowed me to easily remove all the parts clean everything up and reassemble. I really hate replacing just the connector on the end of plugs so I replaced the whole power cable. I found a 15ft white 16ga extension cable at home depot, cut the female end off and crimped it to the AC block using the same style crimp connects that were on there originally.

Some minor surface rust inside the cab and some staining on the MDF that I couldn't really "clean" but overall it's much improved.
Adding the ground post back on the power cable has nearly fixed the "wobbling" issue I was having with the monitor too. on occasion I get a wobble or two right after I power up but other than that it's been rock solid ever since giving the cab a proper earth ground.
One other thing on this cab that still needs to be fixed is the marquee... The marquee on these cabs is 2 piece of plexy that are sandwiched together with a few nuts and bolts, the front piece is clear and fairly thin and the back piece is thicker, tinted green and has a chamfer along the back parameter. The Back plastic also has the white painted line art and "Taito" logo.

The Marquee for this cab is missing all of the hardware and both the front and back plexi were broken:

As anyone who has owned or looked into owning one of these cabs. in-tact marquees are very rare. it seems the way they're mounted causes them to get damaged frequently so most E29 owners don't even have a broken Marquee holder to work with.
Once again I stole some parts from my other Egret 29. on that one the green plexi is 100% in-tact but the clear front pelxi was cracked in 2 across the bottom. I used some acrylic glue to glue it back together. it's very strong (it actually bonds the acrylic back into 1 piece) but with no way to hold the pieces precisely in line with each other it still looks like it has a crack. Either way I was super happy to be able to install a marquee holder on this machine... they just don't look right without it.

I'm hoping to find someone with a CNC acrylic cutter large enough to make repo marquee holders for me. these are pretty large (I think about 22x18in) and the chamfered back edge on the green plexi is something only a CNC router can do properly. If possible I'd get the line art laser etched in, or failing that have some white vinyl cut to lay on it. The front plexi piece should be very straight forward to have done either by CNC or by Laser Cutter. For now this one is good enough")
This part was actually REALLY well designed, 2 Philips bolts and 1 connector and the whole thing can be removed from the cab. This allowed me to easily remove all the parts clean everything up and reassemble. I really hate replacing just the connector on the end of plugs so I replaced the whole power cable. I found a 15ft white 16ga extension cable at home depot, cut the female end off and crimped it to the AC block using the same style crimp connects that were on there originally.
Some minor surface rust inside the cab and some staining on the MDF that I couldn't really "clean" but overall it's much improved.
Adding the ground post back on the power cable has nearly fixed the "wobbling" issue I was having with the monitor too. on occasion I get a wobble or two right after I power up but other than that it's been rock solid ever since giving the cab a proper earth ground.
One other thing on this cab that still needs to be fixed is the marquee... The marquee on these cabs is 2 piece of plexy that are sandwiched together with a few nuts and bolts, the front piece is clear and fairly thin and the back piece is thicker, tinted green and has a chamfer along the back parameter. The Back plastic also has the white painted line art and "Taito" logo.
The Marquee for this cab is missing all of the hardware and both the front and back plexi were broken:
As anyone who has owned or looked into owning one of these cabs. in-tact marquees are very rare. it seems the way they're mounted causes them to get damaged frequently so most E29 owners don't even have a broken Marquee holder to work with.
Once again I stole some parts from my other Egret 29. on that one the green plexi is 100% in-tact but the clear front pelxi was cracked in 2 across the bottom. I used some acrylic glue to glue it back together. it's very strong (it actually bonds the acrylic back into 1 piece) but with no way to hold the pieces precisely in line with each other it still looks like it has a crack. Either way I was super happy to be able to install a marquee holder on this machine... they just don't look right without it.
I'm hoping to find someone with a CNC acrylic cutter large enough to make repo marquee holders for me. these are pretty large (I think about 22x18in) and the chamfered back edge on the green plexi is something only a CNC router can do properly. If possible I'd get the line art laser etched in, or failing that have some white vinyl cut to lay on it. The front plexi piece should be very straight forward to have done either by CNC or by Laser Cutter. For now this one is good enough
So Now you're pretty much up to speed on how this cab sits now here are some overall shots:


Also Just last Weekend @jassin000 hooked me up with some brand new Taito Stools to really complete the package:

So What's left to do?
1. Find an uncracked marquee holder or have one repoed
2. fix the paint on the back of the monitor bezel glass
3. vinyl cut replacements for the blue stripe around the monitor box (it's badly chewed up in one corner).
3. See if I can get some vinyl cut to match the embossed Taito Logos on the speaker backs (something that the early prototype photos of this cab have, but was never done for the final release)
4. source some proper lock camss for the monitor locks (and the coin box, though the generic one is working fine there)
The only other thing that arguably need to be done to make the cab perfect is, as you can see from the pictures, the paint on the cab body is far from perfect. However, it's also not terrible. I'm inclined to leave this as-is since There are a number of parts (such as the riveted on number plate and the glued on foot grip) that I don't think I can remove without damaging. If there were significant damage to the paint I might reconsider, but as it is I'm happy with it.
I don't want anyone thinking that I used used that other Egret 29 for parts. I'm already well underway toward restoring it. I wont be doing an in-depth restore log on that one like I did with this cab, since it'd be mostly redundant, but I WILL be doing a detailed write up as to how I fixed the completely mangled and broken header after the previous owner dropped the cab up-side-down. THAT part of the restore is already done ")
Also Just last Weekend @jassin000 hooked me up with some brand new Taito Stools to really complete the package:
So What's left to do?
1. Find an uncracked marquee holder or have one repoed
2. fix the paint on the back of the monitor bezel glass
3. vinyl cut replacements for the blue stripe around the monitor box (it's badly chewed up in one corner).
3. See if I can get some vinyl cut to match the embossed Taito Logos on the speaker backs (something that the early prototype photos of this cab have, but was never done for the final release)
4. source some proper lock camss for the monitor locks (and the coin box, though the generic one is working fine there)
The only other thing that arguably need to be done to make the cab perfect is, as you can see from the pictures, the paint on the cab body is far from perfect. However, it's also not terrible. I'm inclined to leave this as-is since There are a number of parts (such as the riveted on number plate and the glued on foot grip) that I don't think I can remove without damaging. If there were significant damage to the paint I might reconsider, but as it is I'm happy with it.
I don't want anyone thinking that I used used that other Egret 29 for parts. I'm already well underway toward restoring it.
I wont be doing an in-depth restore log on that one like I did with this cab, since it'd be mostly redundant, but I WILL be doing a detailed write up as to how I fixed the completely mangled and broken header after the previous owner dropped the cab up-side-down. THAT part of the restore is already done
Last edited:

After all this work you'd have to pry this cab out of my cold dead hands.I swore I would not go back to CRT cabs, but looking how this turned out, I'll buy it from you

LOL, I knowAfter all this work you'd have to pry this cab out of my cold dead hands.I swore I would not go back to CRT cabs, but looking how this turned out, I'll buy it from you
You've been looking for these for a while and I know all the work you've put into them, so I dont see you ever letting these go.
if I ever had to pair down to just 1 cab it would be one of the Egrets without question.
after the Egrets I'd probably keep Typing of the Dead (because of how hard it would be to replace) and KI2 (because I have a lot of history with that cab and I've yet to see a nicer one than the one I've got)
my only real gripe with these cabs is the control panel. everything on this cab is so easy to do EXCEPT swapping out the panels. it's two parts with 20 something bolts and you have to pull the whole harness too. if it used the Astro style panels it'd be really nice.
Where do you get those?!You gotta put a couple of these in your sig
 )
)where did you got those?I'll buy one of your egrets when you are ready
Are you still looking for a cps3 cage?
You gotta put a couple of these in your sig

Need 1 for NNC and 1 for my CL
Yeah! Whose pockets do we need to line to get some more cabs done up in fancy art?where did you got those?
mini update on this.
I've got a cutting machine so I've been able to cut some vinyl for the taito logos on the speaker backs.
The production model didn't have this but it was in some of the prototype images. I'm really happy with the result:
before:

AFTER:

I do plan on replacing that blue stripe along the side, I just need to order some longer material to do it.
I've got a cutting machine so I've been able to cut some vinyl for the taito logos on the speaker backs.
The production model didn't have this but it was in some of the prototype images. I'm really happy with the result:
before:
AFTER:
I do plan on replacing that blue stripe along the side, I just need to order some longer material to do it.
