What's new
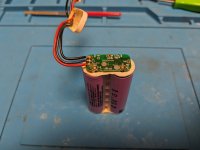
The metal tabs are actually spot welded ons, see on your top pic right hand cell the two little welds. You can diy cells by soldering tabs on but you'll need a decent iron as the heat is wicked away fast by the rest of the cell so can be very problematic.
 
The metal tabs are actually spot welded ons, see on your top pic right hand cell the two little welds. You can diy cells by soldering tabs on but you'll need a decent iron as the heat is wicked away fast by the rest of the cell so can be very problematic.
Thanks for the reply. This Naomi battery replacement isn’t as easy as I originally thought.
 
Last edited:
You can buy batteries that already have tabs on them but maybe try your hand at doing something makeshift with that you have.
 
You can buy 18650 battery's in a series configuration already made up, I haven't looked into it much so not sure what the board on the original pack is controlling, they were probably unprotected cells originally. Modern 18650s generally have protection pcbs inside the cell to prevent over discharging. You can still buy unprotected cells but that's generally for high discharge current stuff with some external monitoring.
 
Didn’t find any batteries with tabs that work so I’m going to pick up some nickel solder tabs and give that a go.

Thanks for the replies
 
Okay so I found a battery holder that fits inside the netdimm. I soldered the leads from the charging circuit to the holder and everything works. only issue that netdimm battery cover can no longer fit. Also need to find a way to secure charging circuit (tape?)

4FBEE429-439C-40A0-BA1C-08F7FE8E3824.jpeg

D66F0B23-03D3-4930-840E-BC4D13FFD6F9.jpeg

ABCDE1CD-286D-433F-AB47-F365CBE93548.jpeg
 
I just built new packs for my DIMMs and it wasn't too bad.

spot welder: https://www.amazon.com/gp/product/B09FJQN7DT
batteries: https://www.18650batterystore.com/products/panasonic-ncr18650ga-ga6
wrap: https://www.amazon.com/gp/product/B097ZPZMNG

Disassemble the original battery by cutting off the outer wrap.
Remove any tape.
Slide the top cardboard cover off the pcb.
Desolder the blue wire.
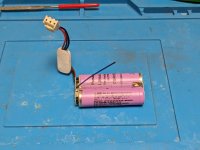
PXL_20240215_014741124.jpg

Desolder the pcb from the two tabs
PXL_20240215_014831714.jpg

Ensure you've got the two bumpers on either side of the pcb. If they fell off be sure to glue them back on.
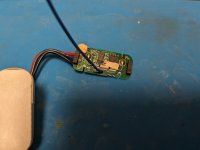
PXL_20240215_015118220.jpg

Cut the cardboard where the pcb was to split the batteries apart and get the holder.
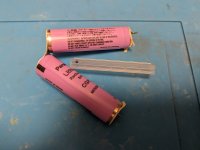
PXL_20240215_015109684.jpg

Orient the new batteries in series. Use the holder and tape them together so its easier to work with.
Tack a nickel strip across one end.
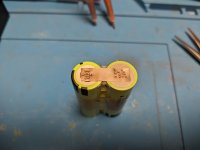
PXL_20240215_015532609.jpg

Tack a thinner strip to that strip and bend it around for the blue wire.
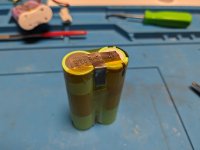
PXL_20240215_015835675.jpg

Fashion some new tabs for the pcb out of the nickel strip and tack them to the other ends of the batteries. There's a decent amount of wiggle room with the pcb for this so it doesn't have to be perfect.
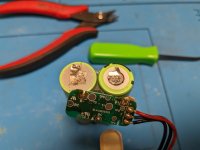
PXL_20240215_020626266.jpg

Solder the blue wire to the middle tab and the pcb to the top tabs. Make sure you have positive on positive and negative on negative.
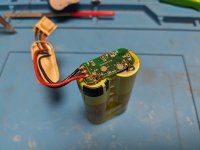
PXL_20240215_020906433.jpg

Put the cardboard cap back on the pcb and use too much kapton tape to wrap it all up.
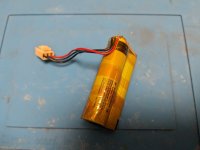
PXL_20240215_021124833.jpg

Finally squeeze the heat shrink wrap over the whole thing and cautiously use a heat gun to shrink it.
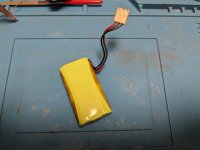
PXL_20240215_021421834.jpg
 
I just built new packs for my DIMMs and it wasn't too bad.

spot welder: https://www.amazon.com/gp/product/B09FJQN7DT
batteries: https://www.18650batterystore.com/products/panasonic-ncr18650ga-ga6
wrap: https://www.amazon.com/gp/product/B097ZPZMNG

Disassemble the original battery by cutting off the outer wrap.
Remove any tape.
Slide the top cardboard cover off the pcb.
Desolder the blue wire.
PXL_20240215_014741124.jpg

Desolder the pcb from the two tabs
PXL_20240215_014831714.jpg

Ensure you've got the two bumpers on either side of the pcb. If they fell off be sure to glue them back on.
PXL_20240215_015118220.jpg

Cut the cardboard where the pcb was to split the batteries apart and get the holder.
PXL_20240215_015109684.jpg

Orient the new batteries in series. Use the holder and tape them together so its easier to work with.
Tack a nickel strip across one end.
PXL_20240215_015532609.jpg

Tack a thinner strip to that strip and bend it around for the blue wire.
PXL_20240215_015835675.jpg

Fashion some new tabs for the pcb out of the nickel strip and tack them to the other ends of the batteries. There's a decent amount of wiggle room with the pcb for this so it doesn't have to be perfect.
PXL_20240215_020626266.jpg

Solder the blue wire to the middle tab and the pcb to the top tabs. Make sure you have positive on positive and negative on negative.
PXL_20240215_020906433.jpg

Put the cardboard cap back on the pcb and use too much kapton tape to wrap it all up.
PXL_20240215_021124833.jpg

Finally squeeze the heat shrink wrap over the whole thing and cautiously use a heat gun to shrink it.
PXL_20240215_021421834.jpg
its what i need to do too ✌🏻 thanks for sharing 🙏🏻
 
Back
Top