What's new
Thanks for the links. My son is the DDR player so I'll share them but he already has thousands of songs. He got 4th at Bearpocalypse Invitational ITG Tournament in Chicago at Mad Matt Garner's this year, and has been hired to work at trade shows like MOMOCON in Atlanta to demo dance pads for Precision DancePads. He can do 20 level songs with S- scores and loves having a 'real' machine to play anytime he wants.
Here's a video of him at a Cosplay convention in Green Bay. He's a lot faster so the songs on DDR machines don't really challenge him anymore.


Correct about the Korean cabinet. I got schematics from several machines and did notice the wire colors differ. Do the US/Japan machines require a 220V transformer, or can the neon ballast run off of 120V?
I don't believe there is any sort of step-up or step down transformer in the Japanese/USA cabs. I don't know for certain though as all the power supply electronics are inside their own cage at the bottom of the cab and I've (thankfully) never had to try to get it open.

Overall build quality of the Japanese cabs is better but Damn of the Korean cabs aren't easier to work on ;)
 
A little update:
So yesterday I modded a Pac Drive to output ground through the + pins and it worked great for driving MOST of the lights.

the dance pad lights, the control panel lights and the marquee lights are all driven from circuitry in the cab:
specifically a circuit containing an inverting Schmidt trigger (74HC14) and a Mosfet (K2232). I decided to measured the current draw on this circuit and they all drew about 1.3-1.7 milliamp. Coupled with the ground mod on the PacDrive this works great. So for anyone who wants to drive pad lights, and marquee lights and still has the original PAD I/O boards and the original Amp-Box all of those light write ups online that state you need to use relays or Mosfets is complete B/S

The problem is the Bass Neons. As I stated before, there is no relay on Japanese cab, the switching is internal to the Neon Inverter... Since the neon inverter taps it's own power from AC completely separate from the DC circuitry that powers the rest of the cab lights coupling the earth ground from the Bass Neon with the Digital Ground from my PacDrive is probably what blew out my PacDrive last time.

I'm going to avoid using a relay for these as I don't really like using a mechanical devices for something that switches so frequently. I might built a little Opto-Isolator circuit for the bass neons instead.

Unfortunately it seems I blew out my Bass Neon inverter too :( so I've got to find a replacement for that before I can find a solution to switch it.

-----------------------
One other thing: I was trying to get open ITG up and running with lights but to do so they require the use of the Win 32 Lib USB driver, I managed to get this working on my Win 7 laptop when I was bench testing the outputs, but when I tried to get it running on my Win XP mini-tower that actually runs on my cab the driver refused to install throwing some error about not being able to use admin privs, despite the fact that I was in-fact using an admin account. I even tryed every trick in the book to run the install with higher permissions with no luck.

I could use the PacDrive Demo app to push signals out to the cab but as far as using Open ITG itself it refuses to connect to the PacDrive without the LibUSB driver.
 
Last edited:
Yeah, I read lots of stuff about having to replace all of the lights with LEDs in the whole machine so the PACdrive's combined 1 amp through the ULN2803s would drive them directly. Whoever said that is nuts - unless you have a bad light/amp box and have no alternative. With the PC and LED monitor, the whole machine takes 120VAC at 2.3amps when running driving all of the original lights.

The red/black wire connector on the back of the 573 controls the neons directly from the 573, without going to the light/amp box. On mine, by unplugging and jumpering the wires together, the neons would come on, and there was only 5VDC at 5ma flowing. Yours has to work the same since we both had 573s. On mine 5VDC+ came from a JAMMA harness supply pin (soldered to one of the terminals on the back of the connector) and went the SSR (4-30VDC trigger, 50-220 VAC load), something like it would be in your power dist box. The black return wire from my SSR went to the neon connector on the back of the 573, and the red wire in the connector was actually soldered to a JAMMA ground pin. So when the 573 completed the circuit, it just turned on the SSR using the JAMMA's power pin. The SSR then conducted 220V across the load pins to power up the neon transformer (6kv 30ma) which lit the bulbs. I am thinking about eliminating the huge heavy 120-220VAC transformer that is only used to power the 220VAC neon transformer, and get a 120VAC transformer instead, like http://www.ebay.com/itm/NEW-NEON-TRANSFORMER-6-000-v-volts-6KV-6000v-30ma-UL-/111776798783

The SSR looks like an Omron G3MB-202P - $4 with shipping on ebay from China. You can trigger it with 5-30VDC and it will drive 50VAC to 250VAC.

If you had this, you could wire it like mine so the 5VDC+ pin on the SSR would be supplied by the + pin on the PACdrive (5VDC from the USB supply), and the - pin on the SSR would go to the trigger pin on the PACdrive. Then you would just wire the load side of the SSR in series with the 120VAC powering your neon transformer. On mine, they just soldered the wires directly to the SSR's pins.
 
yeah the neon transformer in mine is toast... it's getting good AC power and bridging the trigger wires does nothing.

I tried to open it up to see if I could fix it but the frigging thing is entirely encased in epoxy.

I DID find someone on facebook who had converted their bass lights to LED and is sending me a new trasformer so hopefully I'll be back up and running soon.

As I said before I want to avoid using a relay for switching the neons on and off because of it's mechanical nature. as long as the draw on the trigger wires is low (and it sounds like it is) then an Opto-Isolator will work just as well as a relay but have way better response time and no potential for mechanical failures, not to mention completely silent.
 
I hope you understand that I am suggesting you use an SSR (Solid State Relay), like that OMRON G3MB-202P. It is exactly what you describe - a big optically isolated (phototriac or photo MOSFET) transistor, so there are no moving parts. It is NOT mechanical. The draw on the trigger is about 5ma at 5 VDC, which is why I suggested you use the PACdrive to drive its trigger, then connect its load pins in series with the 120V you are supplying to your transformer (when you get it). I think we are saying the same thing as that is exactly how the neons in my machine are controlled.
 
Last edited:
I hope you understand that I am suggesting you use an SSR (Solid State Relay), like that OMRON G3MB-202P. It is exactly what you describe - a big optically isolated (phototriac or photo MOSFET) transistor, so there are no moving parts. It is NOT mechanical. The draw on the trigger is about 5ma at 5 VDC, which is why I suggested you use the PACdrive to drive its trigger, then connect its load pins in series with the 120V you are supplying to your transformer (when you get it). I think we are saying the same thing as that is exactly how the neons in my machine are controlled.
Ah I didn't realize it was an SSR, that makes much more sense.

the new transformer I'm getting is original equipment for the machine so it has the low-draw trigger built in. no need to switch on an off the 120V.

the opto isolator I'm using to interface the trigger with the PacDrive is a PC817 which is the exact model used inside the System 573. If I were going with a 3rd party transformer or one from a Korean cab without the built in trigger then a high powered SSR like you suggested would be a better solution.
 
Some updates on my machine...

Someone on "The Official Buy/Sell/Trade group for rhythm game players" facebook group was kind enough to send me an original neon transformer unit for a Japanese cab, I had to fix a couple of the connectors that had mangled pins but after that I have working neons again!

11809923_983324788375235_1094121317_n.jpg


While I was in there I measured the draw across the trigger wires on the transformer at 0.3mA which is mind-bogglingly low... again the draw for the marquee spot lights and control panel lights is only about 1.5mA since they're all drivin through a schmidt-trigger/mosfet circuit on the light control board. Despite the low draw it needs to be completely isloated from the other light circuits so an opto-isolator or Solid-State Relay is required.

Speaking of that light control board the player 2 control panel lights also weren't working so I pulled the board and did some testing:
11950588_1500649320247145_1268868774_n.jpg


there's nothing serious going on with this board. really the only non-passive components here are the mosfet, which is unlikely to blow out, and the inverting schmidt-trigger, which is pretty much the first thing the input pins come in contact with.

I found the pinout for the 74HC14 inverting schmidt-trigger:
droppedImage.jpg


I started testing the gates one at a time and found that output #2 would stay low no matter what I put into input #2. I had a replacement chip but when I pulled the original I found that the trace to the input pin was lifting. So I replaced the chip and soldered in a wire to replace the trace.... now I've got fully working control panel lights too:

11931052_1682781991959157_1531459344_n.jpg


The last piece I need is for the opto-isolators to arrive so I can wire the bass-neons to the Pac-Drive. all the other lights are running from the PacDrive beautifully. I also got lib-usb working finally so oITG has light output! I'll create a separate post with instructions.

While I was testing some things out I was reminded that one of the subwoofers was blow so I decided to pull the grill and found that the foam cushion was deteriorated 100% around. If anyone is interested in the specs on the subwoofers are 10" diameter 4Ohm and 35Watt They have a 4 screw mounting pattern, but they're just wood screws turned right into the cabinet wood so any mounting setup should work just fine.
 
Here's how you get the software working for PacDrive support in Open In the Groove.

First you need Lib-USB Win32 drivers installed. I used the Zadig package here: http://zadig.akeo.ie/
There is a Windows XP specific build, make sure you download that one if you're using Win XP.

To Install Lib-USB Drivers you'll want do the following:
1. click Device->Create New Device
2. click Options->List All Devices
3. Select the PacDrive from the drop down list. *See note below
4. Select "libusb-win32" from the drive selection list
5. click the big button below the drive selection list to install it.

*Note: Make Sure the PacDrive is plugged into your computer. On Win 7 it came up as "LED Controller" but on XP it was listed as "Human Interface Device" which is totally useless. However the USB ID should be D209 1500, which is a good way to tell it apart from other devices that might have the same name. I believe they make variants of the PacDrive with different USB IDs (so that you can run multiple PacDrives on the same hardware) but you do have to special order these so it's likely that you dont' have one.

Once the Drivers are installed you'll want to edit the static.ini file, this is located in the Data folder wherever you have OpenITG installed (the default location is inside program files).

From here you want to find the [options] section and in that section set LightsDriver=PacDrive as well as LogToDisk=1
if those settings aren't listed then add them.

Then you should run oITG... if all goes well then the pac drive should be working. If Not check the log file that will have been created in the root OpenITG folder in here it will show you any error messages related to the PacDrive.

I found that if it was having problems initializing the PacDrive then it's usually a problem with the Lib-USB driver, though there are other things that can cause problems too.

The first time you run OpenITG with lights enabled and if it successfully initialized the PacDrive it will create a LightsMaps.ini file in Data folder. here you'll be able to re-assign different light signals to different outputs on the PacDrive. The numbers they use for light mapping aren't at all obvious though.

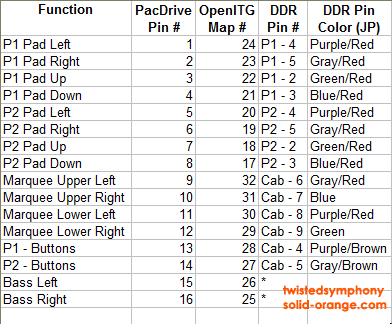
The default Mapping is as follows:
ddr_oitg_pacdrive_pins.gif


If you want to use the correct connectors to plug into the light connectors on a DDR cab you can order them directly from JSTs website: https://order.jst-mfg.com

XMR-10V: The 10 pin connector used for Player 1, Player 2 and Cab lights (so you'll need 3 of these)
XMR-06V: The 6 pin connector used for the Bass Neon Lights
SXM-01-P0.6: The pins for the above connectors, you'll need 21 of these to cover all the pins
 
Last edited:
All Lights are now working on my cab.

for the bass neon circuit I used a 470ohm resistor the optoisolator and a .1uf bi-polar cap just like on the System 573... a bit overkill but I didn't want to take any chases with the neon transformer again.

I think a Solid State relay would be a better solution for most people just for simplicity of wiring.

Here's a video of the lights in action (sound is disabled on the machine at the moment):
http://instagram.com/p/8Mk1uzzGIl

If anyone knows of a build of SM or oITG or a theme that doesn't flash all the lights constantly during attract mode please let me know. It's pretty obnoxious to be going off like that when no one is playing.
 
In the SM 5.09 source, the LightsManager.cpp controls this in the Update function:
void LightsManager::Update( float fDeltaTime )

Here is the chunk that handles the ATTRACT state for the Marquee and neons:
case LIGHTSMODE_ATTRACT:
{
int iSec = (int)RageTimer::GetTimeSinceStartFast();
int iTopIndex = iSec % 4;

// Aldo: Disabled this line, apparently it was a forgotten initialization
//CabinetLight cl = CabinetLight_Invalid;

switch( iTopIndex )
{
DEFAULT_FAIL( iTopIndex );
case 0: m_LightsState.m_bCabinetLights[LIGHT_MARQUEE_UP_LEFT] = true; break;
case 1: m_LightsState.m_bCabinetLights[LIGHT_MARQUEE_LR_RIGHT] = true; break;
case 2: m_LightsState.m_bCabinetLights[LIGHT_MARQUEE_UP_RIGHT] = true; break;
case 3: m_LightsState.m_bCabinetLights[LIGHT_MARQUEE_LR_LEFT] = true; break;
}

if( iTopIndex == 0 )
{
m_LightsState.m_bCabinetLights[LIGHT_BASS_LEFT] = true;
m_LightsState.m_bCabinetLights[LIGHT_BASS_RIGHT] = true;
}

break;
}

All you need to do is add
break;
on the line before the int iSec = (int)RageTimer::GetTimeSinceStartFast();
*******************************************************************************
The player button quick blinking is found near the end of the Update function:

// If not joined, has enough credits, and not too late to join, then
// blink the menu buttons rapidly so they'll press Start
{
int iBeat = (int)(GAMESTATE->m_Position.m_fLightSongBeat*4);
bool bBlinkOn = (iBeat%2)==0;
FOREACH_PlayerNumber( pn )
{
if( !GAMESTATE->m_bSideIsJoined[pn] && GAMESTATE->PlayersCanJoin() && GAMESTATE->EnoughCreditsToJoin() )
m_LightsState.m_bGameButtonLights[pn][GAME_BUTTON_START] = bBlinkOn;
}
}

To disable this quick blinking, add a line of code following the existing one:
bool bBlinkOn = (iBeat%2)==0;
bBlinkOn = 0;

I don't know about OITG or earlier SM source as I've never looked at it, but at one point it was similar, right? After saving these changes, you can just re-compile.
 
oh I've found the code in the source and know how to disable it there, I've just never got any of the SM code to compile right on my machine.

It will compile without errors and but then a lot of the game is messed up and buggy and prone to crashing. When I wrote the PacDrive lights driver for SM 3.9 i had to have beware compile it for me because it just wouldn't compile right for me. To be fair I've never tried recompiling oITG, just SM 3.9 and SM 5.0

In the OpenITG code it makes mention of being able to control lights via the theme... ideally I'd be able to modify the theme to shut them off that way instead of having to recompile. there doesn't seem to be any documentation to speak of.

FWIW the oITG source is here: https://github.com/openitg/openitg

maybe I'll try recompiling oITG tonight I might have better luck with that...

While on the topic someone on Facebook made mention of a setting to change the way the stage lights work. in DDR they typically light up whenever you step on them, but in ITG they light up corresponding to the steps in the track you selected

oITG defaults it to working like ITG but I'd love to get it working like DDR I couldn't find anything in the code related to this option though.
 
Last edited:
Thanks to your excellent post above about getting PacDrive to work with OITG, we switched and everything worked fine after a little PacDrive rewiring. We were worried at first as we got alot of errors and crashes, but once we copied some songs over, that all went away. :) And since he had the Player2 Start button set to the comma key in WinIPAC, there was an issue where that key wasn't being saved to the .ini file, as the key def lines in the file are comma delimited and adding the 3rd comma was a problem. He switched it to another key and it was fine.

It seems that Trevor's top tier buddies don't respect SM scores as much as OITG due to differences in life bar calculations.

We noticed the difference in dance stage lights you mentioned, and are not really sure yet which we like better. The marquee lights in OITG individually blink during a song, whereas SM5.09 all blink together. We also set the LightsFalloffSeconds=0.050000 in both programs to make them 'blinkier' during songs as they turn off quicker.

On SM5.09 Preferences.ini the BlinkGameplayButtonLightsOnNote=0 but when I change it in the oITG StepMania.ini, oITG appears to reset it to =1 before running. I'll look through the oITG code from the link you sent to see why.

The only Windows compiler that worked for me with SM5.09 was VS Community 2013 - older and newer gave compile errors. Once CMAKE runs, I double clicked the Build/StepMania.sln file which opened it up in VS Comm 2013. I then added the pacdrive.cpp and .h into the Solution Explorer window, then told it to Build. Lots of warnings, mostly signed/unsigned issues, but it all compiled and built.

I made a couple of changes to PacDrive.cpp to 1) use a shadow static variable to hold the last bit pattern sent and only actually send it if the pattern changes (the Set function in the driver gets called ALOT) and 2) changed the bits to match oITG so I don't have to re-wire the PacDrive if we switch between them.
 
awesome, thanks!

-----------------------

if anyone is interested here are the subwoofers I used as replacements in my cab:
http://www.parts-express.com/grs-10sw-4-10-poly-cone-subwoofer-4-ohm--292-482

$20 a piece and they are a direct fit, even the screw holes line up perfect and they have the same cone design as the originals so they even LOOK the same (no obnoxious logo across the front of the speaker). Build quality is much better than the originals too.
11326148_1628409954114343_1944808594_n.jpg
 
Last edited:
I just picked up one of these for free - unfortunately it had been broken into and the operator had removed the bits he wanted (screen, game board, light controller pcb, top marquee with speakers etc) & dumped the rest outside in the rain. As they're made of MDF after a week outside it's only fit for the skip.

However I managed to salvage the speaker units from inside, the cables & power supply for the Neon's, all the metal trim, Glass, plexi etc. Best of all I've got both dance mats and they look complete - but the OP cut the wires so there's no plugs on the ends :(

What I'm thinking is to rebuilt the top bit with an LCD screen and PC with stepmania installed, Amps etc. So the top would have everything inside and would have outputs for speakers & neon's on the back. Then I'll have to make some kind of frame to mount the speakers into so the top bit can balance above them.
 
Amazingly I got OpenITG to compile over the weekend, it boots but I haven't fully tested it out yet.

First i tried with VC2008 as thats what I had on my machine but there were a number of errors so looking at the code it seemed as though the VC2010 solution file was the last modified of all the solution files there so I grabbed Visual Studio 2010 Express.

First I ran into an Error regarding Direct X 8. I already had the Direct X 8 SDK installed but I had to manually link the Direct X 8 libraries to the project.
I then ran into an error regarding a missing header file in the Windows SDK. Some research determined that this was due to using the Express version of Visual Studio instead of Professional. I found a thread on Stack overflow with instructions on creating a dummy replacement file which worked.
Finally I ran into a LINK error that research determined was due to not having SP1 installed for VC 2010, so I installed that as well as the Compiler Pack (which adds back in other functionality that SP1 breaks).

After all that and a reboot it compiled without errors.


I added a flag to the Lights Manager to allow enabling and disabling of the attract mode lights through the Metrics.ini file so We'll see how that goes.

I also installed a small LED light bar in side my marquee box to cut way down on the marquee brightness and I finally got around to installing my 1st Mix Internet Ranking Version Marquee, that I Imported from Japan a while back.

12093414_1652280834989377_1344996006_n.jpg
 
Last edited:
I just picked up one of these for free - unfortunately it had been broken into and the operator had removed the bits he wanted (screen, game board, light controller pcb, top marquee with speakers etc) & dumped the rest outside in the rain. As they're made of MDF after a week outside it's only fit for the skip.

However I managed to salvage the speaker units from inside, the cables & power supply for the Neon's, all the metal trim, Glass, plexi etc. Best of all I've got both dance mats and they look complete - but the OP cut the wires so there's no plugs on the ends :(

What I'm thinking is to rebuilt the top bit with an LCD screen and PC with stepmania installed, Amps etc. So the top would have everything inside and would have outputs for speakers & neon's on the back. Then I'll have to make some kind of frame to mount the speakers into so the top bit can balance above them.
Japanese cabs are made of Plywood. I'm not sure on the material of the korean cabs or the Namco "Crap-o-cabs" though so it may have been one of those.

Light control is all provided by the game PCB. The light PCB is just 1 small board located inside of the amplifier box and it only really adds mosfets inline for the control panel and the marquee spot lights. The Pad lights are controlled by the Pad IO boards located inside the dance pads (these are actually the most valuable PCBs in the machine after the game board itself)

The speakers in these machines are pretty crappy. the $20 replacements I posted about above are far superior to the original equipment, and they were some of the cheapest subwoofer drivers I could find.

As for the LCD make sure you check out http://www.displaylag.com/display-database/ With Rhythm games lag plays a HUGE role and even a small amount can make the game unplayable.

OpenITG (and I believe StepMania as well) has a "Global Offset" option that you can use to compensate for lag on an LCD, but even then it's not ideal and you'll want it to be as low as possible.
 
Last edited:
I have a DDR extreme and a minimaid but I just wanted to post to say that I really like what you did. Impressive work !

The minimaid works with 3.9+_redux version of stepmania.

On a side note, my monitor is still ok but I was thinking of replacing it with an LCD, did any one on the forum try that ?
 
I have a DDR extreme and a minimaid but I just wanted to post to say that I really like what you did. Impressive work !
Thanks! :D

The minimaid works with 3.9+_redux version of stepmania.
This is true, but IIRC it requires replacing the .exe file, which means it does NOT work with Beware's extreme.

Although I've heard that more recently they released a Minimaid compaitble version of Beware's Extreme .exe

On a side note, my monitor is still ok but I was thinking of replacing it with an LCD, did any one on the forum try that ?
I haven't done that but I wouldn't recommend it. OpenITG and SM5 should be ok because they can be made to work with widescreen resolutions and you can adjust the offset to compensate for the LCD lag that will occur. However you'll pretty much lose your ability to run original hardware. System 573 would need an RGB to VGA converter, 573 and Python2 based releases don't support widescreen so they'd run stretched and neither have lag adjustment settings either so the game could potentially become unplayable, or at best annoying to play as you wont be able to rely on the visuals for more than a guideline.

I'm unsure if the Bemani PC releases have adjustable timing or not. I believe they have an LCD/CRT setting that set the lag offset to whatever the factory LCD panel has (again I could be wrong I don't have much experience with them).

Honestly if your CRT monitor still works then keep it, Low Lag is extremely important for rhythm games and even the lowest lag displays on the market will need you to dial in the lag offset into the software in order to make them play properly.

If your CRT looks crappy then have it rebuilt.

Don't get me wrong, I like LCDs but they're really REALLY shitty at displaying CRT content properly and unless you're spending a truck-load of money or doing a shit-load of searching for that obscure low-lag LCD model then you're probably going to end up with tons of lag.

That and I've yet to see an LCD swap in an SD cab that doesn't look like hot garbage.
 
Back
Top