This tutorial is for owners of Namco System 2 boards who wish to make a Rolling Thunder 2 jap convert (which has become quite difficult to find) at a lower cost, from any system game belonging to this list (gun games and race games have a second board not compatible for the convert) :
- Assault ;
- Assault Plus ;
- Cosmo Gang - The Video ;
- Burning Force ;
- Dirt Fox ;
- Dragon Saber ;
- Finest Hour ;
- Marvel Land ;
- Mirai Ninja ;
- Ordyne ;
- Phelios ;
- Legend of the Valkyrie ;
- Golly! Ghost! ;
- Kyuukai Douchuuki ;
- Bubble Trouble.
Prerequisite :
- an eprom programmer ;
- ten 27c040 (or 27c4001) eproms, seven 27c010 (or 27c1001) and two 27c512 ;
- a Namco System 2 game from the list above ;
- an hex editor like Winhex ;
- Rolling Thunder 2 romsets : parent and the jap one (can be easily found around the Web and available in MAME) ;
- a soldering iron ;
- a diode with Vf <= 0.4V (this does the job perfectly : http://fr.farnell.com/stmicroelectr...3%A9gories&searchView=table&iscrfnonsku=false )
1/ Application of patches to the program roms :
Unzip the jap romset of the game, and using your hex editor, apply the following patches to both program roms mpr0j.bin and mpr1j.bin :
Patches to apply to mpr0j.bin :
Address : Values : before => after :
0x00002069 : 66 => 4E
0x0000A4E6 : 67 => 4E
0x00002045 : 00 => 4E
Patches to apply to mpr1j.bin :
Address : Values : before => after :
0x00002069 : C4 => 71
0x0000A4E6 : 06 => 75
0x00002041 : F9 => FC
0x00002042 : D0 => 00
0x00002043 : 04 => 10
0x00002044 : 10 => 02
0x00002045 : 02 => 71
2/ Programming and installation of the eproms :
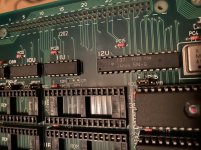
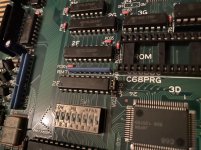
Unclip all the eproms from your game boards in use (except sys2mcpu and sys2c65c), program the new eproms with the parent and jap sets (including the 2 modified program roms) then install them as follows :
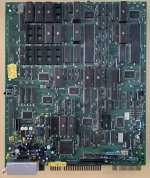
To place on the upper board (the motherboard with the Jamma connector) :
mpr0j.bin (CRC32 b73a212a after applying the patches) (27c010) has to be placed on the socket with MPR0 silk-screen printing ;
mpr1j.bin (CRC32 364a1a17 after applying the patches) (27c010) has to be placed on the socket with MPR1 silk-screen printing ;
spr0j.bin (CRC32 f8ef5150) (27c512) has to be placed on the socket with SPR0 silk-screen printing ;
spr1j.bin (CRC32 52ed3a4") (27c512) has to be placed on the socket with SPR1 silk-screen printing ;
(27c512) has to be placed on the socket with SPR1 silk-screen printing ;
snd0.bin (CRC32 55b7562a) (27c010) has to be placed on the socket with SND0 silk-screen printing ;
snd1.bin (CRC32 00445a4f) (27c010) has to be placed on the socket with SND1 silk-screen printing ;
chr0.bin (CRC32 6f0e9a6 (27c040) has to be placed on the socket with CHR0 silk-screen printing ;
chr1.bin (CRC32 15e44adc) (27c040) has to be placed on the socket with CHR1 silk-screen printing ;
shape.bin (CRC32 cf58fbbe) (27c040) has to be placed on the socket with SHAPE silk-screen printing ;
data0.bin (CRC32 0baf44ee) (27c010) has to be placed on the socket with DATA0 silk-screen printing ;
data1.bin (CRC32 58a8daac) (27c010) has to be placed on the socket with DATA1 silk-screen printing ;
data2.bin (CRC32 8e850a2a) (27c010) has to be placed on the socket with DATA2 silk-screen printing ;
voi1.bin (CRC32 e42027cd) (27c040) has to be placed on the socket with VOICE1 silk-screen printing ;
voi2.bin (CRC32 0c4c2b66) (27c040) has to be placed on the socket with VOICE2 silk-screen printing.
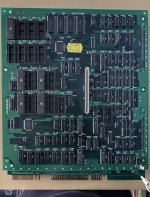
To place on the lower board (video board) :
obj0.bin (CRC32 e5cb82c1) (27c040) has to be placed on the socket with OBJ0 silk-screen printing ;
obj1.bin (CRC32 19ebe9fd) (27c040) has to be placed on the socket with OBJ1 silk-screen printing ;
obj2.bin (CRC32 455c4a2f) (27c040) has to be placed on the socket with OBJ2 silk-screen printing ;
obj3.bin (CRC32 fdcae8a9) (27c040) has to be placed on the socket with OBJ3 silk-screen printing ;
roz0.bin (CRC32 482d0554) (27c040) has to be placed on the socket with ROZ0 silk-screen printing.
3/ Jumpers settings :
Positions of the jumpers required on the top board (the motherboard with the Jamma connector) :
JP60 (* [O--])
JP66 (* [--O])
JP68 (* [--O])
JP67 (* [--O])
JP88 (* [--O])
JP86 (* [--O])
JP80 (* [O--])
JP87 (* [--O])
JP15 (* [--O])
Positions of the jumpers required on the lower board (video board) :
JP3 (* [--O])
JP4 (* [O--])
JP1 (* [O--])
JP2 (* [--O])
JP8 (* [--O])
JP7 (* [O--])
JP6 (* [O--])
JP5 (* [O--])
4/ Hardware modification :
The hardware modification is relatively simple, and without it the converts would not run.
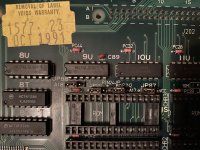
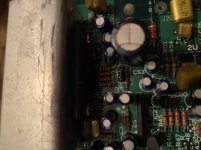
Start by locating the socket with PC50 silk-screen printing (located in 5G) on the lower board (video board) (this is the socket which normally supports the game key, but empty in the case of a convert), then place the diode under the socket on the soldering side as shown on the picture (picture taken by Paul Swan, thanks to him) below :

Once the change has been made, you are now in possession of a functional Rolling Thunder 2 jap convert, good game !!
- Assault ;
- Assault Plus ;
- Cosmo Gang - The Video ;
- Burning Force ;
- Dirt Fox ;
- Dragon Saber ;
- Finest Hour ;
- Marvel Land ;
- Mirai Ninja ;
- Ordyne ;
- Phelios ;
- Legend of the Valkyrie ;
- Golly! Ghost! ;
- Kyuukai Douchuuki ;
- Bubble Trouble.
Prerequisite :
- an eprom programmer ;
- ten 27c040 (or 27c4001) eproms, seven 27c010 (or 27c1001) and two 27c512 ;
- a Namco System 2 game from the list above ;
- an hex editor like Winhex ;
- Rolling Thunder 2 romsets : parent and the jap one (can be easily found around the Web and available in MAME) ;
- a soldering iron ;
- a diode with Vf <= 0.4V (this does the job perfectly : http://fr.farnell.com/stmicroelectr...3%A9gories&searchView=table&iscrfnonsku=false )
1/ Application of patches to the program roms :
Unzip the jap romset of the game, and using your hex editor, apply the following patches to both program roms mpr0j.bin and mpr1j.bin :
Patches to apply to mpr0j.bin :
Address : Values : before => after :
0x00002069 : 66 => 4E
0x0000A4E6 : 67 => 4E
0x00002045 : 00 => 4E
Patches to apply to mpr1j.bin :
Address : Values : before => after :
0x00002069 : C4 => 71
0x0000A4E6 : 06 => 75
0x00002041 : F9 => FC
0x00002042 : D0 => 00
0x00002043 : 04 => 10
0x00002044 : 10 => 02
0x00002045 : 02 => 71
2/ Programming and installation of the eproms :
Unclip all the eproms from your game boards in use (except sys2mcpu and sys2c65c), program the new eproms with the parent and jap sets (including the 2 modified program roms) then install them as follows :
To place on the upper board (the motherboard with the Jamma connector) :
mpr0j.bin (CRC32 b73a212a after applying the patches) (27c010) has to be placed on the socket with MPR0 silk-screen printing ;
mpr1j.bin (CRC32 364a1a17 after applying the patches) (27c010) has to be placed on the socket with MPR1 silk-screen printing ;
spr0j.bin (CRC32 f8ef5150) (27c512) has to be placed on the socket with SPR0 silk-screen printing ;
spr1j.bin (CRC32 52ed3a4
(27c512) has to be placed on the socket with SPR1 silk-screen printing ;snd0.bin (CRC32 55b7562a) (27c010) has to be placed on the socket with SND0 silk-screen printing ;
snd1.bin (CRC32 00445a4f) (27c010) has to be placed on the socket with SND1 silk-screen printing ;
chr0.bin (CRC32 6f0e9a6
(27c040) has to be placed on the socket with CHR0 silk-screen printing ;chr1.bin (CRC32 15e44adc) (27c040) has to be placed on the socket with CHR1 silk-screen printing ;
shape.bin (CRC32 cf58fbbe) (27c040) has to be placed on the socket with SHAPE silk-screen printing ;
data0.bin (CRC32 0baf44ee) (27c010) has to be placed on the socket with DATA0 silk-screen printing ;
data1.bin (CRC32 58a8daac) (27c010) has to be placed on the socket with DATA1 silk-screen printing ;
data2.bin (CRC32 8e850a2a) (27c010) has to be placed on the socket with DATA2 silk-screen printing ;
voi1.bin (CRC32 e42027cd) (27c040) has to be placed on the socket with VOICE1 silk-screen printing ;
voi2.bin (CRC32 0c4c2b66) (27c040) has to be placed on the socket with VOICE2 silk-screen printing.
To place on the lower board (video board) :
obj0.bin (CRC32 e5cb82c1) (27c040) has to be placed on the socket with OBJ0 silk-screen printing ;
obj1.bin (CRC32 19ebe9fd) (27c040) has to be placed on the socket with OBJ1 silk-screen printing ;
obj2.bin (CRC32 455c4a2f) (27c040) has to be placed on the socket with OBJ2 silk-screen printing ;
obj3.bin (CRC32 fdcae8a9) (27c040) has to be placed on the socket with OBJ3 silk-screen printing ;
roz0.bin (CRC32 482d0554) (27c040) has to be placed on the socket with ROZ0 silk-screen printing.
3/ Jumpers settings :
Positions of the jumpers required on the top board (the motherboard with the Jamma connector) :
JP60 (* [O--])
JP66 (* [--O])
JP68 (* [--O])
JP67 (* [--O])
JP88 (* [--O])
JP86 (* [--O])
JP80 (* [O--])
JP87 (* [--O])
JP15 (* [--O])
Positions of the jumpers required on the lower board (video board) :
JP3 (* [--O])
JP4 (* [O--])
JP1 (* [O--])
JP2 (* [--O])
JP8 (* [--O])
JP7 (* [O--])
JP6 (* [O--])
JP5 (* [O--])
4/ Hardware modification :
The hardware modification is relatively simple, and without it the converts would not run.
Start by locating the socket with PC50 silk-screen printing (located in 5G) on the lower board (video board) (this is the socket which normally supports the game key, but empty in the case of a convert), then place the diode under the socket on the soldering side as shown on the picture (picture taken by Paul Swan, thanks to him) below :
Once the change has been made, you are now in possession of a functional Rolling Thunder 2 jap convert, good game !!
Last edited:
 . Happy holidays !