Sorry, regional plastic supplier only had the thinner material. Still waiting on 6mm acrylic I use for base plates. Looks like just over a week (at the earliest).Ordered, wish the lcd piece was available to purchase.
You are using an out of date browser. It may not display this or other websites correctly.
You should upgrade or use an alternative browser.
You should upgrade or use an alternative browser.
- Thread starter mugen_ketsueki
- Start date
Ordered last Wednesday, here and installed under twenty minutes today, following Monday.

Very nice product at good price. MUCH better solution than sacking a real cart shell. Now i have the side mobo clips secure, not flopping around, and some serviceable resting space on top.
Very nice product at good price. MUCH better solution than sacking a real cart shell. Now i have the side mobo clips secure, not flopping around, and some serviceable resting space on top.
mugen_ketsueki
Professional
2 more back in stock people!
mugen_ketsueki
Professional
I saw that there were new items in stock, but still no replies on the form unfortunately. Guess he is busy, or my mail from the form went to the spam folder hehe.@Dloop He has been really busy due the pandemic but soon he will be getting restock. Have to be patient as he is working hard to get things done.
mugen_ketsueki
Professional
He’s busy. People has been emailing him and he’s mentioned that he’s doing a lot. No worries he will reply. He’s trying his best.
mugen_ketsueki
Professional
3 is now in stock!
GeorgeSpinner
Professional
I just got the Lions3 F3 Multi plates.
I have his MV1C MVS plates and 2 of his CPS-1 plates.
I'm a huge fan of his work.
That being said, I had some trouble getting this thing setup.
I think MOST of the issue was MINE.
The first issue I had was with the LCD housing. I couldn't get the back cover installed after with LCD was in the place.
I just ran the screws through the pcb without the back cover installed. It seemed to work out OK.
The next issue I had was that I couldn't figure out how this thing was supposed to be assembled.
I looked at as many pictures as I could find, but they didn't show me what I needed to know.
I ended up doing this:

As you can see, the F3 Multi PCB is all the way on the bottom.
I thought I had to do this because there is no matching slot for the LCD cable in the top plate.
I spent A LOT of time considering alternatives, but after 3 hours I decided this was the way I was going to go.
Please let me know if it's supposed to be setup a different way.
This is the overall look:

*** UPDATE 6/20/21 ***
I think I understand how it's supposed to be setup now.
What threw me off was:
- The slot for the LCD cable being in 1 plate but not the other
- The top of the clips not sitting even with the plates
Side:

Complete:

Clips:

I happy with how it came out.
I have his MV1C MVS plates and 2 of his CPS-1 plates.
I'm a huge fan of his work.
That being said, I had some trouble getting this thing setup.
I think MOST of the issue was MINE.
The first issue I had was with the LCD housing. I couldn't get the back cover installed after with LCD was in the place.
I just ran the screws through the pcb without the back cover installed. It seemed to work out OK.
The next issue I had was that I couldn't figure out how this thing was supposed to be assembled.
I looked at as many pictures as I could find, but they didn't show me what I needed to know.
I ended up doing this:
As you can see, the F3 Multi PCB is all the way on the bottom.
I thought I had to do this because there is no matching slot for the LCD cable in the top plate.
I spent A LOT of time considering alternatives, but after 3 hours I decided this was the way I was going to go.
Please let me know if it's supposed to be setup a different way.
This is the overall look:
*** UPDATE 6/20/21 ***
I think I understand how it's supposed to be setup now.
What threw me off was:
- The slot for the LCD cable being in 1 plate but not the other
- The top of the clips not sitting even with the plates
Side:
Complete:
Clips:
I happy with how it came out.
Last edited:
Necro thread!
I just got one of these, the LCD holder and the top cover. There were 2 clips in the top cover, can't figure out how to attach them. Has anyone got any pics? There is instructions on how to assemble the LCD part, but not the main cover bit
I just got one of these, the LCD holder and the top cover. There were 2 clips in the top cover, can't figure out how to attach them. Has anyone got any pics? There is instructions on how to assemble the LCD part, but not the main cover bit
GeorgeSpinner
Professional
I think you need to be more specific. The thread is filled with pics.Necro thread!
I just got one of these, the LCD holder and the top cover. There were 2 clips in the top cover, can't figure out how to attach them. Has anyone got any pics? There is instructions on how to assemble the LCD part, but not the main cover bit
If you look at the images in the thread, the top clips don't hookup like the original clips. There's a gap. At least that's how it comes out for me.
Still working great after 2+ years.
If you want to share images of what you are having trouble with, it might help us to help you.
What i mean are these clips (i assume they're clips?)I think you need to be more specific. The thread is filled with pics.
If you look at the images in the thread, the top clips don't hookup like the original clips. There's a gap. At least that's how it comes out for me.
Still working great after 2+ years.
If you want to share images of what you are having trouble with, it might help us to help you.
GeorgeSpinner
Professional
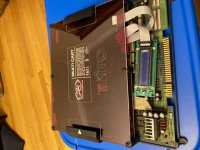
I don't believe they are clips, but are related? Hard to remember.What i mean are these clips (i assume they're clips?)

You can see the orientation of this piece in the image from my post labeled taito-side.
Here it is again.
The image is partially cut off but you can get an idea.
The clip seems to connect to this piece.
If you read my post, I also state that I had trouble finding out what to do with it. I eventually settled on what's shown.
Hopefully, this puts you on the correct path.
GeorgeSpinner
Professional
This shows it better.

They drop in, one on each side, from the top.
They drop in, one on each side, from the top.
Thanks for that! i've put mine together wrong it seems, since i put the 2 top pieces of perspex on top of each other. I think i'll leave it as it though, because i have the newer darksoft kit that has both LCD and OLED and the OLED connector on the kit means i can't install it the way you did.
GeorgeSpinner
Professional
No problem.
Idk if I put it together correctly. It's what I came up with though.
Enjoy.
Idk if I put it together correctly. It's what I came up with though.
Enjoy.
plasticfactory
Grand Master
GeorgeSpinner
Professional
Correct.@Flain you have it right, the acrylic pieces are supposed to be touching each other. The 3D printed pillars sandwich the PCB itself.
I went back and paid closer attention and mine is setup the same way.
You can see clearly where piece sits.
I hope this helps.
