What's new
Hmm - I'm at the point of giving up I think!

I decided to remove the EXC5 capacitor entirely - still red screen.

New 4Gb SD card arrived, so I added the encrypted ROMset to that - still red screen.

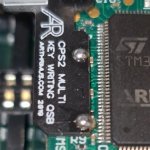
Took everything apart, re-soldered the Key Writing PCB I bought, put everything back together as tightly and as flush as possible - all looks fine to me - still red screen. ?(

Not sure where to go from here?
 
Tight connection between A and B boards and no bent pins?
 
Yep - those connections seem nice and tight - they're both out the cases, so to make it easier. No bent pins either.
 
this multi is new, not secondhand right? older multis needed firmware updates.

Can you show a high res photo of the key writing soldering, and photos from the sides showing the pins entering the B board and the interconnect board? Use imgur or another photo host.

Have you tried running a decrypted game yet? Any hack from the main pack would work.
 
Multi is brand new - bought from SaveYourGames.it a few weeks ago.

I'll do some high res photos now - I suspect I've bodged the soldering TBH!
 
Just tried a SFAlpha hack using another SD Card (4Gb).

Flashed successfully, "have fun", red screen ||
 
For arguments sake, I would try disconnecting the four pin cable and trying an unencrypted ROM again. Then if possible, try removing the Darksoft boards and using a Phoenix ROM set or reprogram the encryption key returning the board to "normal". The goal being trying to determine if the fault is in the board or the multi-kit.
 
I removed the four pin key writing cable, and loaded up a SSF2 free play hack, but it just gave me the usual red screen.

I don't think I'm technical enough to do your other suggestion I'm afraid!
 
I removed the four pin key writing cable, and loaded up a SSF2 free play hack, but it just gave me the usual red screen.

I don't think I'm technical enough to do your other suggestion I'm afraid!
What was the board originally? Someone may be able to hook you up with some Phoenix ROMs. Then you would just put the old ROMs back in the board, replacing one set of them with the unencrypted Phoenix ones.
Marvel vs Capcom
 
2J4AG1v.jpg

push that side in more, you can see the pins showing through on the left. You can remove first and make sure no pins are bent if you’re not sure
 
how about the interconnect board from the side? Some folks don’t realize how much you have to press that in
Here are images from each side - https://imgur.com/a/mECXL2g?
Regrettably I don't have Marvel vs Capcom Phoenix ROMs handy. As for the pictures you provided, the bridge board looks off to me... think it should be flush, looks like one side isn't seated fully. First picture shows a gap on the four pin cable side that isn't showing on the other image.

Edit: Also, are you sure the bridge board is the right way around? It is directional and should only be used in the correct orientation.
 
Last edited:
Are you still running with an unencrypted ROM file? The solder points on the Arthrimus didn't look clean, but it may have just been blurry due to the angle of the photo.
 
Balls - I was hoping that was it, but I pushed them in further, but still the RSOD:
That may just have been part of the problem. I echo the above, try a decrypted rom
 
Here's a close up the soldering. The bottom solder may be an issue here?
 

Attachments

  • soldering-dubious.jpg
    soldering-dubious.jpg
    358.8 KB · Views: 117
Here's a close up the soldering. The bottom solder may be an issue here?
It's hard to tell with those through hole soldering points. But, if you used flux it should have pulled the solder down and into the hole making it concave rather than convex. However it could still look like yours and be fine if enough solder was used. It took me several tries to get the soldering right. Those two points are Setup1 and Setup2 pins, that program the encryption key. So if they're faulty, it should in theory run an unencrypted ROM, but fail to write the encryption key. So... now that the bridge board is correctly seated (going to assume it's facing the right direction, hard to tell from photos) there may ALSO be a problem with the key writing, so I would again discharge EXC5 (just to be sure the keys are blank) then try an unencrypted ROM again.

Edit: In addition, because we can still see the pad on the bottom connector poking out from under the Arthrimus board it means that there is less surface for the second point to connect to. I don't have a good picture of mine handy... but you can kind of see what I mean in this pic.
IMG_0661.jpg
 

Attachments

  • IMG_0655.jpg
    IMG_0655.jpg
    234.6 KB · Views: 102
Last edited:
Back
Top