What's new
Leave the machine off for a few hours or half a day what ever you are most comfortable with.

When you remove the chassis circuit board from the frame just take care not to have your fingers touching the bottom of the board anywhere near the large capacitors. Over time the current should bleed off to safe levels but better safe than sorry :P

The neck board on the back of the tube is directly connected to the chassis. You need to remove this as well from the CRT tube as well they come out together.

Take some photos of how the colored wires plug into the chassis from the CRT's Yoke. One pair is for vertical and one is for horizontal. You also need to remove the degauss wire as well. You need to remove those before the chassis can come out. That way you wont have to worry about messing with them again when you put the monitor back together and you reversed them some how.

It will make more sense as you take the chassis out though. Everything needs to be disconnected from the chassis except the flyback anode cup and the neck board basically.
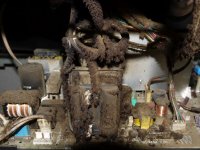
 
Glad to hear you did it safely, anode cup and all.

Before touching anything else, take lots of pictures at every angle so you have references when you need to reassemble and plug everything back in. And of course, wait awhile for it to discharge.

I would recommend putting in new capacitors if you're comfortable enough doing it. If not, you can have someone else do it, or just put it back in. Though the monitor won't last much longer without new capacitors.

Lastly, there should be a black, plastic tray that the chassis is screwed into. This plastic tray screws into a metal plate to keep it secure. Do you have the tray and screws?
 
A mnemonic for remembering the yoke wiring on the MS9-29 is that B faces inwards. That is, for the Red & Blue horizontal connector, Blue should be on the side closer to the center of the chassis. Likewise, for the Yellow & Brown connector for vertical, Brown should be facing inwards.
 
Hey again guys,

Thanks again for all the helpful advice.

Last time I discharged the whole CRT, let it rest for about one week and I started to fiddling with it again today.

I managed to pull out the neckboard out of the tube with little force, avoiding to damage the pins. On my previous posts you pointed me out the neckboard was crooked out on the CRT.
Thankfully that didn't happened at all - the reason seems that the plastic connector pins were desoldered out the board.

Its legs are pried apart out of the base ;(

Hopefully this can be fixed... Would soldering again be an option?

Thankfully the CRT pins seem to be fine, that made me more relieved at the end. Next would be to take out the monitor out of the Cab to start the cleaning process on the chassis - Thanks for all the advice.

Attached are some pictures:

Sample 0.jpg

Sample 1.jpg

Sample 2.jpg

Sample 3.jpg
 
Good thing the tube's pins are okay. You should be able to fix the plastic connector's pins by resoldering or using patch wires if needed. I'd desolder the entire plastic connector first, then look under it to see where all the pins/traces go. Then resolder it back on.
 
Way to go @Pacheco with more and more time you will become even more comfortable working on or around CRT's as you gain experience.
The first time is always scary and especially in a situation like this.

This is actually good news that the neck boards socket was damaged and not the actual tube or its pins. You can repair the neck board or possibly get a replacement too and that is far easier and cheaper than repairing or replacing the tube. You could also just replace the entire chassis and neck board pair. Save the old broken chassis for spare parts or sell it as is to make some cash back.


Its hard to tell but the sockets actual pins look to be damaged at the base of the plastic like they snapped. Which might be tricky to repair.
You might could find a way to solder it back though.

Edit: I missed where you said it came out of the socket. If the entire metal pin came out it may be possible to put it back inside of the plastic socket.

If you can get us a picture of the back of that neck board too where the circuit board is if you can. Could be some damage to the traces for that socket.
 
Last edited:
It looks like at least one pin has snapped. That would explain the funky image you were getting. The chassis being loose and dropping off more than likely pulled on the neck board and that's why it is like it is now. IMO send it off for repair and make the seller pay for it.

If you want to fix it yourself, you need to desolder the connector. I think I have a spare neck connector here (I would have to check, no promises). Or maybe someone closer to you can pull off one from a parts board.
 
Thanks a lot, if you got some spare ones that would be really helpful. Glad to know these parts could be replaced.

Please let me know if you got some and I'll contact on you on that.

I got another 2 questions - I managed to remove the chassis from the Cab :), and as expected is fully covered with gunk and dust.

1.- What would be the best way to clean it? I've seen videos of people hosing up the whole thing or cleaning it with dishwasher, a toothbrush and then dry it inside the oven.

2.- Also, what's this white like glue thing inside the PCB? I looked it up on Google and seems that is a silicone glue used to help up the components inside the board. Has anybody encountered & removed something like this before?

Attached are some pictures.
Once again, appreciate all the support! :thumbsup:
 
Last edited:
It's just silicone glue to keep components in place / pots at their correct settings. If I replace caps I scrape the glue off with a knife. Otherwise I leave it.

As for cleaning, I just blow the dust off. I have no idea why people wash these (especially with the flyback on, yikes). Team NoWash.
 
I wash them because I never want to have m hands emerge filthy after working on a machine, and dust is only part of the equation.

If you do wash it, be sure to remove the chassis from the monitor frame, and then the chassis from its plastic frame as well. I have seen some people wash their monitors by just hosing off everything while it's assembled, which I think is horrifying.

No matter what you use to wash it, be sure to keep some isopropyl alcohol handy, because you should spray it thoroughly onto and underneath components with little cavities that might serve as space for water to remain stuck (inside transformers, under the legs of ICs, etc). The alcohol should displace residual water after most of the drying has occured.

The white goopy glue is harmless; you can usually just pop it off pretty easily with minor force as needed to get to capacitors under replacement.
 
Last edited:
It's not a problem to wash. Simple green the board in the sink. Wash the monitor outside. Use distilled water if your worried. Then immediately use this damned thing : https://www.amazon.com/gp/product/B01BI4UQK0/ref=ppx_yo_dt_b_search_asin_title?ie=UTF8&psc=1

I get every chip, every nook and crany. Especially the screw holes, you would be surprised how those holes retain water. Never had a problem. From that point forward when you work on anything, you don't have have hands that look like you were working in a chimney.
 
What are you guys doing with these to get your hands dirty? Do you regularly cuddle with them in bed or something?

I don't know about you, but I keep mine in my cabs, away from hands. I turn the pots with a tool. I have washed maybe one chassis in my life. It came from a shed and was covered with rat droppings and other muck. I removed the flyback, all the coils, the PTC and some other parts before washing it and throwing it in an oven.
 
It's not just the water either. You're using tap water with probably some kind of cleaning solution. If you think that just evaporates without leaving anything behind, think again. The flyback is not sealed. The PTC is not sealed. The coils aren't sealed. All of these will let water in. And all of that water will leave something behind. That's a fact.

If you regularly wash your gear and you have run them for years without problems, cool. Keep on going, do what you do. However, I can also say that I run dozens of dusty PCBs every week, for five years straight. I have had absolutely zero problems. That dust isn't creating problems.
 
Nobody is saying the dust is creating problems. Where are you getting that from? It's having your hands emerge covered in tar from working on or swapping a chassis that is undesirable. If your things are only dusty, then you're very fortunate, as that's not typical for things that from from operating environments.

In my post I was fairly clear about the importance of displacing water and cleaning solution before allowing it to dry. Kavas mentioned using distilled water. Did both of you miss all of that?
 
No, you're right. I was just ranting. Probably should have picked a better thread for it. It's been on my mind for a while. You aren't saying that dust is creating problems, but I see it way too often.

As for dusty, I label the following under dusty. I don't know, we might have different definitions:

dusty_tosh_1.jpg


As for displacement, I'm sure it works for places like the underside of a component, not sure it will work within a cavity. Are you submerging things in alcohol?
 

Attachments

  • dusty_tosh_2.jpg
    dusty_tosh_2.jpg
    112.7 KB · Views: 102
That picture shows a lot of dust attached to the nasty smoky tar of the machine, which in my experience is pretty different from more mild household dust. Of course it's fine like that when running, but if the time should come to adjust the yoke and convergence rings, or remove the chassis (and get intimate with the anode connection) then it becomes a bad time for my hands.

Naturally it is not like these things just happen randomly during ownership or operation of the cabinet, so these are things I consider "first day" tasks when receiving a cabinet or monitor.

As for alcohol, I generally do not submerge, but go through a substantial amount of a bottle entirely soaking components in it. A spray bottle is used so I can forcefully get it into tight areas. I have fairly high confidence in the alcohol's ability to thoroughly reach the spots that water has. Furthermore, generally wouldn't do this process unless it's fairly hot outside, as the heat and sun do a lot to assist in drying the chassis. In a few instances where I wasn't feeling as sure about it, I depopulated all of the non-primitive components from the board for separate hand cleaning.
 
but if the time should come to adjust the yoke and convergence rings, or remove the chassis (and get intimate with the anode connection) then it becomes a bad time for my hands.
That's when you put on some latex gloves?

For the record, I cleaned that monitor by first blowing off the dust outside and then wiping down parts with a damp cloth. It's reasonably clean. Will my hands get slightly dirty if I touch it? Possibly. But on the other hand, I don't have to worry about ingress or any residue left behind from excess water. It works for me. More than likely the monitor will sit for years to come inside a cab without needing to be touched at all.

Anyway, rant over.
 
The way I always have done a circuit board rinse if you must, is just using distilled water. Its very rare I feel a need to just shove a PCB into a dishwasher and then rinse it off with distilled water.... only once and it was a really bad condition board to begin with so no real loss if it just died.

Compressed air is really all you need or an ESD brush and air. Sometimes just using 97% rubbing alch and a qtip or paper towel works in concentrated areas of cleaning too.
 
Back
Top