What's new
Added this picture to the first post. Anyone without the CN9 connector can add their auto-reset wire to B21 of this connector like so:

2gsr95h.jpg
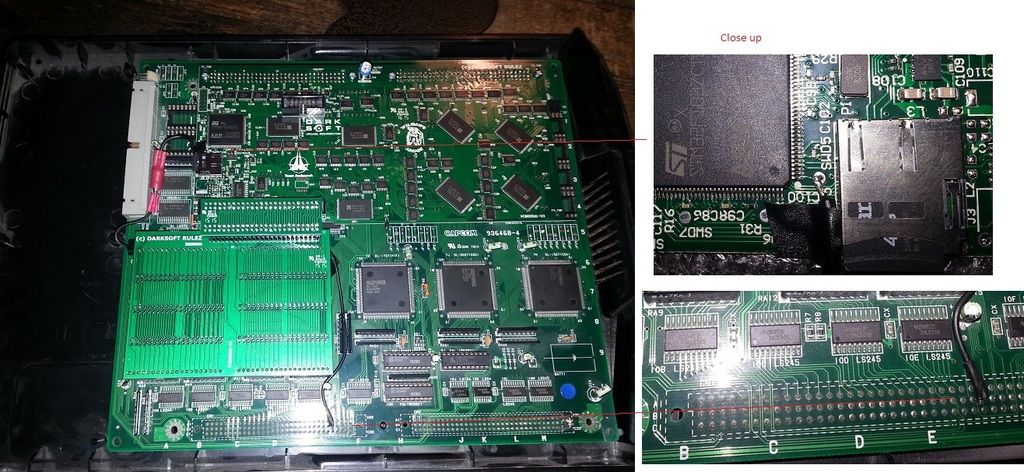
Sorry I can't seem to find the description of the connector so can somebody please post a picture where we see the rows and columns of the connector so we know where B21 is? ... thanks

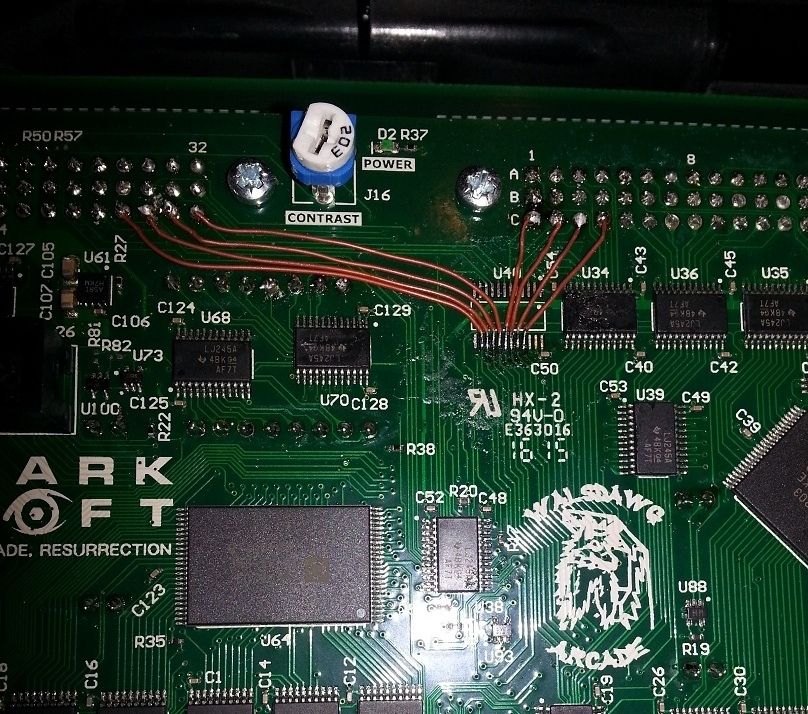
edit: ok I used my brain :/ ...and read what's written on the board and to make sure, I used a DMM and beeped the pin ! but anyway ... B are the top pins and count 21 from the left of his picture above ... of see my picture! *GEEZZUS!! LOOK AT THAT MESS!! <X )
resetpin.JPG
 
Last edited:
Hey All,

I have a Darksoft CPS2 in need of repair, the buttons broke off during travel and the games don't appear to work now. Who should I contact that could possibly repair it?

Off-Topic: where would I get a Naomi CF loading kit?
 
@mrJAMMA Any chance you could fix the images?
Super Puzzle Fighter II Turbo/X - fixed Avalaunch romsets - now have audio completely working:

https://mega.nz/#!dd1XAJZL!nOqnkdmH7qnFPJtGAj2BbwPPuIVEWkYeLkIpb-s0Sb0

CPS2 PAL information:

www.jammarcade.net/cps2-pal-information

Auto Reset wire installation pic - for those who do not have a CN9 header pin connector:

One end solders to SWD5 on multi kit. The other end solders to B28 on CN1 on B board

20150625_232759_zpsfumfz4ve.jpg


Audio Crackling Fix - Jumper wire method:

Remove LJ245A chip at location U40. Install jumper wires as per below photo.

27f772b4-b64a-45ac-9110-929a5319140d_zpsnnzvvoip.jpg


Revision 4 B-board - Jumper Wire from G PAL pin 9 to J17 on multi kit:

Untitled_zpsmchh4htn.jpg
 
There is an error in the "how to update the firmware" PDF. On the last page it says to connect the reboot wire to B28 when it's supposed to be B21 (as per the picture on page 1 of this thread..)

Works like a charm now.. after missing to put the flash-file on the sd-card AND then using B28 to reboot..
I think I'm gonna take a nap now to recover. ;)
 
Is there a new set of instructions now that the kits just released have the new firmware with key writing? A buddy and I just got our kits and wanted to make sure we did not miss anything before putting the kits together. As of now it appears the original instructions are 3 years old and do not note the new wires you need to hook up for the new firmware. Those instructions are in a completely different thread which makes it easy to miss.
 
Anyone lucky enough to have a CN9 connector on their B-board can do a cleaner auto-reset installation similar to what I did here:
28lxd9j.jpg
Can anyone let me know where I can get that little black connector for the reset wire?
I also wanted to ask what the pin sticking out labelled J17 is for and how do I use the long names file to add them to the games?
 
Can anyone let me know where I can get that little black connector for the reset wire?
that's just the half of a dupont cable.

The 1st post of this thread has been updated with V3.0 of instructions. Please download them, it should solve most if not all your questions.
 
Anyone lucky enough to have a CN9 connector on their B-board can do a cleaner auto-reset installation similar to what I did here:
28lxd9j.jpg
Can anyone let me know where I can get that little black connector for the reset wire?I also wanted to ask what the pin sticking out labelled J17 is for and how do I use the long names file to add them to the games?
Get a proper connector which should be there.
JST NH 6 pin
 
Can anyone let me know where I can get that little black connector for the reset wire?
that's just the half of a dupont cable.
The 1st post of this thread has been updated with V3.0 of instructions. Please download them, it should solve most if not all your questions.
I am not sure if I am missing something or not but if I am comprehending this correctly I do not need a reset wire? Or do I use the SWD7 and does that go to the connector in the pin CN9?

I am not interested in key writing just the auto reset feature and adding the long names to the roms.
Get a proper connector which should be there.JST NH 6 pin
Sorry but I am totally confused as to what you are referring to. I' probably just scattered right now though. ?(
 
Last edited:
@The Spaniard in that case just use SWD7.

What Pascal means is that instead of using the half of a dupont cable, you'd better using a proper connector for that plug which is a JST NH 6 pin (google it and you'll know what he means)
 
I have the connectors and can send you a DuPont cable if you want one or if you'd prefer a single wire populated JST connector I can do that too.

Any reason you don't want the key writing option?
 
That would be awesome if you could do that.

I guess key writing is a feature that would be cool to have but I don't know what any of this means:

Pinout for board revision 93646B-6, 93646B-7 and 97691A-3
CN9 pins:
DATAArduino # 2→ CN9 #2
SETUP1Arduino # 3→ CN9 #3
CLOCKArduino # 11→ CN9 #4
SETUP2Arduino # 12→ CN9 #5


So its more about being apprehensive about doing it as I am unsure of where it needs to go. Initially I thought these wires soldered to the tiny little legs on the ARM chip beside it and said Noooo!

But I think looking at the video by MitsurugiW I can see where the pads to solder are but I haven't seen an actual diagram showing what to solder where.

Also not sure if looking at the rollup pack if the keys are already in there or if need to manually add or not?
 
In the roll up pack the keys are there already, load and play. You may need to update your firmware first.

I'll upload a photo when I get home of a board I installed the key writing wires to, I use different colour wires so it should make it easier to see what goes where
 
In the roll up pack the keys are there already, load and play. You may need to update your firmware first.

I'll upload a photo when I get home of a board I installed the key writing wires to, I use different colour wires so it should make it easier to see what goes where
Great, I think @Darksoft confirmed that the recent boards already come with the key writing firmware installed.

Edit: Shieeet how didnt I see this:

index.php


It was't listed in the instuctions for the V3 though.

I'll PM you about the JST connector. :)
 
Back
Top