What's new

nam9

Champion
Joined
Aug 24, 2015
Messages
1,321
Reaction score
1,305
Location
Norway
So this is a project that I have been working on for quite some time now and have (almost) finally finished:

Saturn Naomi.JPG


This unit is a fully consolized NetBoot system running PiForce-Web @devtty0 / Netbooter @chunksin and was heavily inspired by @muckyfingers and FreedomGundam.
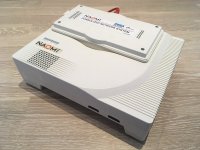
Naomi Front.JPG Naomi Rear.png Naomi Controller.JPG

Wanting to do something different, I opted for Sega Saturn control ports. I'll admit that this was primarily as they match the colour scheme of the Naomi... :whistling:
The other reasons being that I love the feel of the Saturn digital pads, the overall range of available accessories, and... Analog controls.

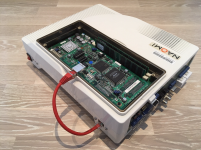
So this is how it looks inside. You will probably notice the power management. I wanted things to be modular and I wanted to ensure that I didn't limit current to the motherboard.
The DC-DC PSU is only rated 160W (200W peak), but has preformed flawlessly so far. Thanks to Larry from HDPlex for some technical assistance there.

Naomi Internals.png


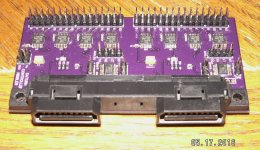
Controller input is handled by the 'Saturn Nibbler' (bottom right) - a custom board made by RDC that handle the Saturn controller protocol translation.
The digital side has a total of 16 outputs for UDLR, Start, ABC, XYZ, LT, RT and 3 software controlled keypress combinations (X+Y+Start = Coin Up).
The analog side has 4 outputs, X & Y axis, LT & RT that output 5v potentiometer style signal for the JVS I/O to interpret.

The JVS accepts 8 analog inputs (A0-A7) but lacks almost any form of standardisation between titles. The Nibbler therefore allows X/Y axes to be inverted or swapped.
Another key press combo puts the 3D controller in to 'Driving mode' so that brake and accelerate are correctly mapped to the LT & RT respectively.
Believe it or not, even the light gun games are playable - albeit rather clumsily - with the analog joystick. The relay switch in the middle remaps P2 controls from the P1 LT/RT to P2 XA/YA.

Thanks again to RDC for all his hard work and assistance. Apologies that I only really managed to hold things back with taking my time with the rest of the build.
The board above went from 1st draft to assembled prototype in 2.5 weeks... By comparison, shipping out to Norway took a week in itself...
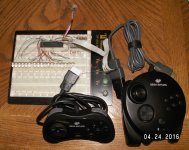
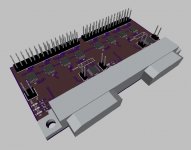
Nibbler 1.jpg Nibbler 2.jpg Nibbler 3.jpg

Anyway, thanks for looking! Hope you like it! :thumbsup:

Naomi HS0130.JPG
 
Last edited:
Awesome job! :thumbup:

Now just wire the crossover cable internally, thats what I am doing to a current build I am doing, for that super, super clean look.
 
Good job, very clean
Can you add more pictures or info for a DIY ?
Sure. Changed quite a few parts from my initial setup:

Naomi Layout.JPG


First of all that tiny power brink has been replaced by a beefy HP PA-1231 unit. The Raspberry Pi was also upgraded to a model 3 with onboard Wifi as I never got the dongle to work with PiForce-Web...
The ATX wires are all AWG18. Not pictured are the terminal connection blocks and wore crimps used for power distribution. The 160W HDPlex DC-DC ATX PSU I used was mounted at 90deg with 2 angle brackets. Unfortunately this model has now been discontinued and replaced by a new form factor similar to the PicoPSU models.

Naomi PSU 1.JPG Naomi PSU 2.jpg Naomi PSU 3.jpg

I used the Sega 838-13683-02 JVS I/O to Jamma card. I had to remove the analog connector and tap the inputs directly. It was easier to install it upside down on nylon standoffs with adhesive bases.
The USB input cable was trimmed down and hard wired to the filter board. The jamma pins were then wired up to the nibbler with a floppy ide cable (hidden under the black tape). I needed to shave down the top of the die connectors to fit things. The Nibbler is held in place with a single screw through the middle of the board into a pcb stand-off. The tight fit of the controller port holes and the white spacer cubes keep everything solid.

The NetDimm module was not too tricky to deal with - I just trimmed off and desoldered the GD-ROM and serial port and cut a communication board shell to fit the ethernet port. The cart top just needed some internal plastic cut to accommodate the RAM modules. I may try to glue a battery holder into the cart top to hold the rechargeable battery.

2017-04-13 21.09.44.jpg


Awesome job! :thumbup:

Now just wire the crossover cable internally, thats what I am doing to a current build I am doing, for that super, super clean look.
Neat idea! There is plenty space to pass the ethernet cable up internally. I may look into that in the future. :thumbsup:
 
Last edited:
Good job, very clean
Can you add more pictures or info for a DIY ?
Sure. Changed quite a few parts from my initial setup:
Naomi Layout.JPG


First of all that tiny power brink has been replaced by a beefy HP PA-1231 unit. The Raspberry Pi was also upgraded to a model 3 with onboard Wifi as I never got the dongle to work with PiForce-Web...
The ATX wires are all AWG18. Not pictured are the terminal connection blocks and wore crimps used for power distribution. The 160W HDPlex DC-DC ATX PSU I used was mounted at 90deg with 2 angle brackets. Unfortunately this model has now been discontinued and replaced by a new form factor similar to the PicoPSU models.

Naomi PSU 1.JPG
Naomi PSU 3.jpg

I used the Sega 838-13683-02 JVS I/O to Jamma card. I had to remove the analog connector and tap the inputs directly. It was easier to install it upside down on nylon standoffs with adhesive bases.
The USB input cable was trimmed down and hard wired to the filter board. The jamma pins were then wired up to the nibbler with a floppy ide cable (hidden under the black tape). I needed to shave down the top of the die connectors to fit things. The Nibbler is held in place with a single screw through the middle of the board into a pcb stand-off. The tight fit of the controller port holes and the white spacer cubes keep everything solid.

The NetDimm module was not too tricky to deal with - I just trimmed off and desoldered the GD-ROM and serial port and cut a communication board shell to fit the ethernet port. The cart top just needed some internal plastic cut to accommodate the RAM modules. I may try to glue a battery holder into the cart top to hold the rechargeable battery.

2017-04-13 21.09.44.jpg


Awesome job! :thumbup: :thumbsup:

Now just wire the crossover cable internally, thats what I am doing to a current build I am doing, for that super, super clean look.
Neat idea! There is plenty space to pass the ethernet cable up internally. I may look into that in the future. :thumbsup:
:thumbsup:
 
@nam9 you should grab one of @Derick2k's new Naomi badges if he has any left. Everything else looks sooo clean but that badge has a bit of yellowing going on.

Sexy label, and I like using a cartridge case for the dimm. I might have to try that.
 
That is the cleanest naomi consolization I have ever seen. Have you considered directly soldering the rj45 cable internally.

But yeah great work. Mine is just a naomi on a piece of wood with wires everywhere.
 
Is there a template available for the Naomi Cart label?
 
That is the cleanest naomi consolization I have ever seen. Have you considered directly soldering the rj45 cable internally.
Cheers! Always room for improvement ;)

Is there a template available for the Naomi Cart label?
I would be interested if there was - I just printed the text on a label writer and pasted it over the existing label.
Replacement labels certainly wouldn't be a challenge for anyone to recreate - more the actual printing / label quality...
 
Minor update! I've been working on some peripherals. Really happy with how this came out!
I had to go this route as Virtual On OT uses P1 controls for left stick and P2 controls for right stick.

IMG_0992.JPG IMG_0977.JPG IMG_0979.JPG

I was planning to trim the control pad pcb down to fit, but it actually wedges in nicely.
The ribbon cable is soldered to the controller chip on one side and the through-hole pins on the other side.

If anyone knows anyone producing replacement plexi/artwork for this or the HSS-0136 (Sega Saturn Virtual stick) then i'd love to swap out the top panel for this!

rap_ot210mm.png
 
Last edited:
This project is becoming more awesome every update. I know you got the analogue controller working, so does this mean you could technically use the mission stick and steering wheel as well? (yes I know the Saturn wheel is garbage, but the ability to use it would still be cool)
 
This project is becoming more awesome every update. I know you got the analogue controller working, so does this mean you could technically use the mission stick and steering wheel as well? (yes I know the Saturn wheel is garbage, but the ability to use it would still be cool)
Both are compatible, but there are other limitations.
RDC even picked up a second Mission stick to try out the twin stick configuration (stock image below...).
That would give you a total of 6 analog inputs in theory..

wmKehL2.jpeg

The Saturn wheel only has one analogue output (the wheel its self) and all driving games need 3 (steering, accelerator and brake).
I have picked up two 3rd party wheels so far, but they don't do true analogue - the pedals output digital signals, acting more like rapid fire.
I'm looking at picking up a MadCatz 'True Analog' Wheel as i have read that it emulates the 3D controller, rather than the digital controller...

Fingers crossed!
 
Back
Top