You are using an out of date browser. It may not display this or other websites correctly.
You should upgrade or use an alternative browser.
You should upgrade or use an alternative browser.
- Thread starter nam9
- Start date
They are both!Are the triggers are on the 3D Saturn controller analogue? I thought they were digital too.
The analogue portion of the trigger is a magnet/sensor combo (hall effect).
In digital mode they act as regular shoulder buttons.
Crazy Taxi works really well

darksofter
Enthusiast
To me this is one of most beautiful consolized systems. Would love to have this one.
ChicksOnLeashes
Student
I think I follow you on instagram!
I've been drooling over this for a while now!
I've been drooling over this for a while now!
Wow this is pretty beast looking..All the naomi set ups I've seen look like a circuit breaker box with a power meter hanging off it and all the wires exposed ready to burn someones house down.
I had no idea they could be so clean..makes me want to give it a go myself.. very inspiring!
I had no idea they could be so clean..makes me want to give it a go myself.. very inspiring!
gamemaster14
Enthusiast
I am very curious about that Sega Saturn controller board. Does it only work with JVS stuff or can it work with any arcade games? The reason I was really interested in it, was to get the rom board for Virtual On for the model 2 and using my Saturn Twin Sticks with it, instead of having to find a Von control panel.
The controller board is not JVS specific. It just breaks out the Saturn input to individual channels:
U, D, L, R, A, B, C, X, Y, Z, LT, RT, Start (plus analog, but that isn't needed with Virtual On..).
I then connect these outputs to the Jamma input of the JVS board.
If you added a second controller output to the Twin Stick as I have done (above), you could probably use 2x RGBs Sega Saturn to JAMMA joypad converter to achieve the same result...
gamemaster14
Enthusiast
I am glad I have stumbled upon this topic now, since I know, if I ever find a Virtual On rom board for my Sega Model 2 (Model 2b, I believe), I should be able to wire up something like the Saturn Converter to use those amazing Saturn Twin Sticks with the real arcade game.
Someone on Atariage posted a nice blurb about the proper mappings if anyone plans to use a twin stick with one of these converters:
Someone on Atariage posted a nice blurb about the proper mappings if anyone plans to use a twin stick with one of these converters:
Here's a partial list of Twin Stick control commands:
The left stick functions as the D-Pad. The triggers function exactly the same as they do on the NiGHTS pad, except that the Twin Stick triggers have only one position.
Right Stick direction ---> control pad equivalent:
Left ---> A
Down ---> B
Right ---> C
Up ---> Y
The buttons on top of the sticks function as X (left stick) and Z (right stick).
XtraSmiley
Legendary
I want to say, this is very awesome, and I am now following your thread!
Is there a way to buy the Saturn Nibbler board?
Is there a way to buy the Saturn Nibbler board?
Not yet... Perhaps at some point though!Is there a way to buy the Saturn Nibbler board?
The Spaniard
Professional
Following for updates as this is so cool.
Sure!Wow awesome! Any updates?
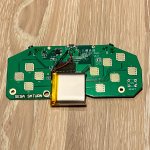
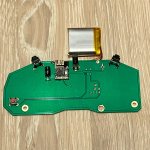
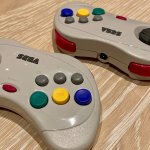
How about some 2.4Ghz wireless OG controllers


You may have heard about these via the write-up over at the Shumps forum.
If you keep reading you'll see that people have quickly run into issues with antennae, range, setup etc.
Bottom line - they work for me. YMMV. That's not a very helpful attitude, so here is what I have learnt...
Firstly, I purchased these direct from the seller on Taobao.com, with TBFocus as my forwarding agent.
The shumps page links to a reseller, but buyers have been sent the PCBs without a receiver unit
 Don't do that. Also direct is cheaper!
Secondly, the receiver plugs are horrible. You can just about force them into the controller sockets, but good luck getting them back out.
I took a metal file to them to slim them down.
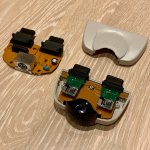
Thirdly.. there are no trigger buttons included. You need to harvest your own... Lucking I had a few padhacks with unused trigger buttons.
They desoldered pretty easily with just a cheap solder sucker
Lastly there are no instructions included. Here are mine:
Switch on: press Start
Switch off: press and hold LT,RT & Start
(3 seconds - red light flashes, turns off).
Program:
Start with everything off.
- Press and hold Start until red led is lit.
- Plug in receiver and power on console. (Receiver should begin to flash rapidly).
- Press ABCXY or Z to set channel. (Receiver flashes slowly, controller is still red).
- Confirm channel: Press Start and Channel button selected previously. (Controller and receiver steady green led).
To reassign channels, repeat above steps.
Reset button looks to reset current connection on current settings.
And don't worry - no HSS-0125 IR receiver units were harmed... Everything is reversible:

Last edited:
AlxUnderBase
Enlightened
Very nice work sir !Sure!Wow awesome! Any updates?

How about some 2.4Ghz wireless OG controllers

You may have heard about these via the write-up over at the Shumps forum.
If you keep reading you'll see that people have quickly run into issues with antennae, range, setup etc.
Bottom line - they work for me. YMMV. That's not a very helpful attitude, so here is what I have learnt...
Firstly, I purchased these direct from the seller on Taobao.com, with TBFocus as my forwarding agent.
The shumps page links to a reseller, but buyers have been sent the PCBs without a receiver unitDon't do that. Also direct is cheaper!
Secondly, the receiver plugs are horrible. You can just about force them into the controller sockets, but good luck getting them back out.
I took a metal file to them to slim them down.
Thirdly.. there are no trigger buttons included. You need to harvest your own... Lucking I had a few padhacks with unused trigger buttons.
They desoldered pretty easily with just a cheap solder sucker
Lastly there are no instructions included. Here are mine:
Switch on: press Start
Switch off: press and hold LT,RT & Start
(3 seconds - red light flashes, turns off).
Program:
Start with everything off.
I used 'Channel A' (Button A) for the first pad and 'Channel C' for the second pad.
- Press and hold Start until red led is lit.
- Plug in receiver and power on console. (Receiver should begin to flash rapidly).
- Press ABCXY or Z to set channel. (Receiver flashes slowly, controller is still red).
- Confirm channel: Press Start and Channel button selected previously. (Controller and receiver steady green led).
To reassign channels, repeat above steps.
Reset button looks to reset current connection on current settings.
And don't worry - no HSS-0125 IR receiver units were harmed... Everything is reversible:


