Ketsui conversion on Knight of Valour 2:
I can't guarantee there's no mistake in the information given, I don't have any donor cart to do the conversion from scratch myself.
Also file names in the MAME romsets don't correspond to the donor used here so I've tried to figure this out.
The model cart being borrowed from
@oneleaf86, I don't want to mess to much with it (i.e. desoldering chips and dumping them).
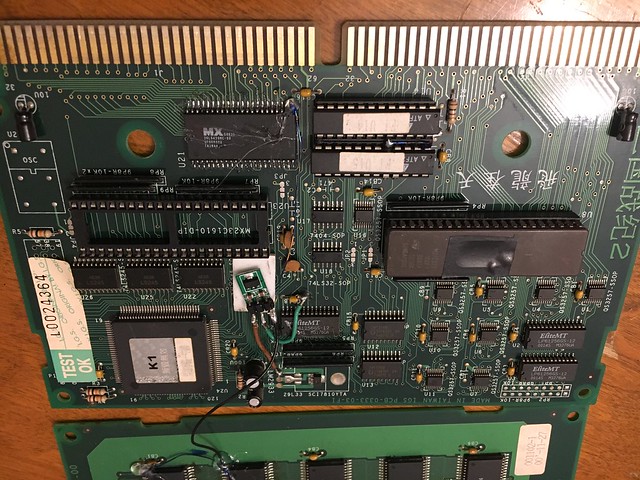
Donor PCBs look like this:

 Link to the needed files:
http://www.filedropper.com/ket
Chips needed:
Link to the needed files:
http://www.filedropper.com/ket
Chips needed:
- 1 * 27C322 (can also use 27C160 if connecting pin 32 to Vcc)
- 4 * MX26L6420
- 1 * MX29L3211
- 1 * LDO 3.3V regulator (not sure how much current is needed, 500mA is probably more than enough)
Burn the files in the appropriate devices:
ketsui_u1.bin => 27C322 (U
")
t04701w064.u19 => MX26L6420 (U21)
a04701w064.u7 => MX26L6420 (U1)
a04702w064.u8 => MX26L6420 (U4)
b04701w064.u1 => MX26L6420 (U5)
m04701b032.u17 => MX29L3211 (U3)
Hardware mod:
PROG board:
1) Pull ROMs U8 & U21
2) Install new U8 and U21 but don't solder pin 23 of U21, lift it
3) Install 3.3V regulator (cart on the picture has a resistor and 2 diodes but I don't advise doing so)
4) Connect lifted pin of U21 to 3.3V from regulator
5) Bend legs 5, 20 & 21 of U15 so they stick out of the socket
6) Connect pin 5 of U15 to +5V (can be found in many places including upper via of CB12). Pins 20 & 21 are left unconnected.

7) Connect pin 6 of U15 to pin 20 of U15 on the solder side (see picture below)
8 ) If using a 27C322 for U8 connect pin 32 to pin 31 (or double file ketsui_u1.bin and do no mod for U
. If using a 27C160 connect pin 32 to Vcc (for
instance pin 23 of U
.
 GF
GF SAMPLES board:
1) Pull ROMs U1, U3, U4 & U5.
2) Install new U1, U3, U4 & U5 but don't solder pins 23, lift them. Also lift pin 1 of U3
3) Connect lifted pins of U1, U3, U4 & U5 to 3.3V
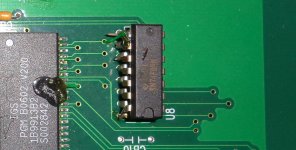
4) Cut pin 5 of U2 (74LS139). Solder leg 4 of U2 to pad of leg 5 (capacitor is just there for decoupling).

") .
.
")