Maybe the severed traces were a factory fix. They seem drilled rather than scratched.2 options:
- restoring the unwanted connections fried something
- you separated the 2 boards and didn't reassemble them properly
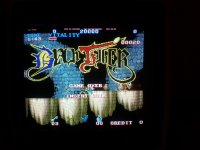
To me the bug on the sprites (horizontal jailbars or "invisible" lines) looks like a counter issue not data bits stuck (this would cause vertical jailbars). IIRC there's few LS161s in the sprite section.
Maybe Caius can confirm it.
Yes, the severed traces are clearly a factory fix, you can understand it by how they have bee severed, they have been not accidentally cut but intentionally.So, please, restore all the fixes as found before (including wires)Regarding the sprites bug, I'm agree with Apocalypse.Usually this kind of faults are caused by bad counters so check if around the sprites ROMs there are some of them (74LS161 are often used).Best would be to figure out all the relevant circuitry tracing the data lines of the ROM back.
Well they weren't too clear! They look like two tiny gouges, and since the boards sit back to back, it seemed plausible that someone had knocked them together rather hard, the board looks rough enough anyway.
The only thing I did was jump those two traces with a piece of wire, so hopefully it didn't affect *too* many things. I'll follow the traces and find all the things it may or may not have affected and replace them. Probably going to take a while though, heh. Once I solve that mess I'll poke around for the counters. Thank you both for your insight, and I'll chalk this up as a learning experience.
I was so excited that I was making progress that I just kept going. "Oh man, now it's mostly working with the new BD03", "Oh, there are a few cold solder joints on this board, let's fix those", "Oh hey, there's two little gouges in the PCB, maybe that's the problem, let's fix it".... And I broke it.
It'll get fixed though, I'm committed. And when it's fixed, I will hang it on the wall as my first PCB repair. I've fixed a lot of monitor chassis over the year, but avoided learning anything about game PCB's, so this is still a learning experience.
Anyhow, thank you both for your insight! I'll see what I can get done, will have to order some things and wait a while, I'm sure.