What's new

darhgo

Student
Joined
May 6, 2017
Messages
77
Reaction score
20
Hey guys! Picked up a ST-V mobo in a lot, and on inspection it looks ok. Hooking it up, the LED lights up and black screen. I've come across two repair logs online: one said to reflow both SH2 chips, and then also discharge all the caps.

Can someone explain how to discharge the caps? I'm gonna hit the reflow tomorrow, as well, and will update!
 
I had one with the same issue. Reflowing the chips fixed her up. Guessing loose joints occur from the stress of inserting/removing carts over time.
 
Just the 2 x CPU chips. Only one of them had a loose connection but figured I'd do both while I was at it.

In my case I could get the board working by applying pressure to the chip with my finger.
 
based on my repair experience on the st-v boards, I think discharging the st-v caps to fix a black screen issue is a myth... if you still want to try it then don't even bother to discharge the supercap next to the battery without removing the cell battery first. otherwise your cell battery will be depleted....

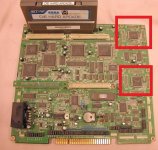
anyway, the black screen may be caused by many things. most popular problem is the cracked solder joints on the legs of the cpus, mostly happens on the slave cpu which is located on the far right corner (when jamma edge facing towards you). generally people handle the pcb holding from that corner and when the pcb flexes, the solder joints crack.

I also see solder cracks on the main cpu but that was rare. good practice to re-flow both. but carefully examine your work afterwards. re-flowing may also cause solder bridges. use lots of no-clean flux while re-flowing. ;)

Other causes for black screen I've seen;

- burned PAL
- burned work RAM
- wrong BIOS chip (ST-V PCB has two revisions. One uses 27C4100 other uses 27C4096 for BIOS. These are NOT pin compatible. Check the silkscreen under the BIOS socket to make sure)
- burned BIOS/EPROM
- One of the STV PCB revisions has a design bug that on factory they installed a cable, on the edge of the cable there is a small filter coil and that connects to the clock section. If that cable is loose or not existing (ripped off during years) then the board cannot boot.
- burned cpu (yes I've seen burned SH-2 CPU once. Sensitive to high voltage. Not that sensitive like a Naomi but still... )

Also, I've seen some writings on the net that says replacing the supercap and coin cell battery to make the board work. This is another myth. It is good practice to replace the supercap and the coin cell with fresh ones but those do not stop the board booting. Infact, I always keep my spare ST-V boards without them. The PCB works without them.

If the above usual suspects are not the cause, then you have to systematically diagnose the problem with a scope by starting with the clock and reset signals on the CPUs.

Good luck...
 
I recently received a STV board with the hope of getting the multi.

However the courier thought leaving it in the bushes at the top of my drive was a good idea rather than delivering it to the house. Of course it spent a few days in the rain before my partner noticed it. It was also not packed very well with a cart just place on top of the board and it all wrapped in corrugated cardboard. No internal packing/bubble wrap so when I went to test it after allowing it to dry for a few days I wasn't surprised to be greeted with a nice black screen on boot.

I joined the STV black screen Club yay!
 
No internal packing/bubble wrap so when I went to test it after allowing it to dry for a few days I wasn't surprised to be greeted with a nice black screen on boot.


I joined the STV black screen Club yay!
Try putting it in the oven (turned off after pre-heating). I wash my boards clean and dry it. Only water generally dont kill boards.
 
Try putting it in the oven (turned off after pre-heating). I wash my boards clean and dry it. Only water generally dont kill boards.
Yeah I left it in a hot water cupboard for a few days before I tested it. It was definitely nice and dry. I think it was more that it probably got damaged in the mail from being poorly packaged.

Probably will need to be reflowed.
 
I had the same problem on 2 ST-V motherboards and both turned out working after reflowing these marked ones (see the attachment)
 

Attachments

  • SegaTitan.pcb.jpg
    SegaTitan.pcb.jpg
    87.3 KB · Views: 377
I had the same problem on 2 ST-V motherboards and both turned out working after reflowing these marked ones (see the attachment)
Can you please give a general idea of how to reflow the chips?
 
I had the same problem on 2 ST-V motherboards and both turned out working after reflowing these marked ones (see the attachment)
Can you please give a general idea of how to reflow the chips?
Just clean the solder surface around it, apply some liquid flux, and resolder them, thats what i did to both my pcbs, worked like a charm ever since!
(ofc no need to remove the chips, I just meant resoldering all the solderpoints)
 
use a hot-air reflow unit - not an iron.
and why would he not use an soldering iron? As I said, I did it, no problems. Of course, by all means if you have a hot-air reflow unit, that works too.. just curious why not using a iron?
 
because someone who has not done it before could bend a pin or create bridges.
 
because someone who has not done it before could bend a pin or create bridges.
I cant see how it would be easier to use a hot air reflow unit for the person who is unexperienced with soldering?
Or even have access to one? :)
 
Back
Top