What's new
@Frank_fjs, @citrus3000psi, here is an example of where if a DIY JAMMA fingerboard was designed where the user could solder on the SCART connector to pipe from the console:
  • RGB, VGnd, & Sync
  • 5vdc & Ground
To feed, power, and terminate properly an LM1881 and THS-Seriers RGB amp, then feed the output signals to the proper pins on the JAMMA fingerboard. Then harvest:
  • Audio Left, Right, Gnd
To which the user can solder on mountable RCA connections or solder on lead wires to feed into an external amp which can be fed back into the JAMMA harness once muxed back down and amped to mono externally. We'd be so happy!

If all of this could be done my modifying the design of the PB.JAMMA fingerboard, that would be awesome as that has the fairly standard 20-pin console PCB connector on it. If done properly, where in place of the SCART connector, a VGA connector could also be soldered in, this would replace a J-Pac as well. The THS-Series amps do a much better job of amping RGB than the older Maxim MAX4386E amp on the J-Pac.

Just some thoughts. Please chime in if you wish to lend your skills to the effort.
 
Last edited:
Would this just be solely for the Saturn or a more universal approach for other game consoles as well? If the latter, a few more things need to be taken into consideration, such as sync.

How do you want controls to work? Directly from the Saturn as normal or are you wishing to convert and connect the inputs from the Saturn to the jamma edge so that the arcade cabs controls can be used? If the latter this makes it a much less trivial task.

Wouldn't an audio amp also be needed, to convert the line level audio output of the Saturn to speaker level which most cabs expect?

I'd be happy to design something if you could assist with supplying me with PCB mount scart connectors. They're mostly discontinued and really hard for me to obtain in Australia.
 
Would this just be solely for the Saturn or a more universal approach for other game consoles as well? If the latter, a few more things need to be taken into consideration, such as sync.
Would be intended for universal use. Any console that can output 15khz viaSCART which is pretty much all of them before the HD era.
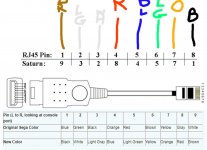
As for sync, the LM1881 IC strips C-Sync (suitable for JAMMA) from the composite video signal from SCART. In the project above, we repuposed the Sync Strike to which does just that to suit our needs. Here is a diagram that shows from the SCART pins which one has the composite signal (pin 19):

SCART_Pinout.PNG
How do you want controls to work? Directly from the Saturn as normal or are you wishing to convert and connect the inputs from the Saturn to the jamma edge so that the arcade cabs controls can be used? If the latter this makes it a much less trivial task.
Neither but much closer to the latter.

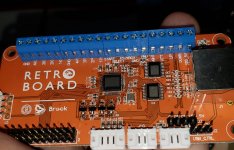
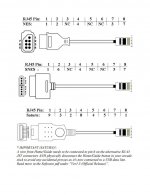
We just need terminals for each button that can map to U, D, L, R, Start, B1-B3 on the JAMMA edge. Then map B4-B6 to a kick harness connector. Inputting into these terminals can be achieved with pad-hacking of actual controllers. But the more desireable way is to use a multi-console PCB like the MC Cthulhu or Brook Retro. Interfacing those multi-console PCB's to the 2x10 pin header that is becoming the standard for multi console PCB's (NES, MD, SNES, TG16, Dreamcast, PS1, PS2, XBOX OG, etc) makes this really simple.

The PB.JAMMA fingerboard implements this beautifully.
Wouldn't an audio amp also be needed, to convert the line level audio output of the Saturn to speaker level which most cabs expect?
Absolutely would be needed. So from the SCART connector, the desire would be to route the stereo line-level output to solder points where the user can,
  • Solder in panel mount 3.5mm pcb mount jack. Connect a stereo 3.5mm jack cable to feed into an external amp such as a TDA2822M
From there, the user can downmux the amped stero signal to amped mono through a simple resistor network. The fingerboard will then need an input for which the user can solder in that amped mono signal to be routed to the corresponding pins on the JAMMA edge connector.
I'd be happy to design something if you could assist with supplying me with PCB mount scart connectors. They're mostly discontinued and really hard for me to obtain in Australia.
These are pretty easy to get. Order a pair or two from here and I'll pay you for it.

The PB.JAMMA fingerboard is IMO the best one out there. Check out this video where the design considerations are discussed. Effectively, for this effort, the ideal is to copy that design completely, adding in the ability to:
  • Integrate a pcb mountable SCART connector
  • Integrate the LM1881, resistors, capactiors to strip C-Sync from the composite signal, then route C-Sync to the JAMMA pin
  • Integrate the THS-Series amp, resistors, and capacitors to amp RGB, then route RGB to the JAMMA pins
  • Route L/R audio to a pcb mountable 3.5mm stereo jack
  • Have terminals to for amped mono input which then are routed to the corresponding JAMMA pins
If the controller interface for the PB-JAMMA can be emulated precisely, not much other work is needed for controls. The only other consideration would be form factor. If you can fit all onto a PCB that can be assembled into a fairly small project box, would make it more pleasant for the DIY guys.

Thanks Frank! Keep the questions/comments coming.
 
In cases where a game console is already natively outputting a clean TTL sync signal, probably no need to do anything with it.

If composite video is the only option, then yeah we can use a sync cleaner and I imagine it wise to run it through an amp to boost it to arcade levels.

Video and audio is my main focus at this stage. Will see if I can find a nice audio amplifier IC.
 
Another thought, since the PB.Jamma board is designed so well, no need to re-invent it unless you want to for this. If you can design a daughter board that can be soldered into the mounts on the PB.Jamma with say pin headers, that will suit the purpose as well.
 
Last edited:
If composite video is the only option, then yeah we can use a sync cleaner and I imagine it wise to run it through an amp to boost it to arcade levels.
Thus far, with the consoles I have tested my DYI rig up with (PS1, PS2, Saturn, DC), there has been no need to amp the sync signal. I have tried this on a Nanao MS8, WG K7000, and a 30" NeoTec.

But should you feel amping C-Sync is needed, then the RGB amp that needs to be used is the THS7374 as it has a 4th channel that can be used to amp C-Sync in addition to RGB.
 
Shmups are buttery smooth.I hope this configuration finds you well for future troubleshooting.

battlegregga.jpg
Brutha, you're going to have to get a 2nd cab just for shmupping in Tate.
The next big plan is to have a proper Vewlix or a Candy. It's on the horizon.
As for the hot glue, I'm locking down parts to put them into a box with the Brook retro boards I have coming. Everything will be like a nice portable little console box you can just plug into the jamma on the cab. My plan with the Brook boards is to now modify my Toaster Nes to RGB with Scart out. It should be a hoot to get Nes and Saturn working on this. Especially my collection with over 680 cartridges :) GUN GAMES!!!!
Very extied.
I see these are good for the Ps360+ and the Cthulu...
hey dude...i dont know if the rj45 saturn cable works with the ps360+...i tried it a while back and it didnt work for me...just a headsup, it was a while back so maybe things have changed since then...but when i plugged it in on my setup it didnt work
I got Brook retro boards coming to me.
Those should be pretty cut and dry to my knowledge.
I got also saturn controller port leads from Console5.com
Everything should be good to go if the wiring is correct with the punchdowns.
I decided to go with the Brook retro boards because they are newer, have updated firmware, faster, etc.
I'll heed your warnings when I start to crimp.


Would this just be solely for the Saturn or a more universal approach for other game consoles as well?

How do you want controls to work?


Wouldn't an audio amp also be needed, to convert the line level audio output of the Saturn to speaker level which most cabs expect?

I'd be happy to design something if you could assist with supplying me with PCB mount scart connectors. They're mostly discontinued and really hard for me to obtain in Australia.
Yes you should be able to just about plug any regular console into this as long as it has RGB out.
I'm focusing on my Nes, and Saturn in there for now.
I thought about modding my Dreamcast as well, but I probably will save that for a candy cab in my future. I've also kicked around the idea of building an i7 tower in there with a JPAC and a CGA video card from ultimarc for other fun projects. Again that would be better suited for a candy as well.

https://arcadeshock.com/products/brook-retro-board
Brook Retro boards. These are dead sexy and should fit the bill.

Audio amp I'm still looking at.
I'd love to have and see something like SCART2JAMMA again.
Everything seems to have dropped off around 2016.
Nothing like that is even available on the Chinese market.
 
Last edited:
Video and audio is my main focus at this stage. Will see if I can find a nice audio amplifier IC.
I see where your thoughts are going with this. There should be no shortage of mono amp IC's that work off of 5v. And that is kind of a problem. Which you select, please make sure it is readily available. I just hope there are enough amps off that SCART rail to power the LM1881, THS7374, and mono amp all at once. If the mono amp is integrated, only wish here is that there is flexibility for a dial-based volume pot like this:

dialpot.jpg
Keeps the form factor small. Also, here is here would be the resistor network that would need to be integrated to downmux line level stereo to mono before feeding into a mono amp:

n109fig2.gif


Lastly, some may opt for stereo wiring to suit the needs of their cab. As such, should still route line level stereo to a 3.5mm panel jacks. Perhaps some solder blob jumper points on the board to give the user options for both.
 
I see these are good for the Ps360+ and the Cthulu...
hey dude...i dont know if the rj45 saturn cable works with the ps360+...i tried it a while back and it didnt work for me...just a headsup, it was a while back so maybe things have changed since then...but when i plugged it in on my setup it didnt work
did you perform the wiring mod on your ps360+?

If you're using the PS360+ on your SEGA SATURN, you're going to have to add a wire from the Home/Guide terminal to pin 6 on the JST header on the PS360+ board.

From the PS360 Setup Guide: "Doing this will sacrifice the usage of the Home/Guide button but you can still access the function by pressing Start + Select instead.
Because of the design of the PS360+ this is the only way to be able to play on
Saturn with full button support. Also you have to physically disconnect the
Home/Guide button on your stick to avoid any accidental presses as it's now
connected to a USB data line."

@psykom1
If you get annoyed with crimping RJ45 cables for the Saturn, or any other console, hit me up. I’ve got a bunch still in stock ;)
 
I see these are good for the Ps360+ and the Cthulu...
hey dude...i dont know if the rj45 saturn cable works with the ps360+...i tried it a while back and it didnt work for me...just a headsup, it was a while back so maybe things have changed since then...but when i plugged it in on my setup it didnt work
did you perform the wiring mod on your ps360+?
If you're using the PS360+ on your SEGA SATURN, you're going to have to add a wire from the Home/Guide terminal to pin 6 on the JST header on the PS360+ board.

From the PS360 Setup Guide: "Doing this will sacrifice the usage of the Home/Guide button but you can still access the function by pressing Start + Select instead.
Because of the design of the PS360+ this is the only way to be able to play on
Saturn with full button support. Also you have to physically disconnect the
Home/Guide button on your stick to avoid any accidental presses as it's now
connected to a USB data line."

@psykom1
If you get annoyed with crimping RJ45 cables for the Saturn, or any other console, hit me up. I’ve got a bunch still in stock ;)
You're talking to a guy that is a crimp-master.
Thanks for the offer.

I've managed the buildout of some serious lans in my time.
 
Got dem BROOK RETRO BOARDS!

2p31wk.jpg

1.JPG
3.JPG
20181215_222058.jpg

I'll let ya know how it all turns out. I have a mobile supergun on a kart. I can test using that until my CP comes back from powdercoating.
Most likely I'll have results by Monday. Bears Packers game is tomorrow.
I fear I'm going to be pretty sauced and well fed watching our Midwest boys do battle.

But seriously gaiz...
These Brook retro boards are pretty dead sexy.
Look at the solder pads on the bottom.
As they say in the UK... "CRACK'N!"

IMPORTANT SCHEMATICS TIME!
(and my GOOGLE push to get this shit in on thread on the internets)
If anybody knows of any other ways these should be made, please let me know.
For now, I'm gonna focus on NES, and Saturn.
Saturn will get push for control conversion of Up Down Left Right, Start A B C and R
Preferably, I'm gonna model the controls off of a VF Hori stick since I have an "MVS" cab w/ 4 buttons.

SHUT UP, YOU'RE CRAZY 4 Button Saturn on a MVS???
Read this link about the stick and why I'm doing it this way for now.
https://obscurevideogames.com/2013/...de-vf-dash-controller-information-and-review/

This is until I build in a kick harness, and prepare the Saturn for a Candy cab.
Plus I'm short of a Capcom kick harness adapter, so that will come in due time.

https://segaretro.org/Real_Arcade_VF


RJ45 conversions.JPG
 

Attachments

  • 2.JPG
    2.JPG
    286.9 KB · Views: 302
  • 4.JPG
    4.JPG
    242.8 KB · Views: 382
  • RJ45 conversions2.JPG
    RJ45 conversions2.JPG
    116.3 KB · Views: 370
Last edited:
Too bad you don't have a PB.JAMMA fingerboard. The connection of your Brook Retro boards to your JAMMA harness would be easy.
 
Too bad you don't have a PB.JAMMA fingerboard. The connection of your Brook Retro boards to your JAMMA harness would be easy.
Maybe I'll order one.
For now the current board is pretty robust, and is handling all this prototyping.
I got the video pretty sorted out and locked down, so controls should be a breeze as long as these crimps are correct.
 
See it in action on my Instagram here ->>> https://www.instagram.com/p/BrkZE4vgzi0/?utm_source=ig_web_copy_link

Well, I got the Saturn all wired up using the Brook retro boards!!!!
I need to get some crimp ends as it's bodged for now, but for now, it works flawlessly, and incredibly crisp controls.
As it stands it's wired for my MVS 4-button cabinet.
I will require a Brook board per player.
Saturn to Brook to JAMMA (MVS)
A - K1 - A
B - K2 - B
C - K3 - C
R - K4 - D
I'm hopefully going to wire the rest of the Brook controller to a CPS2 kick harness.
All of it will fit inside an interface box once I'm completed.
The color chart for conversion is below if you use the Brook, and the Console5.com leads for an RJ45.

20181218_190121.jpg


One thing worth noting.
The amp does an OK job, but I'm wondering if there's even a better way to push more color and brightness.
It just needs a scoush of brightness.
Cranking the monitor tends to wash out the picture.
It could be potentially an amp thing...
Maybe I'm just being too critical.

One fun note for prototyping and crazy conversion for the sake of conversion...
In this picture I'm converting a JPN Sega Saturn to RGB, to a Sync Strike via SCART, out to a TI7316 custom RGB Amp, to Jamma, to a SmallCab Supergun, out via SCART to OSSC, out to an Extron amp/switcher via HDMI, to a 4K monitor :)
Controls out supergun to Undamned USB encoders connected to Hori PS4 fight sticks.
THE SYSTEM WORKS!!!!
LolConversion.JPG
 

Attachments

  • SaturnU.JPG
    SaturnU.JPG
    165.9 KB · Views: 478
Last edited:
One thing worth noting.
The amp does an OK job, but I'm wondering if there's even a better way to push more color and brightness.
It just needs a scoush of brightness.
Cranking the monitor tends to wash out the picture.
It could be potentially an amp thing...
Maybe I'm just being too critical.
According to the spec sheet (Output Characteristics, pg. 5), adding in three 75 ohm resistors as close as possible to the IC, terminating them to ground before you plug into your JAMMA harness should get you 4.5vdc on the output. 150 ohm resisters would get you 4.7vdc on the output. Should be plenty as JAMMA peak is 5vdc although, JAMMA has no real standard.

EDIT: Ignore. See my next post.
 
Last edited:
You'd add the 75Rs in series on the THS outputs, it will then be terminated by another 75R tied to ground within the monitor.
 
The resistors went back to the output positions per original spec.
I think I missed the paragraph this line was in entirely when I read through your response originally.

It should be noted that without 75 ohm resistors terminated to ground before the input into the amp, you are operating your amp in AC-coupled mode, not DC-coupled mode. You are getting a stable picture since you have a domestic monitor that can accept all manner of signals including AC-coupled 15khz RGB. A non-domestic monitor like a Nanao or maybe a Toshiba or any arcade monitor that can only accept DC-coupled input it would not work.

The spec sheet for the THS7316 states that in DC-coupled mode with 75 ohm termination on the output, you'll have typical voltage output at 4.5vdc:

THS7316_DC_Coupled.PNG

You should enable DC-coupled output. Leave the resistors on the output as Bob stated and as you have since done. But set your amp to run in DC-coupled mode. Add in resistors to the input and terminate them to ground. If I understand the specsheet correctly, you will get 4.5vdc on you RGB lines which should be plenty for JAMMA which is 2-5vdc.

Also, I see we have attracted the interest of the experts to this thread which is good. Would love to see the PB.JAMMA re-imagined/modded/accessories developed for it to add in the ability to integrate the necessary IC's to make PC/Console-to-JAMMA a cinch!
 
Back
Top