What's new
I'm going with "mounting hole diameter 0.91mm" from https://www.digikey.co.uk/product-d...corp/0548-0-15-01-11-27-10-0/ED5036-ND/158198

The hole size I actually set in the PCB is 0.95mm, to account for a bit of shrinkage of the hole diameter from the copper hole plating, and production tolerances.

You're the first one to try this with these boards, so it'll be interesting to see how this will work.
Dont mind being a beta tester :D , gonna order a set of the 0548 which have 1.47mm diameter heads and some of the 3016 which have 1.22mm diameter heads, all the other specs are the same, mounting hole diameter is 0.91mm, etc... and see which have the better fitment, etc.. Thanks again for doing these :thumbsup:
 
So what is the next step? Fluffy- are you ordering another batch of pcb's with adjusted hole sizes to accommodate these pins?
 
was just gonna order like 2,000 of these I think the price goes down to like 8-9 cents each, gonna see if price goes down if I get like 5K-10K. If anyone else wants some, I could try to do a group buy for these.
Depending on what price we could negociate I'd keen for 3-5k.
 
was just gonna order like 2,000 of these I think the price goes down to like 8-9 cents each, gonna see if price goes down if I get like 5K-10K. If anyone else wants some, I could try to do a group buy for these.
Depending on what price we could negociate I'd keen for 3-5k.
ok, Ill look into an order of lets say 10K :)
 
Can you do me a favour and send me a few if you get them? I'll send them back together with your boards once I've got them.
 
Can you do me a favour and send me a few if you get them? I'll send them back together with your boards once I've got them.
Yes I can, you want enough for a boardset, I estimated about 425 a set, for the main EPROMs.
 
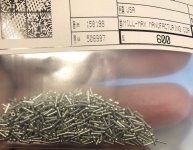
@Fluffy Got some of the pins in, will send out some your way tomorrow. These things are tiny.

IMG_2928.jpg
 
@Derick2k 's pins arrived today, and I tried them out:
IMG_20190910_194546.jpg

First of all, the pins fit fine into the holes, though it is a bit fiddly putting them in.

IMG_20190910_205025.jpg

Aligning all pins of an EPROM was a bit tedious, I had to use magnification and a small jeweller's screwdriver. I've got recycled EPROMS with slightly bent legs, so if you have fresh new-old-stock it may be easier.

IMG_20190910_205040.jpg

The EPROM doesn't sit flush with the PCB, there is still quite a gap, though a lot less than a socket.

IMG_20190910_210357.jpg

This hole is one of the mounting posts, and it sits flush with the PCB. So spacing looks ok.

IMG_20190910_210208.jpg

Unfortunately I don't have a transparent shell available, so I can only check with the caliper relative to the mounting post. There should be a small air gap above the EPROM.

For the initial installation it may be a good idea to first put the pins onto the pins of an EPROM, then fitting it into the PCB. That may be a lot quicker then installing the pins and then trying to insert the EPROM.
It is probably not a solution for quick changes, but to have a chance to replace faulty EPROMs without desoldering.

IMG_20190910_213126.jpg

Side by side: MilMax, normal socket, normal socket + EPROM

Edit: And I just noticed that I lost the silkscreen changes when I updated the footprints. #@$%
 
Last edited:
can you put the sockets onto the legs before hand and then seat the whole thing in for soldering? might make alignment issues less pronounced?
 
Looks awesome, looks like the EPROMs are soldered in. Milmax does sell these in dip carriers flex 32-42pins that you can basically push in all at once and solder in place, but it doesn’t help with the eprom legs alignment. I’m still gonna use these to get the supported games into original shells I have. Still deciding between the solid or transparent, think I’m going transparent to show off fluffys boards though.
 
Back
Top