What's new
Hi!

I have recently received my cart, and I have several issues, ranging from minor to game breaking.

1 - the cartridge shell is scratched. Admittedly this is more an annoyance than anything else and doesn't prevent playing, but I thought that it was supposed to be a repro (and as such, new) shell so I don't know why it would be scratched, and for ~500 euros I guess I was expecting it to be in a better condition.

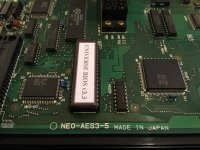
2 - My console is a 3-5 rev with a 3.3 unibios. When running the cart the console is stuck in a reset loop. I see the unibios boot screen, a 'Checking Games' message and it immediately reboots and the same happens. Over and over again. I tried several SD cards (Samsung, Sandisk, with varying sizes) and it doesn't change a thing.

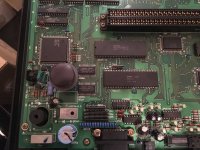
So in order to check what is wrong I borrowed another AES from a friend. I don't know what rev it is as I can't open it, but it's a 5V one (like mine) and I noticed that the RGB was darker than mine. Also, it's running a stock bios.
My tests were run with the exact same setup/cables, the only difference is the console itself (and the bios, as mentioned).
Results:
- Original games run fine on both consoles, with sound and all.
- Multi cart stuck in reset loop on my AES
- Multi cart working as expected on my friend's AES, except that there's no sound (apparently the issue that Darksoft just found a solution for). I ended up using this console to update the menu to the latest.

So yeah, it appears that I can't run the multi cart on my AES, despite original games working flawlessly.

It seems that mathewbeall had the same issue (on page 2, AES Multi Cart Troubleshooting and help), but apparently it fixed itself somehow. It didn't happen for me, unfortunately.

3 - When using the multi cart on my friend's AES, I set the system to MVS and it seemed to work fine on some games, however on some others (eg. garou, last blade 2) the game froze on the first screen ('warning, this rom cartridge is for use...' blabla), and I need to hit the reset button for the game to load, but for some reason it does so in AES mode. Is there a way to make it work in MVS mode?

4 - Not really a problem, just curious: when the cart programs a game the screen is full of flickery white pixels/artefacts. But then it works fine. Is it the normal behaviour?


And that's it.

Obviously not being able to run the cart at all on my AES is the biggest issue.

Any help would be very much appreciated, I can't wait to finally be able to use this awesome cart at its full potential and have some good Neo-Geo fun ;)

Thanks in advance.
 
What bios are you using?

What PSU are you using?

AES cart shells are brand new and should not be scratched. MVS shells are recycled and sandblasted MVS shells.
 
1.- @CPZ - SAVEYOURGAMES can you please let us know what may have happened here? All the shells are new. @quadratic can you post a picture?
2.- Do you have a memory card? Try deleting the BUFF file on the microSD and see if that helps. We need to know your model number. You can see it without opening the cart. It's on the middle and right part of the console. You can see it from the cart slot opening using some light.
3.- A new update that fixes this and other things will be releaesd in the next days.
4.- to avoid the flickering, copy this file attached in the \update screen.
 

Attachments

  • cpld.zip
    1.9 KB · Views: 224
Nothing to worry about guys, this bridge is present in all AES carts and is simply a loop for audio used on NEO-AES. It's documented on the neogeo wiki.
Here is a pic showing how original carts have it.
NEO_AES_fix_B.png
 
@quadratic, are you sure you 3.5 is 5V?
Could you open it and take a pic please.
I know some 9V consoles still work fine with a 5V PSU but are a bit on the low limit voltage wise. The multi being more power hungry than an OG cart this could would explain your issue.
 
Every time I change from one game to another, the SoftDIP settings get scrambled to invalid and out-of-range values.
That's because UniBIOS on AES doesn't expect the PROM to change without power cycling. Not an issue on MVS since mechanism is different (change slot interrupt and backup RAM).
 
Could we just have a little guide of how to take the Cart apart (which side to start etc) as there are no screws, cheers
 
Thanks all for replying so fast!

What bios are you using?

What PSU are you using?

AES cart shells are brand new and should not be scratched. MVS shells are recycled and sandblasted MVS shells.
Bios: unibios 3.3 (obtained directly from raz)

PSU: the 5v one from this page: https://en.retrogamesupply.com/collections/neo-geo/products/power-supply-for-snk-neo-geo-aes

Re. shells: that's what I thought too, and the reason I'm asking.


1.- @CPZ - SAVEYOURGAMES can you please let us know what may have happened here? All the shells are new. @quadratic can you post a picture?
2.- Do you have a memory card? Try deleting the BUFF file on the microSD and see if that helps. We need to know your model number. You can see it without opening the cart. It's on the middle and right part of the console. You can see it from the cart slot opening using some light.
3.- A new update that fixes this and other things will be releaesd in the next days.
4.- to avoid the flickering, copy this file attached in the \update screen.
1. I'll post a picture when I'll get back home tonight.

2. I don't have a memory card. I already tried deleting the BUFF file, no change. Model number is NEO-AES3-5, see attached picture.

3. Great news!

4. Thanks, I'll try when I get back home!


@quadratic, are you sure you 3.5 is 5V?
Could you open it and take a pic please.
I know some 9V consoles still work fine with a 5V PSU but are a bit on the low limit voltage wise. The multi being more power hungry than an OG cart this could would explain your issue.
The sticker at the bottom of my console says 'Use PRO-POW2 AC adaptor only' (see attached picture). AFAIK the PRO-POW2 is a 5v 3A psu, hence why I chose a 5v replacement (at the link posted above).

Now there's a possibility that the motherboard got switched in the case and that the sticker is wrong, I wouldn't know how to check which voltage is correct from looking at the components though... But that would indeed explain it.

Is the picture of the inside I posted enough or do you need a broader view (when I took this one I was only thinking about capturing the revision number and the bios)?

Cheers
 

Attachments

  • mobo.JPG
    mobo.JPG
    253.8 KB · Views: 299
  • serial.JPG
    serial.JPG
    157.9 KB · Views: 252
Could we just have a little guide of how to take the Cart apart (which side to start etc) as there are no screws, cheers
Yes, Aldo aka @[u]@CPZ - SAVEYOURGAMES[/u] will be able to help us with this. As I said it's a VERY simple fix. The most delicate part is opening the cart.
Done it, just took the sticker off and go in through the top, used even force on each side and it came apart NP
Well done. That's how I did it. lift the smaller part of the sticker and then open from the top using even force on each side.

Let us know how it works for you now please.
 
I still get no sound! I get continuity between the joined connectors, so I know its soldered correctly. My power plug is 5v 2.5a I can try with a slightly higher amp rating tonight. Pic below of bridge

DSC00068.JPG
 
I am no expert! But I tested continuity on a real AES cart on the pins in question and indeed they are joined. I then tested the other side of the PCB and they are also connected. The AES multi cart the pins are NOT connected on the underside (solderside)

Should I connect the 2 on the other side as well? Cheers
 
I still get no sound! I get continuity between the joined connectors, so I know its soldered correctly. My power plug is 5v 2.5a I can try with a slightly higher amp rating tonight. Pic below of bridge

DSC00068.JPG
You did it for pins A23-A24 and you need to do it on the other side as well for pins B23-B24. Sorry if I wasn't clear.
Neo-Aes-fix4.jpg
 
Here is a video about how to open your cart:

The shell is a accurate repro of the original one.
 
@quadratic I need to see the whole motherboard, no need for high res pics though, if there's a coil close to the reset button then you have a 9V model.
See attached pictures. No coil, unfortunately. That would have been an easy fix to the problem if it turned out to be a 9v unit.
But then, what could cause this? Any idea what I should check/try?
 

Attachments

  • mobo02.JPG
    mobo02.JPG
    342.9 KB · Views: 250
  • mobo03.JPG
    mobo03.JPG
    321.7 KB · Views: 245
Back
Top