What's new
I figured out my problem. The jamma extender was only a 28 pin one instead of 56 pin. I thought 28 was enough but apparently not.
 
@arcadeqc np I'll include shells for free then, with a minigun sale. I was referring to charging forum members what the production cost is, plus shipping. Not sure how the CC-BY-NC-SA takes such matters to account. Thanks for your work, glad u pointed that out, I don't want to annoy anyone.

Lol when you told me this, I remembered seeing a pile of these with your case up for sale on Twitter. I checked, appears I follow you on the platform and it was you making and selling them.
(。•̀ᴗ-)✧
 
Last edited:
It's probably in good taste (and respectful) to take any and all sales related discussions to an appropriate thread in the actual sales forum on the site.

I've been noticing that people have no shame to sneak in the "i have this for sale" into their contributions to the forum. This happens most often in threads like this where it's an open source product.

By all means, sell your stuff, but i reckon it's good manners to keep the discussion threads related to discussing or troubleshooting.
 
Family portrait. 4P adapter couldn't attend as I'm out of 34P IDC headers so can't assemble one.
74789637_10218780907246806_3732481838996783104_n.jpg

 
You should do some 3D enclosures for all the adapters. :D
and my fav didn't make the cut? ;(
V9CR8H7.jpg
 
I worked on a revised version of the minigun a while ago called the Microgun. Basically I swapped the 8 pin Mini Din for a Genesis 2 compatible 9 pin Mini Din. I also changed the power input options to support a 20 pin ATX plug and removed the 3.5mm audio output because I didn't have a use for it. All of these changes made for a smaller footprint than the minigun, hence the name. Since then some improvements have been made to the minigun project so I've gone back through the Microgun file and implemented some of them.

I have increased the spacing of the controller ports, and added a voltmeter option. Another major change is that I have switched the power connector to an 8 pin Mini Fit JR. Consider this power connector to be an extended version of the standard Minigun pinout. It adds an extra +5v pin and, more importantly a power switch pin. The reason for this is to allow you to attach it to an ATX power supply through an adapter cable and still be able to control the power with the built in power switch on the Microgun. If you plug a standard 6 pin Minigun power cable, the built in power switch simply does nothing.

cc3e3b444b7ea699ee7269408df128f6.png


a90a1467cecafe53ed2749ec0727c765.png


The footprint is incredibly small, just 112.2 x 38.7 mm.

Here's an Oshpark link.

Also for fun I decided to make a fixed resistor version that was as small as physically possible. I call this one the Nanogun, it's basically a cross between the old Minigun Advanced and Standard versions.

22b72db8085136a1edac0ad641d63c0f.png


0459ef90e0933c8c9027a7a96fc79c20.png

This one measures in at an unbelievable 111.1 x 34.3 mm. I honestly doubt anyone could get a supergun any smaller than this without going to a four layer PCB.

Here's an Oshpark link. I still need to add a BOM for these.
 
Last edited:
I just wanted to say a big thanks to @Frank_fjs for these designs. I have finished assembling my first supergun, having not owned any previously (and dealing with the nest of wires of a harness on a workbench previously) and was happily playing games using it into the early hours of the morning.
 
Thanks!

That's what it's all about. Satisfaction of doing it yourself, saving money and being rewarded with a cool and convenient way of playing arcade games.

I don't even use my cab any more. Supergun, comfy lounge and wireless controllers better suit my style.
 
Yes I second that. Thank you all for the help on this forum. I got my supergun up and running as well. I can start hosting locals now.
 
I've updated the Sync Booster PCB to V1.2.

Nothing major, just simplified it by removing the separated sync option (as it has no use in nearly all use cases) and adjusted the IC pads.
78698424_10218829762988169_4322941350006751232_n.jpg
 
I bought all of the components from the BOM, are the screws for the LED display supposed to be really long?
 
i'd buy a prebuilt nanogun , my hands are too jacked up for building something like that >_>
 
Hi guys,

I've just recently received my Minigun and started using it, what a wonderful piece of hardware! Thanks @Frank_fjs

The only issue I currently have with both the PGM and some jamma pcbs is that the image is heavily shifted left and too big vertically. This is on a Sony CRT. Already tried all the possible adjustments on the screen without luck. (There's a gscart switch in the middle)

Is there anything I'm missing?
 

Attachments

  • 8E602E1D-834A-4E5B-82AD-F41383258DF2.jpeg
    8E602E1D-834A-4E5B-82AD-F41383258DF2.jpeg
    401 KB · Views: 205
Thanks @Frank_fjs
From your experience the problem with the size should be particular to my TV right?
 
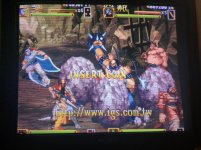
No, it happens with a lot of them. All my TVs do it, Philips, Sony, Bang & Olufsen etc.

It presents itself with the OSSC on modern displays too but you can use the settings available on the OSSC to adjust it out.

It has nothing to do with the supergun.

I believe it's due to the non-standard video timings of arcade boards but could be wrong.
 
Back
Top