What's new

twistedsymphony

Enlightened
Staff member
Immortal
Joined
Jul 21, 2015
Messages
11,936
Reaction score
13,683
Location
NH, USA
I've been hacking around with Taito F2 hardware for a while now. One conversion I've recently complete is converting Ah Eikou no Koshien (a Japanese Baseball Game) into Gun & Frontier (A vertical SHMUP). I wanted to post up a log of this process as I utilized and learned a wide breadth of different tools and techniques and honestly I think the process is more interesting than the end result.

Part 1 Determining Feasibility

I didn't start out thinking "lets convert koshien to gunfront". Rather I looked at the MAME driver with the thought of "are there any games on this hardware similar enough to be conversion candidates?" I like MAME drivers with a lot of comments describing what the hardware is doing or what the different features, are it helps to clarify a lot of things instead of having to analyze the code to figure it out. The Taito F2 driver doesn't disappoint and it has this nice chart of which games use which Taito Customs and what those customs do:

Code:
            I/O    Priority / Palette      Additional gfx                 Other
         --------- ------------------- ----------------------- ----------------------------
finalb   TC0220IOC TC0110PCR TC0070RGB
dondokod TC0220IOC TC0360PRI TC0260DAR TC0280GRD(x2)(zoom/rot)
megab    TC0220IOC TC0360PRI TC0260DAR                         TC0030CMD(C-Chip protection)
thundfox TC0220IOC TC0360PRI TC0260DAR TC0100SCN (so it has two)
cameltry TC0220IOC TC0360PRI TC0260DAR TC0280GRD(x2)(zoom/rot)
qtorimon TC0220IOC TC0110PCR TC0070RGB
liquidk  TC0220IOC TC0360PRI TC0260DAR
quizhq   TMP82C265 TC0110PCR TC0070RGB
ssi      TC0510NIO           TC0260DAR
gunfront TC0510NIO TC0360PRI TC0260DAR
growl    TMP82C265 TC0360PRI TC0260DAR                         TC0190FMC(sprite banking?)
mjnquest           TC0110PCR TC0070RGB
footchmp TE7750    TC0360PRI TC0260DAR TC0480SCP(tilemaps)     TC0190FMC(sprite banking?)
koshien  TC0510NIO TC0360PRI TC0260DAR
yuyugogo TC0510NIO           TC0260DAR
ninjak   TE7750    TC0360PRI TC0260DAR                         TC0190FMC(sprite banking?)
solfigtr TMP82C265 TC0360PRI TC0260DAR                         TC0190FMC(sprite banking?)
qzquest  TC0510NIO           TC0260DAR
pulirula TC0510NIO TC0360PRI TC0260DAR TC0430GRW(zoom/rot)
metalb   TC0510NIO TC0360PRI TC0260DAR TC0480SCP(tilemaps)
qzchikyu TC0510NIO           TC0260DAR
yesnoj   TMP82C265           TC0260DAR                         TC8521AP(RTC)
deadconx TE7750    TC0360PRI TC0260DAR TC0480SCP(tilemaps)     TC0190FMC(sprite banking?)
dinorex  TC0510NIO TC0360PRI TC0260DAR
qjinsei  TC0510NIO TC0360PRI TC0260DAR
qcrayon  TC0510NIO TC0360PRI TC0260DAR
qcrayon2 TC0510NIO TC0360PRI TC0260DAR
driftout TC0510NIO TC0360PRI TC0260DAR TC0430GRW(zoom/rot)
So right off the bat we see that there are a lot of variations in this hardware. it's not like CPS1 or System 16 where every game uses nearly identical hardware. HOWEVER going through this list we can see that some games DO share the same collection of customs. Here is where I found that koshien uses "TC0510NIO TC0360PRI TC0260DAR" for IO, priority, and pallet and gunfront uses "TC0510NIO TC0360PRI TC0260DAR" for IO, priority, and pallet also. koshien is a cheaper sports game and gunfront looks like a cool shmup that sounds like something interesting so lets look deeper into the MAME driver and see what other differences there are.


The next thing I look at is the "Address Map", this is the part of the MAME driver that explains the location of the different hardware features in terms of how the CPU accesses them. You really need this to match between the two games because if it's different then that could be a deal breaker or a lot of work to fix. If your lucky a different address map can be fixed by swapping or modifying a PAL, or jumpers, if you're unlucky it could mean hundreds of patches to the game code (like trying to convert CPS1.5 games to CPS2) or in some cases differences could mean it's not possible at all, or simply not worth the effort. Of course the best scenario is when games use the same exact address map.


Code:
void taitof2_state::koshien_map(address_map &map)
{
	map(0x000000, 0x0fffff).rom();
	map(0x100000, 0x10ffff).ram();
	map(0x200000, 0x201fff).ram().w(m_palette, FUNC(palette_device::write16)).share("palette");
	map(0x300000, 0x30000f).rw(m_tc0510nio, FUNC(tc0510nio_device::halfword_r), FUNC(tc0510nio_device::halfword_w));
	map(0x320000, 0x320000).w("tc0140syt", FUNC(tc0140syt_device::master_port_w));
	map(0x320002, 0x320002).rw("tc0140syt", FUNC(tc0140syt_device::master_comm_r), FUNC(tc0140syt_device::master_comm_w));
	map(0x800000, 0x80ffff).rw(m_tc0100scn[0], FUNC(tc0100scn_device::ram_r), FUNC(tc0100scn_device::ram_w));    /* tilemaps */
	map(0x820000, 0x82000f).rw(m_tc0100scn[0], FUNC(tc0100scn_device::ctrl_r), FUNC(tc0100scn_device::ctrl_w));
	map(0x900000, 0x90ffff).ram().share("spriteram");
	map(0xa20000, 0xa20001).w(FUNC(taitof2_state::koshien_spritebank_w));
	map(0xb00000, 0xb0001f).w(m_tc0360pri, FUNC(tc0360pri_device::write)).umask16(0xff00);
}
Code:
void taitof2_state::gunfront_map(address_map &map)
{
	map(0x000000, 0x0bffff).rom();
	map(0x100000, 0x10ffff).ram();
	map(0x200000, 0x201fff).ram().w(m_palette, FUNC(palette_device::write16)).share("palette");
	map(0x300000, 0x30000f).rw(m_tc0510nio, FUNC(tc0510nio_device::halfword_wordswap_r), FUNC(tc0510nio_device::halfword_wordswap_w));
	map(0x320000, 0x320000).w("tc0140syt", FUNC(tc0140syt_device::master_port_w));
	map(0x320002, 0x320002).rw("tc0140syt", FUNC(tc0140syt_device::master_comm_r), FUNC(tc0140syt_device::master_comm_w));
	map(0x800000, 0x80ffff).rw(m_tc0100scn[0], FUNC(tc0100scn_device::ram_r), FUNC(tc0100scn_device::ram_w));    /* tilemaps */
	map(0x820000, 0x82000f).rw(m_tc0100scn[0], FUNC(tc0100scn_device::ctrl_r), FUNC(tc0100scn_device::ctrl_w));
	map(0x900000, 0x90ffff).ram().share("spriteram");
//  map(0xa00000, 0xa00001).nopw();   /* ?? */
	map(0xb00000, 0xb0001f).w(m_tc0360pri, FUNC(tc0360pri_device::write)).umask16(0x00ff);  /* ?? */
}
So what do we see here?
if you look at each of the "map(" entries the first number is the location of the hardware feature and the second number is the size, the rest of it tells you what that entry is for. ROM and RAM locations are the most important things you want to match perfectly.

At first glance this is very good news because the location of everything is exactly the same but there are some differences:

  • I do see that the SIZE of the ROM space for koshien is LARGER than gun-front, this is ok, because it just means that gunfront wont use up all the available space (had koshien been smaller than gunfront it might be a problem).
  • Next I see that on line 866 koshien uses some kind of sprite banking feature that is absent from gunfront. Since gunfront doesn't use it it's safe to say it will never try to access this memory location so it probably wont be a problem.
  • The last difference I notice is some minor differences related to the tc0510nio chip, the location and size is the same but how it's accessed is different. We know from the chart at the beginning that this is the IO chip, hopefully this is a non-issue so lets keep going.

Now that we know the address map looks decent lets look at the ROM definition, this tells us the size and location of all the ROMs that the game uses.
Code:
ROM_START( koshien )    /* Ah Eikou no Koshien */
	ROM_REGION( 0x100000, "maincpu", 0 )     /* 256k for 68000 code */
	ROM_LOAD16_BYTE( "c81-11.bin", 0x000000, 0x020000, CRC(b44ea8c9) SHA1(f1d19f531b7a653f1c4244d612a339d95ce8cc7c) )
	ROM_LOAD16_BYTE( "c81-10.bin", 0x000001, 0x020000, CRC(8f98c40a) SHA1(f9471306c47ced10a56c09794954e55fdb6f6b85) )
	ROM_LOAD16_WORD_SWAP( "c81-04.bin", 0x080000, 0x080000, CRC(1592b460) SHA1(d42514b4d588d0376914832f0e07ce626d1cdee0) )  /* data rom */

	ROM_REGION( 0x100000, "tc0100scn_1", 0 )   /* SCR */
	ROM_LOAD16_WORD_SWAP( "c81-03.bin", 0x000000, 0x100000, CRC(29bbf492) SHA1(bd370b1de256a432821b443a6653aab8507fb3a7) )

	ROM_REGION( 0x200000, "sprites", 0 )   /* OBJ */
	ROM_LOAD( "c81-01.bin", 0x000000, 0x100000, CRC(64b15d2a) SHA1(18b3b405f77ad80781e3fce4ef021ba49f707ed6) )
	ROM_LOAD( "c81-02.bin", 0x100000, 0x100000, CRC(962461e8) SHA1(cb0313b00681c36110eed50eae41ad98eb22205d) )

	ROM_REGION( 0x10000, "audiocpu", 0 )      /* sound cpu */
	ROM_LOAD( "c81-12.bin", 0x00000, 0x10000, CRC(6e8625b6) SHA1(212d384aa6ed43f5389739863afecbf0ad68af14) )

	ROM_REGION( 0x080000, "ymsnd", 0 )  /* ADPCM samples */
	ROM_LOAD( "c81-05.bin",  0x00000, 0x80000, CRC(9c3d71be) SHA1(79f1bb40d8356d9fc93b569c20be15e7fbf34580) )

	ROM_REGION( 0x080000, "ymsnd.deltat", 0 )   /* Delta-T samples */
	ROM_LOAD( "c81-06.bin",  0x00000, 0x80000, CRC(927833b4) SHA1(c09240e4885d2eace1c64fa6425faeeea0296d98) )

	ROM_REGION( 0x0600, "plds", 0 )
	ROM_LOAD( "pal16l8b-c81-07.bin", 0x0000, 0x0104, CRC(46341732) SHA1(af652621cb96f656fd1f9ed20daeb076641aeb08) )
	ROM_LOAD( "pal16l8b-c81-08.bin", 0x0200, 0x0104, CRC(e7d2d300) SHA1(20a1a258230d5be73381c97509437a9e76de958c) )
	ROM_LOAD( "pal16l8b-c81-09.bin", 0x0400, 0x0104, CRC(e4c012a1) SHA1(56746ce42fd64bf04e17132811de291a1bfa5451) )
ROM_END
Code:
ROM_START( gunfront )
	ROM_REGION( 0xc0000, "maincpu", 0 )     /* 768k for 68000 code */
	ROM_LOAD16_BYTE( "c71-09.ic42",  0x00000, 0x20000, CRC(10a544a2) SHA1(3b46bbd494b432d36aed3fd4b429cef074050c1d) )
	ROM_LOAD16_BYTE( "c71-08.ic41",  0x00001, 0x20000, CRC(c17dc0a0) SHA1(f84e0d1afb403bb06480e8687558cd320d60099e) )
	ROM_LOAD16_BYTE( "c71-10.ic40",  0x40000, 0x20000, CRC(f39c0a06) SHA1(8217f0dd855d6e15756349d47f327742ab50db15) )
	ROM_LOAD16_BYTE( "c71-14.ic39",  0x40001, 0x20000, CRC(312da036) SHA1(44215c64ad9f8a4566cc9f407a7b38799a08d485) )
	ROM_LOAD16_BYTE( "c71-16.ic38",  0x80000, 0x20000, CRC(1bbcc2d4) SHA1(fe664f8d2b6d902f034cf51f42378cc68c970b53) )
	ROM_LOAD16_BYTE( "c71-15.ic37",  0x80001, 0x20000, CRC(df3e00bb) SHA1(9fe2ece7289945692099eba92f02e5a97a4d148c) )

	ROM_REGION( 0x100000, "tc0100scn_1", 0 )   /* SCR */
	ROM_LOAD16_WORD_SWAP( "c71-02.ic59", 0x000000, 0x100000, CRC(2a600c92) SHA1(38a08ade2c6fa005a402d04fabf87ff10236d4c6) )

	ROM_REGION( 0x100000, "sprites", 0 )   /* OBJ */
	ROM_LOAD( "c71-03.ic19", 0x000000, 0x100000, CRC(9133c605) SHA1(fa10c60cd4ca439a273c644bbf3810824a0ca523) )

	ROM_REGION( 0x10000, "audiocpu", 0 )    /* sound cpu */
	ROM_LOAD( "c71-12.ic49", 0x00000, 0x10000, CRC(0038c7f8) SHA1(405def36e67949219b6f9394333278ec60ad5783) )

	ROM_REGION( 0x100000, "ymsnd", 0 )  /* ADPCM samples */
	ROM_LOAD( "c71-01.ic29", 0x000000, 0x100000, CRC(0e73105a) SHA1(c5c9743f68a43273e16f5e5179557f2392505a1e) )

	/* no Delta-T samples */

// Pals c71-16.28  c71-07.27
ROM_END
So Here we can see all of the ROM files for each of these games, the "ROM_REGION" lines tell us the total amount of space used by all the ROMs in that group (often this matches what's in the address map), and the "ROM_LOAD" tells us how the ROM is loaded into memory. the first number after the file name is the location, and the second number is the size... just like on the address map.

if we notice some of the program ROMs are loaded with "ROM_LOAD16_BYTE" and every other address location ends with 1. What this is telling us is that we have 2 8-bit ROMs that are being "interleaved" together to form a single 16-bit ROM. You can think of it like each ROM is a stack of paper so it reads a page from the left stack (the "lower" ROM), then a page from the stack (the "upper" ROM) then the left, then the right, and so on. You can think of a 16-bit ROM as simply being a double-wide page, but some games used pairs of 8-bit ROMs to the same effect.

This is important because we can see that on gunfront it uses 3 pairs of interleaved ROMs , and on koshien it uses 1 pair of interleaved ROMs and then a normal 16-bit ROM. So one of the things we're going to have to do is interleave some of the gun front ROM data before we can write it to that 16-bit ROM. There are some bigger problems here though, most notably there is a gap in the koshien ROM space. The first two ROMs are 0x20000 in size meaning together they form a 0x40000 sized 16-bit ROM. But the third ROM doesn't start until 0x80000... that means there is no ROM space from 0x40000 to 0x80000 gunfront has data in this region, so that's something that will need to be fixed if this conversion is going to be possible.

The other problem here is the ADPCM (Audio Samples) ROM. gunfront uses one that's twice the size of koshien (sizes are in hex so 0x100000 is twice the size of 0x080000). Everything else seems ok as the sizes are either the same or koshien has larger ROM space that gunfront simply wont need

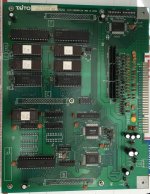
It's entirely possible that the PCB is already setup to fill these gaps, maybe they even use the same PCB? lets track down some photos of the hardware...

ah_eikou_no_koshien.jpg


Ok, so it's not what I was hoping, clearly these are two completely different PCBs, but we can see that they do have essentially the same hardware features. The F2 hardware had some games on single board PCBs and other games with 2-board stacks that use a generic mother board and a sub-board that is game specific (That's what these are). Weirdly the game specific board is where the JAMMA edge is located but you can tell an F2 2-board version from the 3 large connectors labeled T, C, and B. gunfront was released as both a 2-board and a single board version, but I believe koshien was only ever released as a 2-board version.

Normally at this point I would perform a "virtual conversion" in MAME by renaming all of the gunfront ROM files to the names used by koshen, and then loading koshien in MAME with gunfront data to see if runs. Unfortunately the gap in the program ROM space means that's not possible (at least not without modifying the MAME source and recompiling)

I happen to already own a koshien PCB that I bought as part of an F2 bundle. so since we can't test in MAME lets test on hardware.
 

Attachments

  • gunfront.jpg
    gunfront.jpg
    566.3 KB · Views: 677
Last edited:
Part 2 Hardware Mods and ROM mapping

Dealing with koshien's program ROM gap
So as you recall from part 1 the koshien hardware has a gap in the middle of the program ROM space. We basically have 3 program ROMs 2x 27c010 equivalent ROMs (IC10 and IC11) these are 8-bit ROMs paired up to form a single 16-bit 2Mbit ROM and then the 3rd ROM (IC4) is a larger 27c400 equivalent which is a single 16-bit 4Mibt ROM.

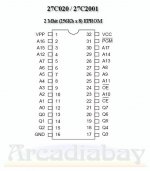
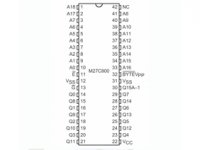
So lets check the hardware and see if those 27c010 sockets can support double sized 27c020 EPROMs, if so that will fill our program region gap and we might be on to something. you can double the size of an EPROM by simply adding 1 more address pin, so the difference between the two chips should just be an address pin. lets look at a pinout to see where it is.

eprom_27C010_pinout.jpg


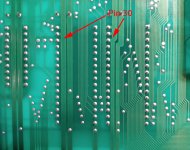
There it is, pin 30. On the 27c010 there's no connection, but on the 27c020 it's Address line 17. Lets check the hardware to see if pin 30 of our program ROMs goes anywhere.

pin_30.jpg

Drats, IC10 and IC11 (our two 8-bit program ROMs) have pin 30 just tied to 5V, so if we install a 27c020 it will just be stuck only ever using half of it.

At this point it's important to remember that typically when you have ROMs that share the same region they're all tied together such that the Address line pins of each ROM is tied to the same address line pin of all the other ROMs in that region, and the same goes for the data lines. ROMs have an "enable" pin that turns on and off the outputs so basically all it has to do to switch between one ROM and the next is switch that one enable pin since everything else is already wired up all the time.

Using this knowledge we know that IC4 (the 16-bit 27c400 program ROM) has an A17 address line. Using a multimeter I was able to confirm that the other address lines between IC10, IC11, and IC4 are all tied together. So lets cut the trace connecting pin 30 to 5V and tie them with A17 on IC4.

koshien_a17.jpg

Now using the multi-meter again to trace out the chip enable pins it seem that there are two PALs on this board that are responsible for controlling the chip enable pins on these program ROMs, fingers crossed that they're programmed in a way that when trying to access data in the gap region we're trying to fill that they correctly enable our IC10 and IC11.


Reconfiguring the Program ROMs
So now I need to program IC10, IC11, and IC4 but the data on these chips is arranged quite different than gun front, so we'll need to merge the program data into a format that works for our newly modified koshien PCB.

Using the ROM LOAD area of the MAME driver as a guide, you can imagine all of the program ROMs get combined together to form one big ROM file some times they just get appended together other times they need to be interleaved, but MAME tells us how. So if we look at the ROM LOAD area show up in part 1 we see that gunfront uses 6x 27c010 ROMs, and they're setup in interleaved pairs to act like 3x 16-bit ROMs appended together. our modified koshien has 2x 27c020 ROMs setup in a single interleaved pair to act like 1x 16-bit ROM (IC10 and IC11), then 1x 27c400 16-bit ROM.

So the 1st and 3rd gunfront ROMs need to be appended to make IC10, the 2nd and 4th gunfront ROMs need to be appended to make IC11 and then the 5th and 6th gunfront ROMs need to be interleaved for IC4, this is only going to fill half of IC4 though (remember gunfront uses less ROM space than koshien) so we're going to double the file just to fill the extra space on IC4.

Appending files together can be done easily on the command line, many hex editors can do it for you. Interleaving is difficult because you need to alternate bytes between two files to create the new one (remember the two stack of paper analogy). There are a couple of ways to do this you could load up the MAME debugger and dump the memory space since MAME interleaves the files when they're loaded into memory. Some more advanced hex editors or EPROM burners might have this functionality. Porchy's BinMan tool is another good option. I've also written a python script I call the ts_rom_tool for performing this kind of thing, so that's what I'm going to use.

the thing I like about my tool is I can use it to create a .bat file to make a scrip that performs the conversion and then if I need to tweak it then I can just tweak the script and re-run it instead of having to manually perform all of the different operations. basically my script looks like this:

Code:
md koshien

REM PROG
type c71-09.ic42 c71-10.ic40 > koshien/c81-11.bin
type c71-08.ic41 c71-14.ic39 > koshien/c81-10.bin
python ts_rom_tool.py -interleave c71-15.ic37 c71-16.ic38 temp.bin
type temp.bin temp.bin > koshien/c81-04.bin
del temp.bin

REM SCR
type c71-02.ic59 > koshien/c81-03.bin

REM Sprites
type c71-03.ic19 > koshien/c81-01.bin

REM Audio CPU
type c71-12.ic49 > koshien/c81-12.bin

REM ADPCM
type c71-01.ic29 > koshien/c81-05.bin

pause
So you can see in addition to concatenating and interleaving files I also use it to rename files and move them all to a sub folder so that there isn't any confusion.

So now I can burn and install all my ROMs. except...


The ADPCM Address Line.
If you recall in Part 1 the gap in the program ROM space wasn't our only issue, the ADPCM ROM was also bigger on gunfront. based on the size of the data and the data being 16-bit gunfront needs a 27c800 and koshien uses a 27c400... maybe we'll get lucky on this one since we weren't so lucky with the program ROM.

snda_size.jpg


NOPE!

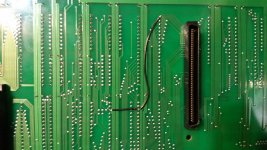
Ok. if we follow the the traces on this ROM and confirm with a multimeter it appears they're all wired to the "T" connector that goes to the main-board without any extra hardware in between. This is good since the main board is the same for all 2-board PCBs it stands to reason that we just have to hook up an extra address line. (remember it just takes 1 extra address line to double the size of the ROM).

lets start by looking at the pinouts for 27c400 vs the 27c800
eprom_27C400_pinout.jpg


So we can see that the only real difference here is the extra two pins added to the top of the chip and only one of them is used. Pin 1 for address line A18.


Thankfully I have a few other F2 boards with larger ADPCM ROMs and I was able to confirm that A18 is routed to T-Connector Pin 31. So we can leave the extra pins hanging out of socket and just hook a wire up to pin 1 and then to the correct T-Connector pin. Additional confirmation comes in the way of all the pins on the T-connector seemed to be in order by address line, so A17 is the next pin over from A18, then A16 and A15 and so-on.


gunfront_sound_mod.jpg


The rest of the ROMs can be programmed and installed normally, so Now it's time to fire it up and see if it works.

I boot it up and I get a lovely screen that looks like this:

tilt.jpg


Ok, not what we wanted but not bad. this seems to imply that we have some program code running so our hardware mods are probably good. Some games have a tilt switch, so maybe that's being triggered? lets boot up gunfront in MAME and see what happens... YUP pushing "T" to trigger the tilt switch gives us the exact same screen.

It seems that minor difference we saw in the address map regarding the IO chip are at play here.

At this point we're going to want to use the MAME debugger to see what's going on inside the hardware!
 

Attachments

  • eprom_27C020_pinout.jpg
    eprom_27C020_pinout.jpg
    28.6 KB · Views: 375
  • eprom_27c800_pinout.jpg
    eprom_27c800_pinout.jpg
    17.1 KB · Views: 349
Last edited:
Part 3 Using the MAME Debugger

So what I'm going to do now is load up gunfront and koshien in the MAME debugger and see if I can determine what's happening with the input data.

The debugger is an awesome tool that lets you look at all the data passing through the "CPUs" and "RAM" on an arcade PCB in real time, you can pause it look at things, or setup "break points" and "watch points" to have it automatically stop when it gets to something you're interested in.

Launching the Debugger
I usually create a batch file to launch mame windowed with the debugger for the specific game I want. so in this case I created two batch files, one for each game, and this lets me quickly and easily launch mame directly into game without having to waste time with menus or command lines every time I want to launch another session.

Code:
mame64.exe -window -debug gunfront
Code:
mame64.exe -window -debug koshien

The Debugger Window
If you've never used the MAME debugger in addition to the game window you'll be presented with a screen that looks like this:
mdebugger.jpg


on the top right we see the game's code, MAME has taken the hex (right side of this box) and de-compiled it to the instructions that the CPU runs, to the immediate left of the instructions are the address within the program ROMs where those instructions reside. So if you were to properly merge all of your program ROMs together, open it in a hex editor and go to that address you'd see the same hex data as you do in this window. only MAME has done us the favor of telling us what this hex means

It might seem like gibberish but assembly is really very simple, it's mostly just pushing binary data around. so "move" is just move data from point a to point b, "clr" means clear the data from a location, "jmp" means jump to a different position in the program, etc. the numbers to the right of the instructions are just telling it where to put the data or where to get the data from. This hardware uses the Motorola 68000 CPU so these instructions are specific to that CPU. It's a really popular one so there are lots of resources available. I've been using this document to look up any instructions I don't know: http://wpage.unina.it/rcanonic/didattica/ce1/docs/68000.pdf

The box on the left hand side of the window basically shows you the internals of the CPU, there are places inside the CPU where information can be stored for processing. you can see some of the locations here such as "D4" and "A0" are referenced in the program code.

The Memory Window
The game will not be running to start. you'll need to click the "Debug" drop down menu and you'll find options for starting and stopping emulation or stepping through. But what I'm interested in is the Memory Window, which is also found inside the Debug Menu. So I start the game running from this menu then I select the "New Memory Window" option.

If you recall back to the Address Map in part 1 the IO chip had this line:
Code:
map(0x300000, 0x30000f).rw(m_tc0510nio, FUNC(tc0510nio_device::halfword_wordswap_r), FUNC(tc0510nio_device::halfword_wordswap_w));

So Inside the memory window I'm going to scroll down to address 0x300000 to see what that data is doing...
memory_window.jpg


So with this window open and the game running I can push buttons and move the joysticks in game and see how the data changes here, all the IO goes through here so even dip switches changed will show up here.

The way addresses work is that each pair of digits on the screen here makes a "byte" so the "00" at the left edge of the line is 0x300000, but the "BF" after that is address 0x300001, and so on until 0x30000F for the last pair on the right side of the line.

by pushing buttons and flipping dip-switches I'm able to determine which addresses correspond to which input.
for gunfront
0x300001 = Dip Bank 2
0x300002 = ?unknown, the game is writing data here
0x300003 = Dip Bank 1
0x300005 = Player 2 Controls
0x300007 = player 1 Controls
0x30000B = coin nibble (I know this because it incremented when inserting coins, also referenced in mame)
0x30000D = system buttons (tilt, service, coin1 and coin2)

the other addresses are either unused or not immediately relevant to us. Remember I'm mostly worried about the tilt button since that's what keeping our game from booting!

doing the same thing in koshen I found this:
0x300000 = ? unknown, the game is writing data here
0x300001 = Dip Bank 1
0x300003 = Dip Bank 2
0x300005 = Buttons for Player 1 and Player 2
0x300007 = system buttons (tilt, service, coin1 and coin2)
0x300009 = coin nibble
0x30000F = Joysticks for Player 1 and Player 2

So we've learned that the inputs are all mapped differently, no wonder it's throwing a tilt gunfront code is looking at 0x30000D which is either being triggered by something else, or wired in a way to show that's it's always pressed.

looking at the PCB there would be no good way to re-wire all of these inputs so a hardware mod is out of the question. So the next step is modifying the game code to fix it. The biggest problem here is that gunfront uses a byte for P1 and a different byte for P2, while koshien uses a byte for all buttons and a different byte for all joysticks. the rest of it is just moving addresses from one location to another (for instances swapping 0x300001 with 0x300003 to make the dip banks correct). So lets get the game booting first and see where we're at before going further.


Creating Watch Points
So what I'm going to do next is create a watch point, I'm going to tell MAME to watch a memory address and then stop if it sees some part of the code reading or writing to that location. Since we're dealing with our IO chip I'm having it watch address 0x300000

I do this by putting this command into the debugger:
Code:
wpset 0x300000,0x10,rw
this is saying set a watch point starting at 0x300000 and continuing 17 bytes (it stops at the beginning of the 17th byte so we need to specify 1 number higher than the area we want to watch) and the "rw" means stop if it's reading or writing to that area.

Every time it catches one the game will stop and you'll need to tell the debugger to run again but it keeps track of what it caught. also keep in mind that the yellow highlighted line is the next line of the program to be executed so it's the line of code AFTER the one caught by your watch point so sometimes it's no where near the code you care about if it happened to be something that causes to code to jump to a new location.

wpset.jpg

Here we can see the first few watch points caught the "PC=" is telling us which address in the program triggered it. What we want to do is get through the code and identify every instruction that touches this address range so we know what to fix.

I also scrolled through the code to see if I could find instructions that referenced the 0x300000 range but might not have run during boot or attract mode. you can see in the code above line:
Code:
010B0E    move.w   D7, $300002.l
This is telling us that in the program hex at location 0x010B0E there's an instruction to move "word" sized data from D7 into address 0x300002

There are a lot of other tips and tricks to identifying this stuff that I wont get into here. But through this process I identified the following program instructions in gunfront:

during bootup
01071C -> writing 00 to 0030000B
010724 -> writing D0 (0000) to 00300002
0107B0 -> reading from 00300003
010932 -> reading from 00300003 to A5 -$7FFA
01093A -> reading from 00300001 to A5 -$7FF9
01094E -> writing 03 to 0030000B
010ACA -> writing D7 (0000) to 00300002
010AF8 -> writing D7 (0000) to 00300002
010B0E -> writing D7 (0000) to 00300002
010BD2 -> writing D7 (0000) to 00300002
010D16 -> writing 00 to 0030000B

after bootup during gameplay loop
010F02 -> writing D0 to 00300002
010F1A -> reading from 00300007 to A5 -$8000
010F22 -> reading from 00300005 to A5 -$7FFF
010F2A -> reading from 0030000D to A5 -$7FF8
010F32 -> writing A5 -$7ff5 to 0030000B


Fixing the Address Mapping by Modifying the Program ROM Hex
So now we have an IO address map so we know which ports in koshien should be mapped where in gun front, and we know where all of the instructions are in the game code... so now we modify the ROMs to fix this using a simple Hex Editor.

BUT FIRST, we can't just open up the ROMs in a hex editor, remember part of the program is split across interleaved ROMs so if we open it in a hex editor we'll only see every other byte. It's be like trying to read AND MODIFY a book with every other letter missing. So I created a batch script to quickly and easily merge the program ROMs together into a single file for editing, and then another script to split that single file back out into separate files for burning to ROMs.

Code:
py ts_rom_tool.py -interleave c81-11.bin c81-10.bin 1st.bin
type 1st.bin c81-04.bin > prog.bin
del 1st.bin
Code:
md mod
type prog.bin > mod/prog.bin
py ts_rom_tool.py -half prog.bin 1st.bin c81-04.bin
py ts_rom_tool.py -deinterleave 1st.bin c81-11.bin c81-10.bin
del 1st.bin

type c81-04.bin > mod/c81-04.bin
type c81-11.bin > mod/c81-11.bin
type c81-10.bin > mod/c81-10.bin
on my split script I'm also making a backup copy of the file to a separate directly so I always have a copy of the last revision I made.

So now what we'll do is we'll go down the list of instructions I made, find them in the de-compiled source window of the MAME debugger, and then find them in the hex editor so they can be changed.

Here are some of the lines that need to be changed, noticed the address in the brown box on the left, and the hex in the orange box on the right, the other colored boxes identify the address locations that need to be changed.
hex_editing1.jpg


Now here's the file open in our hex editor:
hex_editing2.jpg


So baisically I take the list I made earlier of the instructions that read or write to the 0x300000 areas. We go to the address in MAME Debugger window, then go to that same address in the Hex Editor and verify that the hex is a match. Then we modify the values int he hex editor based on the cross-reference we made earlier.

Once we've fixed all the locations in the list. I'll run my script to chop up the big prog.bin file into unique smaller files ready to be programmed to the ROMs. For now I'm not worried about the buttons and joystick mapping so Player 2 will get all the buttons and player 1 will get all the joysticks.


The Results...


IT BOOTS! The TILT error has been fixed :D We still have to worry about the joystick and button mapping but unfortunately it looks like there are some sprite issue ah damn, lets get that working first before we worry about the controls.
 

Attachments

  • tilt.jpg
    tilt.jpg
    3.6 KB · Views: 2,732
Last edited:
PART 4 Comparing against other Hardware
So as you can see in the video the game boots and plays, it seems the background tiles are good but some of the sprites are messed up. These are stored in the OBJ ROM (IC9). Pulling out that ROM and testing the game shows that the bad graphics have either disappeared or been replaced by colored blocks, so this confirms that something related to that ROM is the root of the problem.

Troubleshooting
Simple things first, confirm that the data written to the ROM is correct... re-dumped and confirmed good.

Next lets take a look at the MAME driver and see if we missed anything... nothing weird with how that ROM is loaded. the only difference with koshien is that koshien has a second OBJ ROM but that shouldn't cause us any problems.

Looking through the MAME driver I see a few games have "Scrambled" graphics data for protection, neither gunfront or koshien do though, so that's a dead end also.

Looking through the MAME however I am reminded of that extra "sprite banking" function that existed in koshien that wasn't in gunfront. I also recall from another F2 conversion I've done that in MAME there is a separate Taito F2 video driver and some games interact with the OBJ ROM differently depending on how they're configured in that video driver. Lets take a look at that...

Code:
/************************************************************
                      SPRITE BANKING
  Four sprite banking methods are used for games with more
  than $2000 sprite tiles, because the sprite ram only has
  13 bits available for tile numbers.
   0 = standard (only a limited selection of sprites are
                  available for display at a given time)
   1 = use sprite extension area lo bytes for hi 6 bits
   2 = use sprite extension area hi bytes
   3 = use sprite extension area lo bytes as hi bytes
            (sprite extension areas mean all sprite
             tiles are always accessible)
************************************************************/
Code:
VIDEO_START_MEMBER(taitof2_state,koshien)
{
	core_vh_start(0, 1,  - 1);
}

VIDEO_START_MEMBER(taitof2_state,gunfront)
{
	core_vh_start(0, 3, 3);
}
UGH...

looking deeper into the video driver for any other game specific stuff I see this:

Code:
void taitof2_state::koshien_spritebank_w(u16 data)
{
	m_spritebank_buffered[0] = 0x0000;   /* never changes */
	m_spritebank_buffered[1] = 0x0400;

	m_spritebank_buffered[2] =  ((data & 0x00f) + 1) * 0x800;
	m_spritebank_buffered[4] = (((data & 0x0f0) >> 4) + 1) * 0x800;
	m_spritebank_buffered[6] = (((data & 0xf00) >> 8) + 1) * 0x800;
	m_spritebank_buffered[3] = m_spritebank_buffered[2] + 0x400;
	m_spritebank_buffered[5] = m_spritebank_buffered[4] + 0x400;
	m_spritebank_buffered[7] = m_spritebank_buffered[6] + 0x400;
}
Ok so I'm guessing that the sprite banking functionality that I initially ignored isn't so inconsequential after-all.


Hardware Comparison
Looking through the video driver I decide to see if there are other games that use the "core_vh_start" configuration similar to gun front.

I see that HatTrick Hero/Football Champ does, so I pull out that PCB. to see how it compares, I quickly realize that the object ROM on that PCB is controlled by to a TC0190FMC chip which neither koshien nor gunfront uses. looking at the list of Taito Customs way back at the beginning this is a sprite banking chip used by a few games... ok so that's not a help. I check a few other games and finally discover that "ssi" (aka Majestic 12) is a game that I own, it uses the same "core_vh_start" configuration as gunfront, AND it doesn't have any weird sprite banking (just like gunfront).


Sometimes you can learn things about the games you're working with by looking at a completely different game on the same platform.

Here's the OBJ ROM on my Majestic 12 PCB
m12.jpg


It's pretty obvious even from the picture that all the traces simply run to the T-Connector and nothing else. Poking around with a multimeter and I confirmed that 100% of the data and address pins are connected to the T-Connector, and the enable pin is tied to ground, meaning it's set to be enabled 100% of the time.

OK lets compare that to my koshien PCB... hmm not the same, it seems that some of high address lines and the enable pin are tied to the PAL at IC23. going way back to part 1 and looking at pictures of the gunfront PCB this PAL doesn't exist on that PCB... I think we found the source of the sprite banking mess!
sprite_banking_pal.jpg


Mapping Pins
First things first lets figure out exactly what the differences are here. I know the enable pin is wired differently, and I know some of the high address pins are wired differently, most of the address and data pins seem to be wired properly to the T-Connector though. But lets go through and document the differences completely so we can see what we're dealing with...

ROM PinFunctionT-CON (SSI)ROM (koshien)T-CON (koshien)
1A18T-90PAL-16PAL-13
2A17T-91PAL-17PAL-14
13GGNDPAL-19*???*PAL-18 on 2nd ROM


Only really 3 pins different, which isn't bad. So I can see that on ssi T-connector pins 90 and 91 go to OBJ ROM pins 1 and 2, but on koshien they instead go to PAL pins 13 and 14, and then ROM pins 1 and 2 go to PAL pins 16 and 17.

The Enable pin on ssi is simply tied to ground but on koshien the enable pins of OBJ ROM1 and OBJ ROM2 (which we aren't using) are both controlled by the PAL pins 18 and 19

Non-Distructive Testing
Before I go cutting up traces and running jumper wires I decide to do some testing that wont permanently alter the PCB.

Firs thing I try is simply removing the PAL and see if the game runs without it. Unfortunately that's a bust. the game throws a coin error on boot so apparently there are some functions handled by the PAL outside of Sprite Banking. :( damn...

So I need some way to separate the pins of the ROM that are connected to the PAL and rewire them to the correct pins on the T-Connector so that the OBJ ROM is wired the same as as the one on Majestic 12. I could bend the pins out of socket and solder wires to them but I really don't like bending or soldering to pins unless I have to. so I install a socket into the socket and I bend the pins out on that and solder some wires to their appropriate destinations on the T-Connector.

It's Ugly... but we now have 100% working video :D


Multiple Solutions
So we have a few different options for a more permanent solution to this.
Option A. We could cut traces and wire jumper wires, I don't like this option unless there is no other choice, as it's ugly and not 100% reversible. It was unavoidable with the Program and ADPCM ROMs but might be avoidable here.

Option B. We could pull some of the PAL pins out of socket and wire jumpers. Slightly better than cutting traces but would still be a bit ugly.

Option C. since the inputs from the T-connector and the outputs to the ROM are all passed through the PAL, we could try to modify the PAL data to bypass whatever the sprite banking functionality is. this seems the cleanest option, lets try it!


PART 5 Making a Custom PLD
First thing is first I see if I can dump the PAL, unfortunately my programmer doesn't have support for the model used. It appears that it is dumped in MAME but @Derick2k recently send me a PCB to make a brute-force PAL dumper that I've been looking for an excuse to try out.

The Processes utilizes the "Charles MacDonald" PAL Adapter. Essentially the adapter allows you to read a 16V8 style PAL or GAL with a normal EPROM programmer as if it were a 27c020 EPROM. In effect while reading the PAL it creates a ROM image that represents every possible input and output (assuming it's not a "registered" PAL that uses a serialized input, but in my experience those are quite uncommon).

pld_dumper.jpg


Once that's done you take the resulting "ROM dump" and pass it through a piece of command line software that he developed to create a .pld file:
Code:
pa paldump.bin > paldump.pld
This file can then be opened in a program like WINCUPL for viewing the equations and creating a .jed file.

maybe I'm doing something wrong but so far my results have been less than ideal... sometimes pins come out with equations that include every possible combination of every input pin.

thankfully for my use here the few pins with that problem were also the pins that I was going to "rewire".

the resulting equations looked like this:
Code:
/* Dedicated input pins */

pin 1   = I0; /* Input */
pin 2   = I1; /* Input */
pin 3   = I2; /* Input */
pin 4   = I3; /* Input */
pin 5   = I4; /* Input */
pin 6   = I5; /* Input */
pin 7   = I6; /* Input */
pin 8   = I7; /* Input */
pin 9   = I8; /* Input */
pin 11  = I9; /* Unused input */

/* Programmable output pins */

pin 12  = B0; /* Unused input */
pin 13  = B1; /* Input */
pin 14  = B2; /* Input */
pin 15  = B3; /* Combinatorial output */
pin 16  = B4; /* Combinatorial output */
pin 17  = B5; /* Combinatorial output */
pin 18  = B6; /* Combinatorial output */
pin 19  = B7; /* Combinatorial output */

/* Output equations */

 B7 = 'b'0;
 B6 = 'b'1;
 B5 = B2;
 B4 = B1;
 B3 =  I0 &  I1 & !I2 & !B1 &  B2 
    # !I0 & !I1 &  I2 & !B1 &  B2 
    #  I0 & !I1 &  I2 & !B1 &  B2 
    # !I0 &  I1 &  I2 & !B1 &  B2;

/* End */
B7 (Pin 19) was set to always output "0" or Ground, as this is tied to the OBJ enable pin and we want that always on.
B6 (Pin 18) is the enable signal for the second OBJ ROM that we're not using with gunfront so I tied that high to always be disabled.
B5 (Pin 17) is wired to simply output whatever comes in on B2 (Pin 14). This essentially wires t-connector pin 91 to OBJ ROM Pin 2
B4 (Pin 16) is wired to simply output whatever comes in on B1 (Pin 13). This essentially wires t-connector pin 90 to OBJ ROM Pin 1
B3 was left alone, it has the equation that that the Charle's MacDonald software generated. Presumably this is the thing related to the coin error that occurred when I removed the PAL in my earlier test.

There were no other equations in the output so this is a pretty simple PLD!

I'm still learning the WinCUPL software, I had a hard time figure out how to get it to produce a .jed file for me to actually write but I found that this PDF has some good info if you're getting started like me: https://www.eng.mu.edu/~perezjc/eece143/Lecture05.pdf


No pretty picture or video to show. results are the same as they were with the double socket wire mod, only now everything is nice and tidy without any traces cut, pins pulled or wires added in order to get the OBJ ROM working as it should :D


Only thing left to do now is fix the Joystick and button inputs so I can play the damn thing X/
 
Last edited:
Part 6 Modifying MAME

Why?
So far all of the problems encountered with this conversion have been solved except for the controls. If you recall back in Part 3 we learned that gunfront uses 1 byte of data for player 1 controls and a different byte of data for player 2 controls, while koshien has the IO mapped such that 1 byte is for both joysticks and a different byte is for all buttons.

When I fixed the input mappings to get the game to boot I mapped the joystick byte to player 1 and the button byte to player 2. The result is that you can play the game but player 1 has to move players 2's joystick to push start and shoot and player 2 has to use player 1's buttons to move around.

This can be fixed, but it's not a simple fix, we essentially need to ROMHACK the game to remap the buttons and while we could patch and burn ROMs and test in hardware, a patch of this complexity is new ground for me so I'll likely be tweaking an iterating a lot. Having to re-burn the program ROMs every time I want to test can multiply the time it takes. So instead I'm going to do it in MAME but I can't easily do that with my normal MAME version.

If you recall back in Part 1 we couldn't test a "virtual conversion" in MAME because of the gap in the program ROM space. Well what we're going to do is modify the MAME source code to remove that gap, essentially modifying the source the same way we added the new address line on the hardware. that way we can test a our ROMHACK on a "converted" game in MAME instead of having burn chips to test on hardware every time.

Setting Up the Environment
There are some official instructions for building MAME here: https://www.mamedev.org/tools/
I found these to be lacking some detail that allowed me to get up and running quickly so here are the steps I used for getting setup on 64bit Win10. I can't say if this will work for you but it's what worked for me...

First download mysys64-32: https://github.com/mamedev/buildtools/releases/download/5.0/msys64-32-2019-12-23.exe
Rather than running the exe I used 7-zip to extract the content to C:/mysys64


Next I downloaded the latest MAME source from git-hub: https://github.com/mamedev/mame basically just go there and click the big green button on the right that says "clone or download".

I extracted the content of this to C:/mame_src

Once that's done I made sure the mysys64 environment was configured for my system by running c:/mysys64/autorebase.bat
According to the documentation this shouldn't need to be done if installing to c:/mysys64, but in my case it wouldn't work otherwise.

Finally run c:/mysys64/win32env.bat
this will launch the build environment. there are some things that get initialized the first time you run it so it's part of the installation process. Once you're in you can leave by simply typing: exit

That's all you need to do to get ready to compile! But I want to make my mods first.


Modifying The Source Code
All we need to do is double the size of IC10 and IC11 in the ROM definition for koshien.

Here is the original Source:
Code:
ROM_START( koshien )    /* Ah Eikou no Koshien */
	ROM_REGION( 0x100000, "maincpu", 0 )     /* 256k for 68000 code */
	ROM_LOAD16_BYTE( "c81-11.bin", 0x000000, 0x020000, CRC(b44ea8c9) SHA1(f1d19f531b7a653f1c4244d612a339d95ce8cc7c) )
	ROM_LOAD16_BYTE( "c81-10.bin", 0x000001, 0x020000, CRC(8f98c40a) SHA1(f9471306c47ced10a56c09794954e55fdb6f6b85) )
	ROM_LOAD16_WORD_SWAP( "c81-04.bin", 0x080000, 0x080000, CRC(1592b460) SHA1(d42514b4d588d0376914832f0e07ce626d1cdee0) )  /* data rom */
Here is the modified source:
Code:
ROM_START( koshien )    /* Ah Eikou no Koshien */
	ROM_REGION( 0x100000, "maincpu", 0 )     /* 256k for 68000 code */
	ROM_LOAD16_BYTE( "c81-11.bin", 0x000000, 0x040000, CRC(b44ea8c9) SHA1(f1d19f531b7a653f1c4244d612a339d95ce8cc7c) )
	ROM_LOAD16_BYTE( "c81-10.bin", 0x000001, 0x040000, CRC(8f98c40a) SHA1(f9471306c47ced10a56c09794954e55fdb6f6b85) )
	ROM_LOAD16_WORD_SWAP( "c81-04.bin", 0x080000, 0x080000, CRC(1592b460) SHA1(d42514b4d588d0376914832f0e07ce626d1cdee0) )  /* data rom */

All I've done is change the ROM size on IC10 and IC11 from 0x020000 to 0x040000

Not necessary but while we're at it we can fix the ADPCM ROM size as well.
From this:
Code:
	ROM_REGION( 0x080000, "ymsnd", 0 )  /* ADPCM samples */
	ROM_LOAD( "c81-05.bin",  0x00000, 0x80000, CRC(9c3d71be) SHA1(79f1bb40d8356d9fc93b569c20be15e7fbf34580) )
To this:
Code:
	ROM_REGION( 0x100000, "ymsnd", 0 )  /* ADPCM samples */
	ROM_LOAD( "c81-05.bin",  0x00000, 0x100000, CRC(9c3d71be) SHA1(79f1bb40d8356d9fc93b569c20be15e7fbf34580) )

again I'm doubling the size, only this time going from 0x80000 to 0x100000 Also note I'm increasing the ROM_REGION size since I'm increasing the size of not just the ROM but the whole data-region. This didn't need to be done on the Program ROMs because the gap was in the middle and the total region size didn't change.

That's all we needed to to replicate our wire patches made in hardware back into the MAME source code. And now we can compile it.


Compiling MAME Source
Compiling MAME can take a long time, especially on an low powered machine (on my old laptop a full compile would often take more than a day). Thankfully MAME has compile options that let you compile just the driver you care about. So we're going to make a MAME build that only functions for Taito F2 games... since that's all we care about for this source code modification.

Open up the build environment by running c:/mysys64/win32env.bat

Then navigate to your source folder by typing:

Code:
cd c:/mame_src

(this may be different if you put yours someplace else)

finally star the compile by typing in this command:

Code:
make SUBTARGET=f2 IGNORE_GIT=1 SOURCES=src/mame/drivers/taito_f2.cpp -j 4
You can see that I'm telling it here to specifically build just the f2 hardware. The "-j 4" parameter specifies how much CPU you're dedicated to the compile process. the official instructions recommend going 1 number higher than the number of cores you have. I set it a bit lower than that because I want to be able to still have decent power to use my machine while it's compiling. This isn't super relevant to targeting specific hardware like this though since compiling only took about 2-minutes :)

The end result will be the compiled .exe installed inside the c:/mame_src . I just run it there as if it were my regular mame folder. If you need to tweak the code and recompile you can just follow the compile steps again. If you screw something up you can delete the whole mame_src folder and extract a fresh copy of the source.


Running a Virtual Conversion

I've mentioned it before but to test a conversion in mame you basically need to take the ROM files from the game you're converting to (in this case gunfront) and rename them all to be what mame expects for the game you're converting from (in this case koshien). They don't have to be zipped up but they should be in a folder inside your rom folder with the name of of the donor game.

Whenever you do this you will also want to launch the game directly from the command line, if you try to launch from the menu MAME wont let you since the CRC check on the files will fail mame will think they're corrupt since they don't match but they don't mach because they're for a different game. Launching from the command line will bypass this. The conversion batch files I made back in Part3 come in handy for this, since I built it rename all of the files and put them in a folder named "koshien" everything is already set to run in MAME.

My new mame compile has a new exe name of "f264.exe" (for Taito F2 64-bit)
so I launch it with the debugger like this:

Code:
f264.exe -window -debug koshien
Running that the game boots and plays in MAME, controls are incorrect, as expected, and interestingly none of the sprites appear.
ktgf_mame.jpg


This is likely because the modifications we made to the MAME driver didn't include fixing the sprite banking Interestingly it has different behavior than the real hardware (real hardware had corrupt sprites, MAME has no sprites). This isn't super important though since we're only worried about getting controls working and it works well enough to do that.


Part 7 ROM HACKING
Now that we've got our modified F2 version of MAME running we can develop a ROM hack to fix the controls.
This is a pretty in-depth topic but basically it boils down to the following steps

1. figure out exactly what you want to accomplish at a binary. In this case I need to replace the code that copies the input data from the IO chip address into the memory address with new code that does that while swapping the data around at the same time.

2. write the assembly code to perform the desired function.

3. convert that assembly code to hex

4. figure out how to fit your new code into the game data without disturbing any of the other existing code.

5. test it out in MAME

- Adjust and repeat as necessary.

doing this I made heavy use of the scripts I created earlier for merging the program ROMs into a single file and then splitting them back out into ROM sized files. since I needed to adjust and retest my code 6 or 8 times before it was exactly how I wanted it.

If you're interested in the actual code I used there is another topic I created earlier dedicated to just that: Looking for Advice about 68K ROM Hacking


And with that I now have a fully working Gun & Frontier made from a PCB that would otherwise never have been played. :)


FINAL THOUGHTS
I do actually like Gun & Frontier as a game, I think it's a fun SHMUP with some pretty interesting art design. On a whole though I really enjoyed the challenge of figuring out this conversion and I learned a lot of things through the process.

A lot of people ask about conversions on these forums and I've been meaning to do a formal write up explaining the process for a while. Given the wide breadth of challenges and techniques I had to use to get this one done it felt like a really great project to share.

I also want to point out that there were a number of dead ends I ran into and other hiccups that I didn't mention.

Sometimes simple mistakes get made too. when I first went to test the controls on an arcade machine instead of my test bench I had no sound! my test bench doesn't have speakers at the moment so it was the first time testing the sound. Come to find out it was because my Sound CPU ROM was empty, I forgot to program it! but of course I was racking my brain for some aspect of the conversion I missed... Sometimes the problem is simple to solve.

In other cases things don't always work out and your assumptions aren't always correct and sometimes the best thing to do is step away for a while and come back later to look at it with fresh eyes.

In any case, thanks for reading and I hope you learned something :)
 
Last edited:
thanks for the kind words guys :)

I especially like that you went for a custom pal instead of bypassing it, nice touch!
I always like trying to take the "cleaner" option that will leave the PCB, and the program code, looking as close to factory as possible. And I prefer modifications that can be undone as if they were never there. I hate cutting traces because it can't be undone and it's definitely not factory looking, sometimes that's the only option though. Creating a custom PAL here it seemed like the perfect of a use case for one. :D

I'm still having some troubles with the "pa" software that converts the brute force dump to a .pld.
here's the original dump and pld conversion for the PAL. you can see the ridiculous equation it produced for B7 and B6.
 

Attachments

  • koshien_c81-09.zip
    9.8 KB · Views: 463
Amazing thread! thanks for sharing in such detail including steps taken.
 
Nice project and write up. It also giveS me hope that the single layer football champ board may also be convertible to metal black having seen your work above.

The main differences here are the sound Rom sizes and the use of the larger (4 player option) io ic. Possibly things can be altered to make this io ic run ok. Ie it handles extra things not less

would you be interested in taking a look at it? The good thing is the other chips and the sprite layering one are the same.

Dead connection is still a cool solution though if not.

Cheers
 
It also giveS me hope that the single layer football champ board may also be convertible to metal black having seen your work above.
Thanks, I think it is possible and I have looked at it. the IO used on Metal Black is simpler than the one used on Football Champ so it's possible that it will work.

the bigger problem is the rest of the memory map there is lots of code that will need to be modified to deal with the different location of things. It's possible some of this could maybe be changed with PAL modifications but it would be a lot of work either way.

Code:
void taitof2_state::footchmp_map(address_map &map)
{
	map(0x000000, 0x07ffff).rom();
	map(0x100000, 0x10ffff).ram();
	map(0x200000, 0x20ffff).ram().share("spriteram");
	map(0x300000, 0x30000f).w(FUNC(taitof2_state::spritebank_w)); /* updated at $a6e, off irq5 */
	map(0x400000, 0x40ffff).rw(m_tc0480scp, FUNC(tc0480scp_device::ram_r), FUNC(tc0480scp_device::ram_w));     /* tilemaps */
	map(0x430000, 0x43002f).rw(m_tc0480scp, FUNC(tc0480scp_device::ctrl_r), FUNC(tc0480scp_device::ctrl_w));
	map(0x500000, 0x50001f).w(m_tc0360pri, FUNC(tc0360pri_device::write)).umask16(0x00ff);  /* 500002 written like a watchdog?! */
	map(0x600000, 0x601fff).ram().w(m_palette, FUNC(palette_device::write16)).share("palette");
	map(0x700000, 0x70001f).rw("te7750", FUNC(te7750_device::read), FUNC(te7750_device::write)).umask16(0x00ff);
	map(0x800000, 0x800001).rw("watchdog", FUNC(watchdog_timer_device::reset16_r), FUNC(watchdog_timer_device::reset16_w));   /* ??? */
	map(0xa00001, 0xa00001).w("tc0140syt", FUNC(tc0140syt_device::master_port_w));
	map(0xa00003, 0xa00003).rw("tc0140syt", FUNC(tc0140syt_device::master_comm_r), FUNC(tc0140syt_device::master_comm_w));
}


Code:
void taitof2_state::metalb_map(address_map &map)
{
	map(0x000000, 0x0bffff).rom();
	map(0x100000, 0x10ffff).ram();
	map(0x300000, 0x30ffff).ram().share("spriteram");
//  map(0x42000c, 0x42000f).nopw();   /* zeroed */
	map(0x500000, 0x50ffff).rw(m_tc0480scp, FUNC(tc0480scp_device::ram_r), FUNC(tc0480scp_device::ram_w));     /* tilemaps */
	map(0x530000, 0x53002f).rw(m_tc0480scp, FUNC(tc0480scp_device::ctrl_r), FUNC(tc0480scp_device::ctrl_w));
	map(0x600000, 0x60001f).w(m_tc0360pri, FUNC(tc0360pri_device::write)).umask16(0x00ff);
	map(0x700000, 0x703fff).ram().w(m_palette, FUNC(palette_device::write16)).share("palette");
	map(0x800000, 0x80000f).rw(m_tc0510nio, FUNC(tc0510nio_device::halfword_wordswap_r), FUNC(tc0510nio_device::halfword_wordswap_w));
	map(0x900000, 0x900000).w("tc0140syt", FUNC(tc0140syt_device::master_port_w));
	map(0x900002, 0x900002).rw("tc0140syt", FUNC(tc0140syt_device::master_comm_r), FUNC(tc0140syt_device::master_comm_w));
//  map(0xa00000, 0xa00001).nopw();   /* ??? */
}

You can see the ROM and the main RAM are fine but everything after that needs to be fixed... <X

I own an original Metal Black (2-Board version) so it's not really worth the time investment for me, but if you'd like to tackle it I can help out with photos and chip mapping on the Metal Black PCB where needed.
 
Found one "Ah Eikou Glory Koshien" (it's only sub board) today. Now is needed to find a F2 mother :happy:
 
Back
Top