What's new

GTO77

Enthusiast
Joined
Jul 6, 2021
Messages
105
Reaction score
136
Location
DFW TX, United States
Hi Everyone! Relatively new here, but wanted to share my most recent project. I also posted this on the KLOV forums, but posting here as well in case anyone here needs some of this info. I had been looking for a Crazy Taxi upright (the Naomi Universal Cabinet version) for a few months, with very little luck. My hope was to get a Crazy Taxi upright and then get another machine to convert to a UK version Outrun 2 upright. However, the Crazy Taxi alone was impossible to find.

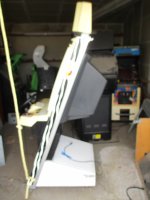
Thankfully, user @r5g_on_klov on the KLOV forums approached me with a Jambo Safari upright he had available for sale (by the way, great seller. Highly recommend him if you're looking for a machine). I decided to get it and, after much pain dealing with STI/NAVL/Beltmann (their prices are stupid nowadays), got the machine and ordered all the necessary items for the conversion. Not going to spend much time on the conversion, since it has been done many times before. Here is what the Jambo looked like:

IMG_6512.JPG
IMG_6511.JPG
IMG_6480.JPG
 

Attachments

  • IMG_6509.JPG
    IMG_6509.JPG
    97.2 KB · Views: 57
As you can see, decent condition with some damage to the red tube light cover and yellowing of the white plastic and artwork. I ordered the decals, topper, etc from Arcade Art Shop (https://www.arcadeartshop.com) and they came fast and were very high quality. Super nice guy to deal with. After disassembling everything and giving the machine a nice cleaning, I bought a few cans of Rust Oleum 2X Painter's Touch paint and primer (Golden Sunset color) and a couple of cans of Krylon triple thick Crystal Clear Glaze.

Did about 5 coats of paint and 3 coats of the glaze. For the light box artwork, I got the nasty surprise that the artwork is actually screen printed on the plastic. Attempting to scrape it, just left the plastic too cloudy. I went with a local acrylic shop who did an amazing job of creating a brand new, clear replacement.

After that, I contacted eBay user Tim from ArcadeMarquee.com (I've used him before and I'm sure many of you have as well) and gave him a rough idea of what the original light box artwork looked like. He then used his design powers and created an awesome translite that I could tape to the inside of the plastic.
 
The speaker cover with Jambo artwork also had to go. I bought a sheet of plexi from Home Depot, cut it to size, drilled holes and installed. I'm probably getting a front glue sticker to put on the inside at some point.
 
The floor mat was a disaster. I spent a lot of time painting some custom Crazy Taxi artwork over the Jambo Safari artwork, only to have it ruined by a layer of clear flex seal. My plan was to cover the painted surface with clear liquid rubber. Tested it on a corner and seemed fine, but ended up reacting with the yellow paint and ruining it.

Ended up having to redo it and have ordered some clear vinyl to put on top instead. After retouch, it ended up not as good as my original paint job :(. Oh, well.
 
Here is the finished project. Not professional by any means, but I'm really happy with it.

20220620_235740.jpg
20220620_235744.jpg
20220620_235801.jpg
20220620_235809.jpg
20220620_154438.jpg
 
And now, the good stuff. I had been looking to play Crazy Taxi High Roller on this machine, but the CTHR shifter is pretty much unobtanium and I had seen many people looking for one as well. I hope this next part will be useful for them.

I bought a return-to-center arcade shifter (part number 50-8115-00 on Happs website), but unfortunately it was too big to fit in the enclosure for the CT control panel.
 
My two options were:

1. Cut the enclosure for the shifter larger - but this meant cutting the plastic control panel, as well as some metal underneath to make it fit. Plus, no way of knowing if it would work due to the existing drill holes.
2. Cut a hole into the control panel to add the jump button - probably the easiest, but it would be awkward to use and, again, I did not want to damage the control panel.
 
Therefore, I decided to combine both shifters and Frankenstein a CTHR shifter.

First, I disassembled the Jambo Safari shifter and removed the handle and shaft. Warning: the retainer clip for the shaft is a b*tch to remove.
Then, I removed the shaft for the Happs shifter. Couple of issues right off the bat:
1. Happs shifter shaft is too long.
2. Happs shifter shaft is not round in diameter. It has a flat side to prevent it from spinning, since it has a wire coming out of it for the button.
3. Plastic part that holds the shaft is not interchangeable. It interacts with the microswitches completely differently.
4. Diameter of the plastic part opening is smaller than the diameter of the Happs shaft.
 
Step 1: used a diamond tipped circular saw blade and cut the Happs shifter shaft to the same length below the retainer clip as the original Sega shifter.
Saw cut though that pretty easily.

20220619_121343.jpg
 
Step 2: drill a hole on the plastic part that holds the shaft as well as the outside of the shifter casing. This is needed for the shifter handle button wiring to go through.

20220619_121328.jpg
20220619_121355.jpg
 
Step 3: used a Dremel to grind the inside of the smaller plastic piece so that the Happs shaft would fit inside.
Step 4: once everything fit, lined up all the parts (thankfully I took decent measurements) and ran the button wire through all the holes. This was also a major pain. I used a bent safety pin to pull the wires through the final holes.

20220619_203308.jpg
20220619_203312.jpg
 
Step 5: since we can't have the shifter spinning out of place and pulling/winding the wire, I used some JB Weld plastic bond to fill the gap on the shifter shaft flat side. In all honesty, I should have done this before the shaft and just grind to shape. Doing it after meant that the shaft is essentially glued in place. Not a big deal.

Warning: both sides of the plastic piece that interact with the microswitches are NOT the same. Make sure it us facing the exact same way when replacing. I did not pay attention and had to move the microswitches to the opposite sides (and even had to install one backwards to interact properly with that piece).

Well, final result ready for some High Roller! I tested it and works like a charm.

20220620_235817.jpg
 
Hope this is helpful to anyone needing a CTHR shifter. This solution keeps the original shifter assembly, so no need to damage your control panel. The shifter ends up sitting a bit higher than the original, but plays fine.

Let me know if you have any questions if doing a similar restore or following the same instructions for building the shifter.
 
Great job this looks awesome. I too found myself buying a Jambo to play CT but like the white because it goes with all my other white cabs. With that being said I just simply switched carts. My question is, I had to hack up my shifter to make it reverse instead of lasso but every time I hit reverse this weird code pops up upper left corner of the screen. Almost like when you hit "inspect" on a web page and it gives you the Hotmail codes or whatever it's called. How did you wire your jambo to reverse for CT?🤔 or are you only playt CT HR?
 
So far, only CTHR and Outrun 2/Outrun 2 SP. What method are you using to wire your shifter? Are you bridging the wires at the 60-pin connector? That is the method I saw online and what I was planning on doing as well, since I do want to play Jambo.
 
Y
So far, only CTHR and Outrun 2/Outrun 2 SP. What method are you using to wire your shifter? Are you bridging the wires at the 60-pin connector? That is the method I saw online and what I was planning on doing as well, since I do want to play Jambo.
Yes. I think 2 wires connected on one pin and the other 2 on another. I forget the location but there's only 1 video of it being done on YouTube and he doesn't clearly show how he did it other than listing the locations. And on his it doesn't appear to give the same artifacts on the screen that I get. I can live with it, just odd and if I'm inadvertently triggering a menu I'd like to figure out how to fix it either way. I'll post a pic or video some time this week.
 
Y
Yes. I think 2 wires connected on one pin and the other 2 on another. I forget the location but there's only 1 video of it being done on YouTube and he doesn't clearly show how he did it other than listing the locations. And on his it doesn't appear to give the same artifacts on the screen that I get. I can live with it, just odd and if I'm inadvertently triggering a menu I'd like to figure out how to fix it either way. I'll post a pic or video some time this week.
I have not done it yet, since I want to order the JST connectors first so that I can crimp the wires together. Here is the website I saw that had a pretty good picture of how the jumper wires look: https://gamerepair.info/games/7_crazy_taxi

Hope this is useful.
 
If you find yourself stuck on shifter wiring, ping me. I had to rewire my CT upright to play OR2 & Jambo
 
Back
Top