What's new

Kyotaro

Student
Joined
Feb 9, 2020
Messages
30
Reaction score
27
Location
California
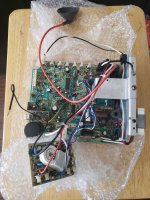
Purchased a Wells Gardner k7000 19'' chassis and found a suitable funai A48LGS30X consumer tube.
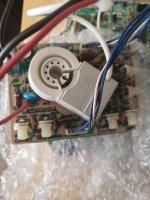
Since I do not have the yolk of the original tube I notice the wiring/molex connectors to be different.
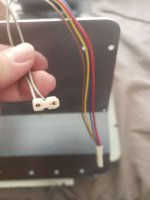
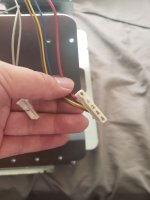
Anyone know where to source the 10 pin data connector, power cable, yolk wire and degauss connector that would be suitable for the chassis.
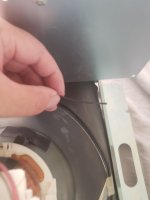
I've attached pictures of the chassis I have on hand and the consumer tube I am using. Please let me know if anything else is needed since this is a first for me.
 

Attachments

  • 20211009_140616.jpg
    20211009_140616.jpg
    238.8 KB · Views: 90
  • 20211009_140352.jpg
    20211009_140352.jpg
    141.1 KB · Views: 89
  • 20211013_161827.jpg
    20211013_161827.jpg
    82.3 KB · Views: 85
  • 20211013_161838.jpg
    20211013_161838.jpg
    83.5 KB · Views: 115
  • 20211013_161846.jpg
    20211013_161846.jpg
    69.8 KB · Views: 93
  • 20211013_161850.jpg
    20211013_161850.jpg
    76.3 KB · Views: 89
https://www.arcadepartsandrepair.co...-connectors/4-pin-plug-housing-2-36mm-cm1003/

Arcade parts and repair has all the connectors for a K7000 swap. Make sure to get an iso transformer. This is required for K7000.
Power connector is here:

https://www.arcadepartsandrepair.co...n-062-power-connector-male-receptacle-cg1015/

You'll need this for your degauss connector:

https://www.arcadepartsandrepair.co...-connectors/2-pin-plug-housing-2-36mm-cm1001/

For the RGB/Sync 10 pin connector, that's a Molex KK .156" series (also available at arcadepartsandrepair). When wiring it, you can follow this guide (K7000 section near the bottom):

http://homearcade.org/BBBB/sync.html

Lastly, don't forget to wire up your dag wire to ground on the neckboard. A few ways you can do that, but I just soldered a wire with this pin on the other end with some heat shrink:

https://www.arcadepartsandrepair.co...tors/1-pin-wafer-header-2-36mm-cm1007-cp1012/
 
Last edited:
Awesome thanks for the RGB/Sync guide will def be using it.
Ordered a bunch of stuff recommended and some extras just in case.

Incase someone stumble upon this thread for a straight k7000 chassis wiring:
10pin is CA1000 don't forget the trifurcon pins
Yolk CM1003
Degaussing coil should be CN1001
CC1001 and CC1004 are the usual power connectors for the chassis
 
I was about to make this thread. I'm using an Orion tube thats similar to yours. The neck board is a perfect fit on the back. Just to make sure im good, I need to get connectors that are linked above and wire the cables from the new tube with the connectors that will fit on the k7000 board. Seems pretty straight forward. The only kinda confusing part is the 6 RGB connector and 3 Sync connector. I will need to wire the new tube with the 6 pin connector thats linked above. The last part is sync which i dont see the wiring for that on the new tube. But reading the link above, the sync for the k7000 (bottom two pictures) comes from the arcade board itsef?
 
But reading the link above, the sync for the k7000 (bottom two pictures) comes from the arcade board itsef?
Sync is the white wire on the 6-pin Mini Cute monitor harness; connect that to -H on the K7000.
 
Sync is the white wire on the 6-pin Mini Cute monitor harness; connect that to -H on the K7000.
I see it. So use 3 pin connector to the K7000 to plug to -H. But now the question goes to the rest of those cables on the harness. The 4 pin connector from the tube/yoke goes to the K7000 as well but what about the other cables on the cute harness (only using white for sync).
 
I see it. So use 3 pin connector to the K7000 to plug to -H. But now the question goes to the rest of those cables on the harness. The 4 pin connector from the tube/yoke goes to the K7000 as well but what about the other cables on the cute harness (only using white for sync).
RGB and Ground go to RGB and Ground on the P1 connector on the K7000 chassis. See the schematic on page 19 in the below manual.

https://www.arcade-museum.com/manuals-monitors/Wells Gardner K7000 Manual from Williams Game.pdf
 
Back
Top