Here's a tutorial to make a scanner suitable for artwork out of a Canon LiDE 300. This is a cheap scanner that gives great results and the mod is very easy. I picked up mine for 70 euros locally. For anyone in the US, it's 58 bucks on Amazon.

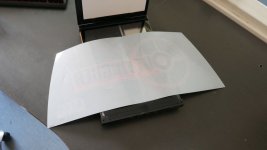
Once you're done, you have a completely flat scanner bed that you can use to scan anything that's 30cm tall. Width is only limited by the space you have available around the scanner. Marquees, Japanese style control panels, move sheets, no problem.
LiDE 400 will also likely work, but I don't see any reason to get the more expensive model. The only benefit it seems to bring is higher dpi, and honestly, for arcade artwork even 600dpi is plenty enough.
Note that I had already performed the mod prior to taking the photos.
See below for how-to:

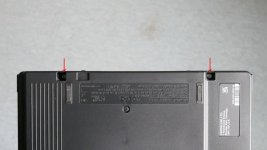
Remove these two screws at the back

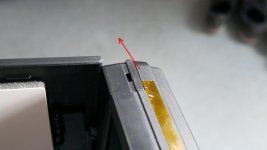
Pry the top plastic piece off, the one acts as a hinge for the cover. There's a tab that holds it in place, you need to clear it. Use a flat head screw driver or similar tool. Do the same for the other side.
After the top cover is removed, you can lift the glass. Hold the glass from the top edge, don't put your fingers under the glass. You do not want finger prints on the under side.
When you have the glass in the air, remove the side pieces. They're stuck on with double sided tape. You can just pull them off.
Once you have the sides removed, put the glass back down. The tape likely left some marks, however, there's no need to clean the glass at this stage. Conquer your OCD and move on with the tutorial.

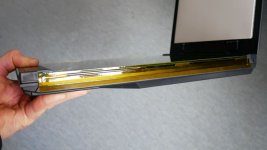
I placed kapton tape over the sides to keep the dust out, I suggest you do something similar.
When you have the sides taped, put the hinge back on. It just snaps into place. Put the screws back in. You can now clean the glass. Use alcohol for the tape residue.
See the next post for suggestions on scanning software.

Once you're done, you have a completely flat scanner bed that you can use to scan anything that's 30cm tall. Width is only limited by the space you have available around the scanner. Marquees, Japanese style control panels, move sheets, no problem.
LiDE 400 will also likely work, but I don't see any reason to get the more expensive model. The only benefit it seems to bring is higher dpi, and honestly, for arcade artwork even 600dpi is plenty enough.
Note that I had already performed the mod prior to taking the photos.
See below for how-to:

Remove these two screws at the back

Pry the top plastic piece off, the one acts as a hinge for the cover. There's a tab that holds it in place, you need to clear it. Use a flat head screw driver or similar tool. Do the same for the other side.
After the top cover is removed, you can lift the glass. Hold the glass from the top edge, don't put your fingers under the glass. You do not want finger prints on the under side.
When you have the glass in the air, remove the side pieces. They're stuck on with double sided tape. You can just pull them off.
Once you have the sides removed, put the glass back down. The tape likely left some marks, however, there's no need to clean the glass at this stage. Conquer your OCD and move on with the tutorial.

I placed kapton tape over the sides to keep the dust out, I suggest you do something similar.
When you have the sides taped, put the hinge back on. It just snaps into place. Put the screws back in. You can now clean the glass. Use alcohol for the tape residue.
See the next post for suggestions on scanning software.
Last edited:


