What's new

hoagtech

Enlightened
Joined
Mar 28, 2019
Messages
1,874
Reaction score
2,925
Location
Bellingham WA
My Catcher and Aero are waiting on parts so lets start a thread for these wide metal cabinets.

My Colorado was in the shop so I jumped "ol Bessey" and picked up the cab from storage and brought it to my lakehouse along with my "battlebox of tools".. I almost hurt my back loading it with two people. So in order to unload, it would require me to remove the monitor while it was on the back of my truck

CB18-A59-D-EA9-C-403-F-B405-64-EB8-A1-F7-A39.jpg


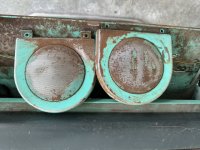
The "dirt" was unreal and pitch black around everything..

7090-C227-6400-4-F8-A-BD7-C-DC7-BBABC6-AA5.jpg


After reaching in unknown spaces for a few minutes (with gloves on) I found the steel rod which unlatched the top opening. I like the monitor detachments in the frame. It allows me to completely remove the monitor frame after unplugging two receptacles.

8-B88-F2-CC-FB40-42-B6-A5-BA-A5-F2-EC958-D33.jpg


After a wipedown of the monitor. I noticed some "Tetris" burn in.

707-B4-C68-F440-4-B20-983-F-D27-EC9910-D43.jpg


I final look down the cab. These were the cleaner parts. The monitor housing had at least a 1/3 cup of soot requiring me to change out my soap bath a good six times.

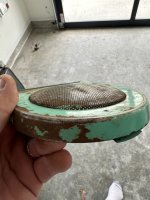
The monitor shroud on this cab was huge.. After a generous cleaning I got the tube model and crossed referenced it with tubular in case I didn't like the tetris burn (*spoiler I love it so far)

The shroud and the monitor had an ungoldly amount of toxic dark black soot which soiled my bath in multiple wipes..

4-B15016-F-E522-4-AC0-98-BE-2-A3-A05-A74280.jpg

E5001-AB9-E638-410-F-A018-B33524920516.jpg

Tubular.jpg


When I flipped the cab upside down I discovered a GIANT power switch on the bottom and this weird port that I would love to know its function. The PSU metal was perfectly in tact to my surprise.

E5-ACBC15-06-CE-4-FD2-BAC8-153-DF0-A45-A58.jpg

81-E77786-2-E46-428-A-85-D1-871-D6095-DEEE.jpg

9-BF6542-B-025-F-494-C-82-C0-76-E889012-F9-F.jpg


I found screws to remove the big "footrest piece" or whatever it was and was able to retrieve the PSU and chassis from the cab

6-FEA970-C-FA76-4757-9-D00-A9-C736453-D71.jpg

778-BCC54-7-A67-4-B2-B-BB5-E-45828-D687018.jpg

AF7-F4-D21-429-B-4254-AB27-8-F6-E147-A4-E0-E.jpg


That's all for today. But I anticipate removing the final components to be powder coated in the next posts.
 
Nice! Looking forward to following your progress! This thing is going to look awesome when done.
 
Neat cab. I'd love one as well

What color code are you going with? Pantone half baked?
 
Last edited:
Neat cab. I'd love one as well

What color code are you going with? Pantone?
That's a good question.

This picture throws me off.

Sigma-Game-Fantasia-28-13-MM-Land-game-center.jpg


It shows blue cabs but the Russian video shows green cabs..

View: https://www.youtube.com/watch?v=a4jTvGoTDfU&t=1s


Small update:

I tried removing the speaker panels to tackle some rough rust on the CP speaker covers.

4-F203035-AF80-45-B7-AE53-3282-DB97318-D.jpg

FBAE1-AA8-6842-4658-AF6-F-E346062-DB2-D1.jpg


The right one came off and I was greeted with piles of dust in the speaker lol.

Then came the arm pain. Sanding these G*D! speakers..

I had to alternate arms. After a futile start the metal coat finally gave way and allowed me to sand the rust off and clear the speaker holes in the cover. The back side was equally rusty.

BFCF588-E-0-F98-4-A51-8-BB4-0-A76-A90-E9549.jpg


I then took a large curved pipe wrench to the dented speaker grill and recreated the round speaker and removed the dents..


Before:
FBAE1-AA8-6842-4658-AF6-F-E346062-DB2-D1.jpg


After:
C59-C403-E-EDBC-4-D09-A732-93-CE0514-B5-F8.jpg


These rusty speakers are ready for a new look
 

Attachments

  • BFCF588-E-0-F98-4-A51-8-BB4-0-A76-A90-E9549.jpg
    BFCF588-E-0-F98-4-A51-8-BB4-0-A76-A90-E9549.jpg
    119.1 KB · Views: 52
  • C59-C403-E-EDBC-4-D09-A732-93-CE0514-B5-F8.jpg
    C59-C403-E-EDBC-4-D09-A732-93-CE0514-B5-F8.jpg
    135.3 KB · Views: 52
Another chill vibe day at the lakehouse.

I started by removing components like the coin mech from the cab to get my powder pile larger.

Yen chute, Then speakers

14-D54-C3-F-CFCD-427-B-A2-EA-B0-C93-C612428.jpg


Extension arms, and bezel frame. I got the top off

4-DEA711-A-8177-495-D-B7-BE-2-B7-BFD8-ED070.jpg

75325-B03-D2-C1-4-A68-96-BF-43216716706-A.jpg


After a couple shared pics here and two sentences. In reality there were about x35 screws removed to make it to this point.

C02875-FA-08-AE-48-A2-B32-F-55748-BA630-C2.jpg


I plan on taking the section to my graphics guy so he can scan it and either make a decal or a sticker to surround the yen.

BE530-B18-6539-45-A2-8775-C12-F99-C7-A44-E.jpg


I was wondering why this cab had a copper wire running out the topper with an alligator clamp on top. It seems like a very archaic way to earth a cab IMO.

723-E4490-490-F-4446-B40-A-38-B2-C4932-E97.jpg

15-CCCE4-C-712-C-4472-B1-F3-6-A334-BDD459-D.jpg


After dissconecting the sides of the top piece. I am starting to get quite the hoard of powder going on finally. I feel some progress is being made.

1-FDCAB39-3-C9-A-477-E-8-A03-DB9-F759-E8-B2-A.jpg


Next was the topper and rails. I popped out the factory badge and am ready to perform one of the most fulfilling parts of an arcade restore. The topper graphic cleanup...

CEDA0356-6-C60-4-CB2-8-ECE-8790-A8-A04-A56.jpg

C4379821-5611-462-C-A8-E3-E1-F4-F27-BB384.jpg


TIme to head upstairs to clean the plastics. I started by hosing off the bezel in the shower. It was nasty. Unfortunately I don't think Ill be able bring the luster back on this bezel and will have to primed, painted, and possibly clear coated.

14420-C78-CEFE-44-C2-BB88-2-E2-F1147-ECEE.jpg

44-C3785-A-3-CE2-4946-ABDD-55-F30-E4-F3-ABF.jpg


The Topper however was a dream. I had to get out the big guns and use a razor to remove the caked on glue. Not even ISO soaks put a dent on it. I used olive oil and a razor to avoid scratches.

3615-F808-776-D-4828-A9-F4-C2445-F0-C033-D.jpg


I would say it turned out almost perfect. Here's a before I rubbed the lithium grease into it..

15-B61-C9-E-FD1-A-4-B77-B442-57268-A0-DE900.jpg


After a good rub *lol. I let the lithium do it job and destroy all oxidation. It looked like it came out the plastic assembly line..

Ahhhhhhh. Thats a good feeling. Happy Cinco de Mayo. I'm gonna drink a Margarita and stare at this thing for a bit..

AE138743-D76-A-417-A-9542-F4310-B17338-B.jpg
 

Attachments

  • 806-D5988-6-DDA-4330-9-D64-01980354-BC97.jpg
    806-D5988-6-DDA-4330-9-D64-01980354-BC97.jpg
    104.9 KB · Views: 74
Last edited:
The theme of this restore day is "Brass Screws" and lots of them. I started early in the day removing them from every component.

The problem was the bottom half of every screw was rusted. And when rusted thread contacts rusted tap it forms a weld..

So while this day was a bear. It needed to happen for the progress of the cab. I removed an additional x130 screws at very weird angles. It required an 18V Milwaukee with clutch set to "12" and type set to "1"

F6756-DF2-CB1-B-4-E5-B-B4-E1-27-AA4637088-F.jpg


first I removed the lid lock latch:

B256-F3-BD-C442-44-EA-A324-950-BCD1720-CA.jpg


On the upper lid there was a pressure switch hooked to Positive and negative terminals. it made me wonder if the power turns off when the lid is open..

2-E1102-B8-7-FD6-4317-896-F-8-E90-CFF9-EB61.jpg


I disconnected and reconnected outside the lid to keep collecting my powder hoard.

6-D4-AEF0-B-6-CBE-4-CA3-9-B3-C-880877-F6-B0-D3.jpg


It was when I started to disconnect the back rail I discovered something INSANE on this cab.

There are no rivets or welds on this body. it is completely modular!!

9865-F91-D-E039-46-C3-824-C-E477-EAEF2-EA7.jpg


I wanted to remove the Jamma housing and sound amp assembly so I could prove my theory and take apart the whole cab.

Removing the CP didn't allow it to fall off. It was welded by a layer of rust in between. So I put a block of wood above and hit it with my pipe wrench to pop it loose.

B01-CE2-F6-E8-F3-4715-86-A2-ECBF6-E902074.jpg

B1-FE0-F36-5-DD0-4506-803-F-6-EDB55-FFAAA8.jpg


Before removing the sound amp. I took detailed drawings and notes on the locations each wire and destination in the wire harnesses for reassembly..

C24-FBBB0-E33-E-4-C52-82-E1-87283-A2-F3-AC4.jpg


Another 20 screws and the sound amp was free. unfortunately I lost one due to what I call "rust melting" The screw head lost its shape in corrosion and caused me to break some drill bits boring it out to the point I could chisel it off..

5126-F77-A-5848-44-EA-BCCD-41-C7-C0-A5-DB9-E.jpg

457-A757-F-AA3-E-4-ECF-93-E8-FE32-F9-A7-B1-EF.jpg


Removed the Jamma housing and was beginning to see the barren floor of the cab.

F114237-E-088-B-4-A8-D-8-E11-5584-E606-E565.jpg

9-A8-C8825-BFC0-448-C-884-B-B59-BF779-A42-B.jpg


Sure enough. The back popped off after 20 screws.

C448-E7-BB-E086-46-A3-BE5-F-00677-F3-F1-FF7.jpg

4-B78-D65-D-8479-44-E7-A2-CD-49-FE4-A9-B4-FF6.jpg


And then the side.

7-B89-E9-B3-009-B-4-F0-F-A0-C1-06-F0-F1-CB7-F42.jpg

AB333-FE1-3-F71-436-F-82-D7-8120-A66-F3945.jpg


And finally the other side. Its hard to see during the bright sunlight, but this pile of cab filled a side of my garage and plus the last powder coated pieces I had on the last post I made. I imagine my Powder Coater is going to charge me double for this cab..

64206885-3858-4-B87-9-D0-A-23-D429-CD75-AC.jpg


That was a fun full day of disassembly and rust.

Still to do and coming up next:

-Razor CP graphics. Send them to @alberto1225 (Pm incoming)

-Disassemble footrest bar from bottom of cab.

-Separate each color of powder coat.

-remove housing from sound amp.

-Pre-sand before sandblast and coat

-Powder coat/ Reassemble and tune.
 
These cabs are so weird and goofy I always kinda wanted to try to find one some day almost.
Very cool documentation!
I keep telling myself this is the underwhelming lull.

I have good faith in my powder coater but all my taps will be powder coated too so I’m keeping my expectations low and my Tap and Dye set ready with some thread cutting fluid..

I just need to use my free time to push forward..
 
Sometimes things just take time to do, if you rush through things you may end up causing more troubles haha.
Im sure you will get it setup just how you want!
 
Sometimes things just take time to do, if you rush through things you may end up causing more troubles haha.
Im sure you will get it setup just how you want!
Thanks for the kind words @GeekMan1222

I know the only path to the goal is working towards it!

Small update:

There are only a few pieces left to go to sandblasting and powder coating including the sound amp enclosure and PSU board.

Tackling the sound amp included loosening hex screws in the knobs to remove them and then removing the small nuts to release the pots.

7094-B0-EF-FB8-A-4-EB7-815-B-1-BC2-AC81-E766.jpg


I had to pry the clips holding the small transformers to the amp and then squeeze the tips of the plastic spacers holding the amp pcb above the metal along with unscrewing another transformer from the enclosure. I drew a blueprint of where everything went and screw sizes for reassembly..

8055-A7-EA-2-C19-4-AAC-92-CA-C6-FDD8-C536-B3.jpg

276-D212-E-D610-4-D92-B272-9-CCB6689008-C.jpg


Next was the metal sheet that held the power and filter.

62117624-140-C-47-E3-A0-DD-B352564-E1-DE5.jpg


I carefully diagrammed where each tie was placed removed the pieces as planned.

B96-B94-CE-F3-E7-454-A-AB6-D-0382-CF52-A40-A.jpg


The VERY last piece holding me back from powder coating was the foot rest, and underside of the bottom of the cab.

97-B1-B955-E55-E-407-B-B390-9-EDA0-AD059-CC.jpg


This is where my experience ends and advice is needed.

These screw ends are large and all filled in, melted, or scraped to the point where they can't begin to be removed.

9-ED640-E4-A4-B0-4-F87-A585-C0-EF23-B44-B05.jpg

6116-E20-F-F5-CD-4076-9-DDF-EF16-C6-AB3079.jpg

44-C46-F3-D-9-FA1-4-CFA-B121-7-EB74-AE747-DB.jpg


Gods of ArcadeProjects.com. I ask your advice to advise me to remove these awful screws that are preventing me from finishing this restore!

How do I get these god awful screws off this footplate so I can get some sweet sandblast/powder coat relief from this project?

Thanks and shout out to the arcade moms out there on Mothers Day
 
You could try screw removal pliers, or, if you're going to be replacing the screws in any case, you could dremel a slot in them for a slotted screwdriver.
 
Looks like this would be a really fun restore! Kinda jealous, but also very happy for you.
I’ve always been intrigued with these cabs. I like how they look, but some people think their too wacky.
Looking forward to seeing this all minty!
 
Well enjoy the ride gentlemen, because its gonna get start get getting good after today..

Shout to @djsheep and @nem for giving me to the inspiration to extract these screws.

First I banged the screw heads with a hammer to hopefully detach the threads from the rust, and then grabbed my biggest pair of pliers and grabbed each of them above the washer carefully with my finest death grip

A59-C9-E6-B-A295-4-EED-8494-748727537-D83.jpg


The first screw loosened and the rest were history. Footrest bar begone!

The leg levelers were pretty bad too. Anything on the bottom had a lot of rust in the threads. You can see it where the threads attached rust by looking at the rust trail in the middle of these.

EC0-AAA60-AE4-E-4188-A0-D6-E4-AFD8-F3-CEDA.jpg


Casters were an obvious next with at this point an expected amount of rust in each bolt. I got through it though and kept my cool.

87-F7-C923-B6-FE-456-B-AD6-A-151-D61-BB523-D.jpg


The final piece was this monitor housing. 8 screws and a grunt I was done disassembling the cabinet.

F28585-D1-E160-4548-A271-5-E95-B47-B85-EE.jpg


Im really gonna miss these stickers and art. Especially the Sigma model tag with the kanji stamps on the inside of the JAMMA door. I took overhead scale photos with a quarter in case I could manipulate them back with a sense of scale in the future.

443-A4-DA5-5788-40-ED-9-C03-583-B34504-FB4.jpg

6-E95-E05-A-2452-4407-A37-F-1-B78-C528191-F.jpg

0-D98-E9-A5-81-C2-4026-86-B9-5-B86-A0895694.jpg

D2651198-C75-B-4-C9-F-A146-E26627-AD93-AF.jpg


The next step was time consuming. I photo journaled each wire tie location on every panel, and then then scraped the adhesive and detached each one. I left this photo dump in the spoiler in case anyone finds this thread and can use this info..

3-D35-DE71-8833-4-C4-E-8075-3869810-DC4-E1.jpg

1-A77-BF7-B-0-F86-4-BAD-9-D0-A-DEC245740222.jpg

3-FA5-FB6-F-B3-F5-4-B80-945-A-754726543199.jpg

B5536-C14-BB0-A-483-F-9-A0-C-E2-A895-BA3288.jpg

0-B603672-EAB6-4321-A27-C-24-F728-E32-A0-D.jpg

C6-F8-F19-D-1-DBD-47-B5-9-BFB-C6-FDA768-DE42.jpg

5-E5-AA292-73-DC-4431-8-CAF-275-EAFFCD3-ED.jpg

7171-ADF7-1-A41-4498-9-A1-D-BBA25-FD594-BC.jpg

6-C244390-D950-4-A33-9-B90-830-B3895-BA20.jpg

C604333-D-173-F-441-D-8798-8-B912728-F61-F.jpg

F544-C178-5-EDB-44-EF-8-D16-0-C6654-C3-E49-E.jpg

After sorting into different color piles. This cab is ready for the Powder Coater!

E99-D54-A0-0-AA2-4-B95-A53-A-4-E4-AA418-B0-E7.jpg


Next up: wire baths and air compressors
 
Back
Top