What's new
Fully Recapping the D board stopped the jitter
Partially Recapping the E board meant I was able to dial in the geometry properly
Thank you for this info. I wish I had known the culprit for the jitter 10 years ago. I used to have a stack of BVM F series I got for cheap. Sold them all because I couldn't stand the jitter. I still have one 14F5U left that also has the jitter. At least I know how to fix it now.
 
The ISR (BC) board is next on the list - I need to dump the eproms before they fail, and given how rotten all the SMD caps have been on all the other boards I'll redo those too

IC full list
1652851363986.png


And the digikey cart
IC 31 and 121 are nothing to do with this, but I need them for another project, adding them to the list just in cse
1652851396439.png


I should probably also dump and refresh IC107, IC108 and IC3 while I'm working on this. Of course this being Sony; Why use one EPROM when you can use THREE!!!
IC107 and IC108 = 27C256, these are (weirdly) available new locally, for about $15 each.
IC3 = 28F020P-15, these might be a bit harder to find.
 
This is the full list for the E board and the D board (the D board is the little sub-board that hangs off the E board)
1658397201354.png


I'm still debating if its worth recapping the entire board - this particular monitor has way over 100,000 hours on it, so it's probably overdue...
 
Most of the later model BVM's (1995 onwards) would ship with either a 4:3 mask or a 16:9 mask - The idea is that it would mask off the extra glass if you were displaying a 16:9 picture on a 4:3 tube.
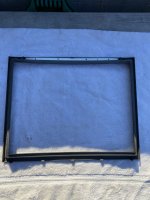
Replacement masks are pretty much unobtanium now. They used to pop up ebay or esty occasionally but those days are long gone. A BVM looks a bit sad without a mask.
IMG_1668.jpeg
So I started work on a 3D model to print a new mask. Mine is a BVM 20E1E, but this should also fit the 20" F and G monitors.

Ill try to do two versions
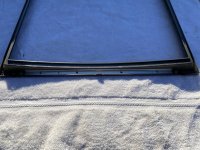
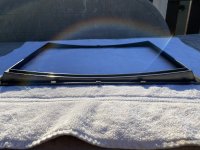
the basic one is just a mask to cover up all the holes, this should be time consuming but straightforward to draw and print. Because the front of my BVM looks so ratty this will be a massive improvement for me.

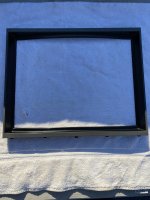
the advanced one will a mask and a bezel - it won't be a recreation of the factory original, too hard to print, but it should be pretty close. Because of the overhangs this is going to be an enormous pain to print, assuming I ever actually finish the design there will be a lot of rework after printing.

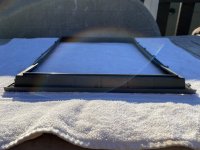
Basic - this is pretty much done. Unfortunately because of the size of my printer I'll have to print it in 6 parts.
Screen Shot 2022-08-01 at 5.57.41 PM.pngScreen Shot 2022-08-01 at 5.57.28 PM.png

Advanced - this actually turned out to be a massive pain - if anyone has any close up pictures (even links to pictures) I'd love to see them. This one is a long way from being printable
Screen Shot 2022-08-01 at 5.58.20 PM.pngScreen Shot 2022-08-01 at 5.56.38 PM.png
 
Nice work so far. This is the first time I've seen someone work on a bezel model for the 20" BVM.

For the advance version, needing to break the part down due to print size may be a blessing in disguise. You could first break it into 4 pieces at the corner/diagonals of the bezel, then further break down each side of the bezel into smaller parts, and print everything vertically (the broken down parts would have a L shaped footprint). That way, minimal supports are required, and you are gluing the part in the same direction as the Z layers. Attaching parts that are aligned by layer is usually pretty clean if the printer/prints are well tuned. Additionally, that sort of print orientation would resolve detail wise much better vs trying to print the bezel flat due to how Z is orientated.

Some challenges/cons I can think of if you follow my suggestion would be:

- The small and narrow part footprint is a challenge for bed adhesion. It may require brims, which will negatively affect quality and increase part cleanup time.
- While printing vertically for detail makes for the best surface finish, it will also massively increase print time compared to printing flat
 
Most of the later model BVM's (1995 onwards) would ship with either a 4:3 mask or a 16:9 mask - The idea is that it would mask off the extra glass if you were displaying a 16:9 picture on a 4:3 tube.

So hype man, I need one of these for my BVM G20.
 
I'm going to call the basic one "done" for now

I've printed and test fitted the critical bits and they fit OK. If someone wants to print the full thing, glue it together, and send any feeback here I'll change the size if required, but it should be OK

Screen Shot 2022-08-02 at 11.48.24 AM.pngScreen Shot 2022-08-02 at 11.48.34 AM.png
 

Attachments

  • BVM mask rev 2 test print required.stl.zip
    7.8 KB · Views: 71
The Advanced one is looking good

Here it is - as close as I can get to the original from photos I found on this internet - if anyone has one that they want to send me for measurements that would really help - but I'm quite happy with this.

The only area that is obviously different from the factory one is the slope on the top and bottom of the mask where they join the curve of the screen. on the factory one there is a slight gradient on this, presumably to make it easier to pull out of the mould. Sketchup does not like joining a slope onto a curve, so in this model those planes are completely flat.

Screen Shot 2022-08-02 at 11.39.52 AM.pngScreen Shot 2022-08-02 at 11.39.21 AM.png

The only problem is that this is going to be extraordinarily hard to print, and also the minor matter that it may not actually fit at all.

My brute force and stupidity method would be to put it face down then fill all the air gaps with slicer generated supports, but the front of the thing will look like a dogs breakfast when those supports come out.
Perhaps it would be possible to sand and paint with automotive primer to fill in all the gaps?

Any thoughts appreciated
 

Attachments

  • BVM mask advanced unprintable rev 4.stl.zip
    17.6 KB · Views: 69
Have fixed the advanced one so it looks as close to factory as I can imagine it. Think I've come up with a way to print it (in many, many pieces) too.

Starting to feel pretty hopeful that this could be possible...
Screen Shot 2022-08-02 at 6.21.16 PM.pngScreen Shot 2022-08-02 at 6.21.48 PM.png
 
1659488291259.png


Looks like JCLPCB can print it in one piece, you reckon it's all good? Might get one made.
 
1659488291259.png


Looks like JCLPCB can print it in one piece, you reckon it's all good? Might get one made.
No, don’t print that one, I’ve still got some work to do to make sure it fits right.

For seventy bucks I want to make sure it’s right first. Reckon I’ve still got a week or so to get it right.

Good to know they can print it tho!
 
No, don’t print that one, I’ve still got some work to do to make sure it fits right.

For seventy bucks I want to make sure it’s right first. Reckon I’ve still got a week or so to get it right.

Good to know they can print it tho!
Awesome, will stay tuned.
 
Hi, amazing work you going here. Do you think this would fit the A series? I have two A20s but only one 4:3 mask. Would like to print a 2nd. Thanks
 
Hi, amazing work you going here. Do you think this would fit the A series? I have two A20s but only one 4:3 mask. Would like to print a 2nd. Thanks
Send a pic of the front and back of the one you have and I'll check it out
 

Attachments

  • 983B9FBC-EE9B-4D10-BBA2-E59E05E70C1A.jpeg
    983B9FBC-EE9B-4D10-BBA2-E59E05E70C1A.jpeg
    174 KB · Views: 102
  • 36A1FEEC-9302-4A91-9746-324AB8687A11.jpeg
    36A1FEEC-9302-4A91-9746-324AB8687A11.jpeg
    270.4 KB · Views: 75
  • 2953CAC2-68F3-4EFA-BB36-629D5627C410.jpeg
    2953CAC2-68F3-4EFA-BB36-629D5627C410.jpeg
    201.4 KB · Views: 73
  • D6F80FA6-6696-44B6-BCAC-5DF1F7BCEC8B.jpeg
    D6F80FA6-6696-44B6-BCAC-5DF1F7BCEC8B.jpeg
    230.5 KB · Views: 79
  • 32389848-D64B-48A2-8FBE-64B288BFF331.jpeg
    32389848-D64B-48A2-8FBE-64B288BFF331.jpeg
    233 KB · Views: 80
Looks exactly the same mounting hardware and dimensions as the E1E that I’m modeling off. If it fits mine it will fit yours. Sweet!
Setting realistic expectations here, I do not have an original mask to model off, so my copy is going to be slightly differrnt.
 
Looks exactly the same mounting hardware and dimensions as the E1E that I’m modeling off. If it fits mine it will fit yours. Sweet!
Setting realistic expectations here, I do not have an original mask to model off, so my copy is going to be slightly differrnt.
Cool! If you need any more pics or measurements let me know. Im happy to help.

I have this cheap caliper if it can help.
https://www.amazon.com/gp/product/B001AQEZ2W/
 
Last edited:
@pbjr Yes please, that would really help me out.

Specifically I'm interested in how fat the front faces of the bezel are - I've tried to draw some green lines to show what I mean. The sides, top and bottom. At the moment the sides are 9mm and the top/bottom are 19mm - how does that compare to the real thing?
Screen Shot 2022-08-04 at 8.02.51 PM.png

Overall starting to feel good - think I've found a way to split the model up and make it printable on my printer at home - Then when I've confirmed the sizing is right I might splash the cash as @Nimmers suggested and add to my next PCB order.
Screen Shot 2022-08-04 at 8.02.24 PM.pngScreen Shot 2022-08-04 at 8.01.35 PM.png

Also, if anyone knows anything about painting for 3D printed stuff now would be the time...
 
Back
Top