You are using an out of date browser. It may not display this or other websites correctly.
You should upgrade or use an alternative browser.
You should upgrade or use an alternative browser.
- Thread starter TodoRojo
- Start date
Got parts back from paint today. The finish is great. I’m really happy with it! I started assembling tonight and I’m documenting every step. It’s taking probably three times longer to get it done; hopefully it’ll be of value.


Slowly but surely!
A note to potential restore-ers: The powder coat on the doors has indeed made it a bit difficult to fully lock the doors. Although I absolutely love the powder coat and I'm glad I did it; it has made reassembly just a bit tricky. I got the doors to the point where they close fine now, but it wasn't as easy as "screw them in tight and move on." If I re-do my other cab, I'll probably stick with painting for everything just for less fuss on the doors. I will be sad to miss out on the durability of powder coat, though!
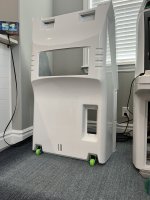
Got the ol' green wheels on:
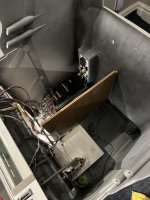
A picture of the inside. I haven't put new cable ties in yet -- hopefully I don't kick myself for not doing that before putting the two halves together . It's crazy how clean it looks (and smells!) It's like having a brand-new cabinet.
I have been asked why I didn't paint the inside. This may sound like a weird reason; but I really want this to be as close to original as it can be. Although it has been repainted, I wanted it to still have that same feel when you're inside the cab. I do love when the inside is white because it feels brighter inside and smooth, though. Different strokes I guess.
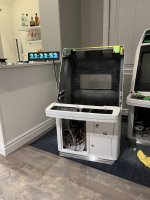
Once I had the halves together, I put the top mounting bracket on. I held off on the lower one to keep it easy for me to manage the cables. Put the control panel on top to get a pic.
Put the CP together, took some pictures . @alberto1225's panels sure glow beautifully. I was also able to salvage the original Instruction Sheet so I put that back in there. It's a little wavy from spilled drinks, but it looks great anyway.
New ¥100 from @hursit . Looks absolutely amazing. I was super nervous putting this in place, but it dropped in perfectly. Today I'll be tackling the Astro City stickers which I also purchased from him. I'm nervous for that. If you have any tips -- I'd love to hear them!
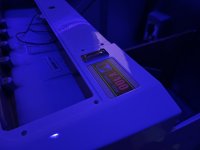
A note to potential restore-ers: The powder coat on the doors has indeed made it a bit difficult to fully lock the doors. Although I absolutely love the powder coat and I'm glad I did it; it has made reassembly just a bit tricky. I got the doors to the point where they close fine now, but it wasn't as easy as "screw them in tight and move on." If I re-do my other cab, I'll probably stick with painting for everything just for less fuss on the doors. I will be sad to miss out on the durability of powder coat, though!
Got the ol' green wheels on:

A picture of the inside. I haven't put new cable ties in yet -- hopefully I don't kick myself for not doing that before putting the two halves together
I have been asked why I didn't paint the inside. This may sound like a weird reason; but I really want this to be as close to original as it can be. Although it has been repainted, I wanted it to still have that same feel when you're inside the cab. I do love when the inside is white because it feels brighter inside and smooth, though. Different strokes I guess.

Once I had the halves together, I put the top mounting bracket on. I held off on the lower one to keep it easy for me to manage the cables. Put the control panel on top to get a pic.

Put the CP together, took some pictures

New ¥100 from @hursit . Looks absolutely amazing. I was super nervous putting this in place, but it dropped in perfectly. Today I'll be tackling the Astro City stickers which I also purchased from him. I'm nervous for that. If you have any tips -- I'd love to hear them!

Thank you!Looking fantastic! What did you/the powder coaters do to clean the inside?
I did the cleaning on these for the most part. The powder coaters sand-blasted the pieces I gave them. I think one page 3-4 I have some pictures of cleaning; but to give you an idea...
We have a dog-run in our basement which used to be the back patio. It has been enclosed and a French-drain was installed so it's a pretty perfect place to clean and sand etc. Once the pieces were all apart I got the really thick dirt in the bottom of the cab with a few rags and some general purpose cleaner. The fiberglass really isn't easy to clean with rags though because it's so rough, so after that I got some brushes (like the ones you use to clean your tub or sink) and took all the pieces down to the dog-run. I soaked everything in simple green and started scrubbing lightly. That did the trick for the tough spots, then I just had to hose it down. I then followed up with an air compressor to clean out all the screw holes and hard-to-reach areas.
To prep for paint I used a combination of sandpaper and soda blasting, then hosed down and wiped with IPA.
One warning: my cab had some flaking paint (it's pretty clear mine was in a humid area) and the hose / air compressor blew a bunch of the old paint off. Fine since I was planning to repaint, though it would've been sad if I wasn't.
Nice, thanks for the info! Yeah, I've been following this thread, you've put a lot of effort into these. Sounds like the process I've been following to clean the inside of my Blast, I think it needs a few more sessions before the dirt and smell aren't too noticable.Thank you!
I did the cleaning on these for the most part. The powder coaters sand-blasted the pieces I gave them. I think one page 3-4 I have some pictures of cleaning; but to give you an idea...
We have a dog-run in our basement which used to be the back patio. It has been enclosed and a French-drain was installed so it's a pretty perfect place to clean and sand etc. Once the pieces were all apart I got the really thick dirt in the bottom of the cab with a few rags and some general purpose cleaner. The fiberglass really isn't easy to clean with rags though because it's so rough, so after that I got some brushes (like the ones you use to clean your tub or sink) and took all the pieces down to the dog-run. I soaked everything in simple green and started scrubbing lightly. That did the trick for the tough spots, then I just had to hose it down. I then followed up with an air compressor to clean out all the screw holes and hard-to-reach areas.
To prep for paint I used a combination of sandpaper and soda blasting, then hosed down and wiped with IPA.
One warning: my cab had some flaking paint (it's pretty clear mine was in a humid area) and the hose / air compressor blew a bunch of the old paint off. Fine since I was planning to repaint, though it would've been sad if I wasn't.
God almighty, it is finally done.

Friday and Saturday were the final touches.
Got the surround and billboards installed. The surround is the one piece I didn't do much with beyond a polish. I may bondo it and repaint... but I also have my eye on YAJ.
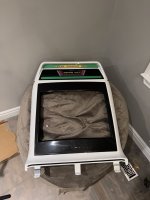
I used some pictures from before paint to place all the cable ties where they were from the factory. I wish I could've found the same beige that Sega used, but these black ones will do just fine.
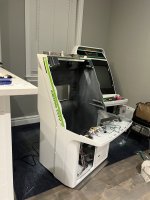
Some testing! This was after swapping around PSUs. The whole story is this: A few months back, I purchased a PSU and Amp from YAJ which I set aside for this cab. I recapped the PSu and Amp and then did some small testing with them, but didn't use them extensively. The PSU that came in the cab was actually in OK shape, so I recapped it and immediately put it into my other Astro. I've been using that one for a few months now.
When I started up the power supply (nothing connected, of course) I noticed a small buzzing noise. I checked all the voltages and everything was fine except for -5v. I tried replacing IC3 and the buzzing persisted and the -5v didn't change. The buzzing seems to be going from L2 (the large inductor). I have bid on a new PSU on YAJ in hopes that I can win it and harvest the inductor. That said; the PSU works ok. It's currently in my other Astro and running a MiSTerCade. I figure if it blows up I'd rather lose a MiSTerCade than a board that isn't currently being made.
After I swapped the good PSU into the new-er cab, I tested and it was working great!
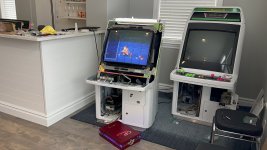
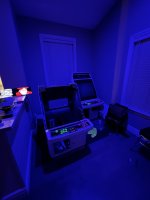
Finally.... my arcade is READY!

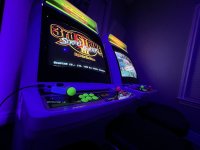
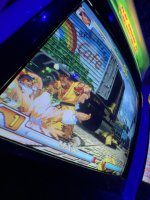
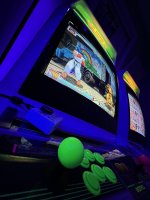
What a fucking JOURNEY this has been. I really didn't expect to sink as much money into this (or time) as I did; but I'm really happy with the end result. I did the best I could to keep things as close to original as I could (stickers are on the way, by the way!) and I think it came out great. I will be posting a long-format video of my entire re-build sometime this week. I have 160 videos to organize and edit into a video out of clips I took while I put the machine together. I detailed every piece of it. I hope that this helps others out as much as the community has helped me!
A lot of people made this result possible, and there are likely people I'll miss here so I apologize if I miss ya!
@GeekMan1222 @ShootTheCore @FluxChiller @Softdrink @hursit @Lemony Vengeance @misteraddons @Ajax @kyletwentytwo @imbord3rlin3 @alberto1225 @AlxUnderBase @djsheep @hyp36rmax @joeks @opt2not @Aurich... the list very likely goes on. Thank you to everyone that has helped me reach my goal here.
I may restore another cab one of these days; but that was a metric shit-ton of work. For now, I'm just gonna play some damn games!
Friday and Saturday were the final touches.
Got the surround and billboards installed. The surround is the one piece I didn't do much with beyond a polish. I may bondo it and repaint... but I also have my eye on YAJ.

I used some pictures from before paint to place all the cable ties where they were from the factory. I wish I could've found the same beige that Sega used, but these black ones will do just fine.

Some testing! This was after swapping around PSUs. The whole story is this: A few months back, I purchased a PSU and Amp from YAJ which I set aside for this cab. I recapped the PSu and Amp and then did some small testing with them, but didn't use them extensively. The PSU that came in the cab was actually in OK shape, so I recapped it and immediately put it into my other Astro. I've been using that one for a few months now.
When I started up the power supply (nothing connected, of course) I noticed a small buzzing noise. I checked all the voltages and everything was fine except for -5v. I tried replacing IC3 and the buzzing persisted and the -5v didn't change. The buzzing seems to be going from L2 (the large inductor). I have bid on a new PSU on YAJ in hopes that I can win it and harvest the inductor. That said; the PSU works ok. It's currently in my other Astro and running a MiSTerCade. I figure if it blows up I'd rather lose a MiSTerCade than a board that isn't currently being made.
After I swapped the good PSU into the new-er cab, I tested and it was working great!

Finally.... my arcade is READY!


What a fucking JOURNEY this has been. I really didn't expect to sink as much money into this (or time) as I did; but I'm really happy with the end result. I did the best I could to keep things as close to original as I could (stickers are on the way, by the way!) and I think it came out great. I will be posting a long-format video of my entire re-build sometime this week. I have 160 videos to organize and edit into a video out of clips I took while I put the machine together. I detailed every piece of it. I hope that this helps others out as much as the community has helped me!
A lot of people made this result possible, and there are likely people I'll miss here so I apologize if I miss ya!
@GeekMan1222 @ShootTheCore @FluxChiller @Softdrink @hursit @Lemony Vengeance @misteraddons @Ajax @kyletwentytwo @imbord3rlin3 @alberto1225 @AlxUnderBase @djsheep @hyp36rmax @joeks @opt2not @Aurich... the list very likely goes on. Thank you to everyone that has helped me reach my goal here.
I may restore another cab one of these days; but that was a metric shit-ton of work. For now, I'm just gonna play some damn games!
ShootTheCore
Legendary
Congratulations on wrapping up the restoration-it’s gorgeous!
Haha a man of culture, I see! Thanks much.Congrats! Time to crack open that Blantons
Congratulations on wrapping up the restoration-it’s gorgeous!
Thanks to you both. Thanks for everything you've provided and done to help!Congratulations
i have to start very soon to restorate my cabinets too
FluxChiller
Professional
Quality work man! I am a in the weeds guy on details and you took it it up a level.

FluxChiller
Professional
Wet sand the inside, the the first few layers of fiberglass will hold the most odor, getting rid of those first few layers will make a big difference. Be sure to wet sand so you dont breath in nasty dust. I op'td to then paint over top of that.. but that's optional.Nice, thanks for the info! Yeah, I've been following this thread, you've put a lot of effort into these. Sounds like the process I've been following to clean the inside of my Blast, I think it needs a few more sessions before the dirt and smell aren't too noticable.
FluxChiller
Professional
What stickers do you have left to apply? I recently replaced my reproduction side art with Hursit's and they are awesome. Large decal applications always give me anxiety but using a fine mist spray bottle of water and dawn has made that process much easier on my nerves.
I may have missed it, how did you restore the metal kick plate? Thats one piece of mine I'm not happy with.
Can you tell me more about soda blasting? I have used it on small scale for scale modeling with an airbrush, but not at a large scale for something like this. What parts etc do you need?
I may have missed it, how did you restore the metal kick plate? Thats one piece of mine I'm not happy with.
Can you tell me more about soda blasting? I have used it on small scale for scale modeling with an airbrush, but not at a large scale for something like this. What parts etc do you need?
Thanks so much!Quality work man! I am a in the weeds guy on details and you took it it up a level.
Stickers: I need most of the labels for the back like the jamma cert and stuff. I just got some serial number stickers from GateNinety but they printed the wrong serial so I have to contact them. I thought about doing the same for applying the large decals but my wife and I got them on together without too much fuss. They actually came off pretty easy as long as we didn’t really push them down so I could peel back a bit if needed.What stickers do you have left to apply? I recently replaced my reproduction side art with Hursit's and they are awesome. Large decal applications always give me anxiety but using a fine mist spray bottle of water and dawn has made that process much easier on my nerves.
I may have missed it, how did you restore the metal kick plate? Thats one piece of mine I'm not happy with.
Can you tell me more about soda blasting? I have used it on small scale for scale modeling with an airbrush, but not at a large scale for something like this. What parts etc do you need?
Kick plate: that thing SUCKS lol. Lots of heavy cleaning polish and then medium cut polish. Lots of scrubbing. Elbow grease was necessary so prepare your shoulder lol. It’s still not where I want it, but I need to get a belt sander or something. The polish helped a LOT; though sanding all the scratches away and reapplying the brush look will be a future project.
Soda blasting is awesome! All you really need is the baking soda and the hopper thing — I got both at harbor freight. I think it’s 1-3 pages back that I posted the links — , and a compressor with a hose / standard attachment. Basically you blast baking soda at 80psi or so and it strips away the paint and leaves the fiberglass in tact. If you have a weak compressor it takes a while, but worth it for getting the tight spots. If you have a big enough compressor you could strip paint from the entire thing no problem.
Small updates today:
Won a new PSU so I’ll be able to swap parts into mine and fix the buzzing. That makes me happy!
My YouTube video is up. I’ll post it when I’m done time stamping it.
FluxChiller
Professional
Getting the rust stains out of plastic can be a bitch, curious on what method you used. I am working on a yaton refugee konami windy right now that was stored outside for much of its life, its rough, got alot of this to deal with.
Simple green and scrubbing. Also sanding. Since I knew I’d be repainting I wasn’t afraid to lose some plastic. If I wasn’t repainting I probably would’ve sanded it off and then get back to a shine with these pads from woodcraft https://www.woodcraft.com/products/micro-mesh-pen-sanding-kit
Getting the rust stains out of plastic can be a bitch, curious on what method you used. I am working on a yaton refugee konami windy right now that was stored outside for much of its life, its rough, got alot of this to deal with.
It is also an elbow grease item
FluxChiller
Professional
I hear ya, I know that all to well. Was hoping for a less manual solution lolSimple green and scrubbing. Also sanding. Since I knew I’d be repainting I wasn’t afraid to lose some plastic. If I wasn’t repainting I probably would’ve sanded it off and then get back to a shine with these pads from woodcraft https://www.woodcraft.com/products/micro-mesh-pen-sanding-kit
It is also an elbow grease item
Alrighty, here is the assembly video. I have added time stamps and a few links. I may add more as I think about it but I'm sick of staring at the computer for now 
I hope it is helpful to any would-be candy cab owners or restorers!
View: https://www.youtube.com/watch?v=EQzhdFYszV0

I hope it is helpful to any would-be candy cab owners or restorers!

