What's new
Man this is great to see. I have windy 1 in about the same shape as yours, a yaton special that spent alot of its life outside. Abused, then rusted to hell, then a really shitty yaton rattle can paint to "fix it up" before sending it over to the US. Tube is scratched to hell.


I had to back burner the project and its still in a million pieces on the bench but its next on the list. I got a small start on a few things. Paint is gonna be handled at a pro shop, the pearl adds another layer of expertise that i dont have.

I did get the tube frame/handles rust free and polished :)
Oof, yeah you got some rust to remove. I was lucky that this cab didn’t have that much.

Hope this thread helps motivate you to get ramped up on your windy 👍
 
I'm in the midst of a pony mark IV restore. I'm curious about the results on how the painting comes out. I'm indecisive on what I want to do right now lol
 
Oof, yeah you got some rust to remove. I was lucky that this cab didn’t have that much.

Hope this thread helps motivate you to get ramped up on your windy 👍
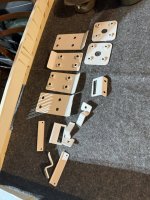
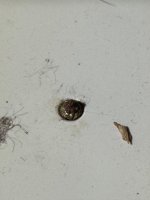
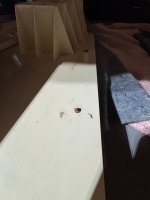
Got most of the rust removed then painted. My big pain point is similar to what you or others mentioned above. I had so much rust during disassembly I broke off quite a few screws, like totally the heads are gone and now just the heavy rusted shafts are stuck down in the brass inserts. I bought a screw removal tool, but they are so tiny, I dont want to crack the plastic and even after that i for sure am going to need to replace those brass inserts, no idea where to source them.

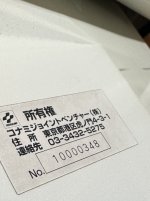
Whats your serial, just curious. My girl has been around!
 

Attachments

  • IMG_6427.JPG
    IMG_6427.JPG
    279.3 KB · Views: 67
  • IMG_6428.JPG
    IMG_6428.JPG
    141.4 KB · Views: 66
  • IMG_6429.JPG
    IMG_6429.JPG
    111.5 KB · Views: 66
  • IMG_6430.jpg
    IMG_6430.jpg
    267.3 KB · Views: 71
Last edited:
I'm in the midst of a pony mark IV restore. I'm curious about the results on how the painting comes out. I'm indecisive on what I want to do right now lol
The Pony Mk IV is not pearlescent, right?

Normally I would just use Gloss White Enamel rattle can, 3 coats with wet sanding in between (starting with 180 grit sandpaper, then progressing to finer grit with each coat). If I were restoring a Pony I’d probably go that route.

this is the first time for a restoration that I’m considering a professional paint job because of the 3-step pearlescent finish.

Got most of the rust removed then painted. My big pain point is similar to what you or others mentioned above. I had so much rust during disassembly I broke off quite a few screws, like totally the heads are gone and now just the heavy rusted shafts are stuck down in the brass inserts. I bought a screw removal tool, but they are so tiny, I dont want to crack the plastic and even after that i for sure am going to need to replace those brass inserts, no idea where to source them.

Whats your serial, just curious. My girl has been around!
The inserts can be easily found at somewhere that carries metric hardware. I’m not sure where you are, but we have Ace Hardware here in cali, and I’ve been able to find most of my missing screws and fasteners for arcade cabs.

Here’s my serial #
IMG_2902.jpeg


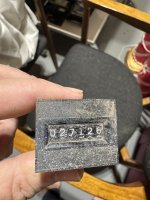
What’s your coin counter at?
Mine has seen some plays.
IMG_2863.jpeg
 
The Pony Mk IV is not pearlescent, right?

Normally I would just use Gloss White Enamel rattle can, 3 coats with wet sanding in between (starting with 180 grit sandpaper, then progressing to finer grit with each coat). If I were restoring a Pony I’d probably go that route.

this is the first time for a restoration that I’m considering a professional paint job because of the 3-step pearlescent finish.


The inserts can be easily found at somewhere that carries metric hardware. I’m not sure where you are, but we have Ace Hardware here in cali, and I’ve been able to find most of my missing screws and fasteners for arcade cabs.

Here’s my serial #
IMG_2902.jpeg


What’s your coin counter at?
Mine has seen some plays.
IMG_2863.jpeg
 

Attachments

  • IMG_6431.jpeg
    IMG_6431.jpeg
    204.6 KB · Views: 66
Worth a shot cheap lol

If your gonna go that route, use duplicolor, super white 2 is a good choice. Get a dedicated spray top with a trigger, they are cheap, the stock tips are garbage for any of the cans. Will make it come out way better.
 
Normally I would just use Gloss White Enamel rattle can, 3 coats with wet sanding in between (starting with 180 grit sandpaper, then progressing to finer grit with each coat). If I were restoring a Pony I’d probably go that route.

this is the first time for a restoration that I’m considering a professional paint job because of the 3-step pearlescent finish.
So you already know my thoughts on the more hardcore route lol.

But, that said, you can get pearl white in rattle cans. Might be worth at least picking up a can to test it, $12 could end up saving you a lot of other money. Standard brands like Rusto and Duplicolor do them, and the Duplicolor one is even meant to be a "car finish" as far as appearance.
 
I'm sure you've seen it, but in case you haven't, there's a really nice windy restore on arcade otaku. It looks like they got a really good paint match so it would be worth reaching out to get the paint code!
Oh I missed that, it's a Neo Gold restore too. Nice.

https://forum.arcadeotaku.com/viewtopic.php?t=45412

He took the aforementioned 'hardcore' route, he's painting with a full size gun (the Devilbiss he mentions), and clearly has a beefy compressor to back it up. As he says in the thread:

Remember...this is a three stage paint...so 1 - Base colour- 2- Actual Pearl- 3- 2k clear-coat...then buff if you wish. i was happy with the shine anyway 'factory'

@opt2not and I have talked about this outside the forum, it's a whole other journey. If you're going to do more restores or projects of this nature though it really does offer you a lot of possibilities vs rattle cans. Including doing a proper 2K clear to finish it off. But you're talking several hundred dollars of equipment minimum, and space to store the compressor. And 2K clear is nasty stuff, you 100% need proper PPE.

I have a smaller gun, and smaller compressor, which aren't as ideal for something this large, but would still work fine with just a little more spray time. If anyone is interested I can give more details, but I won't derail the thread further.
 
Thanks friends!

Yeah I’ve been reading through all the great Windy restore threads on various sites, the AO thread is fantastic. 👍

@Aurich is right, one of the things we talked about was diving into getting a proper paint gun setup. I have been considering it for the future as it would come in handy for various projects.
Though, for this project I think I’m going to let a pro handle the 3-step paint process.
That process is intimidating af, and I think I’d rather “cut my teeth” on a smaller more controlled project to learn how to do this kind of painting.
My ongoing Sega driving cab project for example would be the right project for it. That cab has some smaller plastic side pieces that I want to give a hot rod red finish to.
 
That process is intimidating af, and I think I’d rather “cut my teeth” on a smaller more controlled project to learn how to do this kind of painting.
Yeah, totally fair!

The other thing about the bigger scale stuff is look at his pics, he's set up a whole paint booth. That takes space, and if it's outside you gotta factor in weather and temperatures. So as much as I do think it's a cool idea I will freely admit that I'd struggle with the scale of it. Look at the size of my paint booth lol:

IMG_3733.JPG


Not exactly going to fit a cab in there. 😂

I'm enthusiastic about the DIY and learning parts, but it's a lot to bite off.
 
I'm really liking this restoration project. It reminds me a lot of the one I made to my Astrocity, during the covid confinement. There's something I've never fixed on it, and that's a small crack just below the control panel. It's basically where they all break. Surely people would sit on the contro panel to watch their friend play.

I painted the cabinet with a gun, but I didn't know what to do with the slit. Seeing the repairs you made to his windy, maybe it's time to face that unsolved problem and use some of your techniques to fix it. Do you recommend some epoxy with metal mesh? It's a slight crack, but it could get bigger over time.

I'm upset that i didn't fix it before I painted it, but with confinement, I had to do it all at home in my garage and I didn't really have the skills to face that problem.
I can't wait to see your next steps in restoration
:) :) :) :)
 
Yeah, totally fair!

The other thing about the bigger scale stuff is look at his pics, he's set up a whole paint booth. That takes space, and if it's outside you gotta factor in weather and temperatures. So as much as I do think it's a cool idea I will freely admit that I'd struggle with the scale of it. Look at the size of my paint booth lol:

IMG_3733.JPG


Not exactly going to fit a cab in there. 😂

I'm enthusiastic about the DIY and learning parts, but it's a lot to bite off.
This is the way.
 
I'm enthusiastic about the DIY and learning parts, but it's a lot to bite off.
For those who don’t know, Aurich is a DIY master.
He’s got all the awesome hardware to make whatever he wants! Naturally I go to him for advice 😉

Do you recommend some epoxy with metal mesh? It's a slight crack, but it could get bigger over time.
I would definitely reinforce that crack with mesh. I’d also likely use bondo for filling if the crack is big enough. This putty stuff is nice for holes but not really for cracks. Unless there’s a large space missing.
But yeah, mesh + epoxy is a good idea.


Today was monitor servicing day. I recapped the entire chassis and neck-board, including the B+ filter cap and I also replaced the HOT.

IMG_3628.jpg
IMG_3631.jpg


Pretty lil' Nichicon caps.
IMG_3629.jpg


While I was recapping I noticed some oxidation on the Vertical deflection IC.
IMG_3615.jpg


Pulled it. Yep, it's pretty oxidized. I got new one on order I'll put in once it arrives. Can't be too careful with oxidation on components.
IMG_3627.jpg


I replaced the HOT with this one:
IMG_3625.jpg

Slightly beefier HOT, more robust, higher rated also:
Description
FJL6920 High Voltage Color Display Horizontal Deflection Output Transistor HOT. TO-264 Package with BCE on this NPN triple diffussed planar silicon transistor. This HOT can be used to replace most TO-247 and TO-264 High Output Transistors in most arcade monitors. This FJL6920TU can replace the following 2SC5149, 2SC5589, 2SC4542, 2SC5150, 2SC5144, 2SC5411, 2SC3686, 2SC3688, 2SC4692, BU2532AL, BU2520AX, BU2520AW, BU4530AL, 2SC4769, 2SC5296, 2SC5297, 2SC5302, 2SC5584, 2SC5588, 2SC5143, 2SC5387, 2SC3997, 2SC5552, 2SC4288A, FJAF6808D, J6808D, FJL6820 and many others. The FJL6920 is an Vceo 800V and Ic 20A and is a very reliable and robust HOT since it’s amperage rating is about twice as high as most monitors require.

Once I recap and service the PSU, I'll fire this up on the monitor and see if my work turned out well.
 
Great job so far! I can't wait to see what you do with the scratches on the CRT glass as I have two with the same issue.
 
For those who don’t know, Aurich is a DIY master.
He’s got all the awesome hardware to make whatever he wants! Naturally I go to him for advice
And yet, of the two of us, who has cabs with 'patina' and who has minty clean restores? 😂

Also, I badly need to recap my Windy chassis, I've had the caps for like 2 years and just haven't made the time. You're making me feel bad now lol.
 
Great work on the restoration Gilly. I wish you had YouTube page to document it all for a visual archive? But I understand YouTube videos are a beast in itself to make/edit.
 
Back
Top