It looks like the current version of the prog board conflicts with some tabs in the cartridge, so it will take at least one more revision before I can make them generally available. But here are the build instructions I've got so far.
Instructions:
You need:
3x 27c322 EPROMs
2x GAL16V8 (I bought ATF16V8B-15PU-ND digikey.co.uk/short/pjvhzq but any brand should work.)
5x 0.1uF capacitor
2x 10uF capacitor (electrolytic, 16V, though anything higher should work as well. The capacitance doesn't need to match exactly, either.)
1x 100 Ohm Resistor
2x 10k Ohm resistor array 8 res 9 pin
Optional:
3x 42 pin socket (Advisable!)
2x 20 pin socket (Advisable!)
3x jumper pin header + jumper
1x an on/off switch of your choice (if you want to switch banks frequently)
Soldering:
All chips are in the area of the cartridge that allows sockets, so it is highly advisable to place all chips in sockets. Especially if you want to try different games, or different game revisions.
The jumpers are optional, but you can connect an on/off switch to JP2 if you want to switch ROM banks frequently. Make sure you install the resistor array the right way around. (Pin 1 is marked with a dot, you can verify with your voltmeter switched to Ohm: Pin 1 to any other pin should be 10k, any other pin to any other pin should be 20k.)
ROM files:
If you use the python script to generate the ROM images you need to burn "P1", "T1" and "T2", and put them into the corresponding sockets. The "Ketusi TRAP" ROM contains the unmodified game in bank 0 and the modified game in bank 1.
If you don't use the script you'll need to identify the program ROM and the tile ROM from the Mame driver source. The program ROM goes into P1, the tile ROM needs to be split in half for T1 and T2. Espgaluda and Ketsui are not encrypted. DoDonPachi needs to be decrypted before it can be used.
The Ketsui ROM in the Mame set is in the second bank, so the middle jumper needs to be set.
PAL files:
For U6 there is only one choice, as all games have the same tile ROM mapping. For U5 you've got three choices: A generic PAL that supports all games, the U5_DDP version that is used for DoDonPachi, and the U5_ESP version that is used for Espgaluda and Ketsui.
The file with the extension ".jed" is written onto the chip, the file with the extension ".pld" contains the input equations and can be compiled with WinCUPL.
Installation:
Double check that you don't have a short circuit, and that all chips are oriented correctly. If you use sockets make sure both the socket and the chip are oriented correctly. Sometimes a leg can "fold up" while it is inserted into the socket, especially if it is badly aligned.
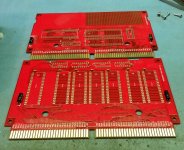
The program board is the upper board, and the components need to face up. Double-check against an original cartridge before switching on.
If you check with a continuity tester between +5V and GND, there should be no continuity, other than a short "blip" as the capacitors are charged or discharged.
If you use the generic U5 PAL and DoDonPachi you need to place a jumper on JP1.
If you burned the "Trap" version of Ketsui you need to place a jumper into JP2 to select the trap version.
Version 1 of the program board will not fit into an unmodified cartridge. You should be able to break off the tabs that are in the way, or just wait for revision 1.1 which fixes the problem.
Troubleshooting:
- game doesn't boot:
- check for solder bridges on PAL U5, the EPROM P1 and the resistor array
- check that the P1 ROM contains valid data (verify in the EPROM programmer against the input data)
- if you're planning to run DoDonPachi, make sure you use an unencrypted version. There should be some IGS PGM GAME SYSTEM text near the start. (Low and high bytes are switched, so letters are swapped.)
- Make sure the resistor array is installed the right way around. Pin 1 is marked with a dot.
- if you see the PGM BIOS logo but then go into the test menu:
- make sure that you're running DoDonPachi
- make sure the 100 Ohm resistor is installed
- if you want to run Ketsui or Espgaluda make sure you use the U5_ESP PAL or leave JP1 open with the generic PAL
- if you see a screen of random noise:
- make sure that you're running Ketsui or Espgaluda
- make sure the 100 Ohm resistor is installed
- if you want to run DoDonPachi make sure you use the U5_DDP PAL or close JP1 with the generic PAL
- graphics corrupted:
- the text during the initial legal screen and the scrolling ground textures are produced by the T1 and T2 ROMs
- check for solder bridges on PAL U6 and the EPROMs T1 and T2
- check that the T1 and T2 ROMs contain valid data (verify in the EPROM programmer)
- check that the U6 pal contains valid data/the correct JED file
- the title screen for Ketsui and ESPGaluda and all sprites are rendered by the A1-A4 ROMs and the B1 and B2 ROMs
- check for solder bridges on the EPROMs, U11 and U10. Check that U11 and U10 contain the correct chips: U10 should be 74LS139 and U11 should be 74LS138. (On U10 pin 9-16 are used for address decoding, double check for short circuits and dodgy connections)
- check that the ROMs contain valid data
- if your EPROM programmer contains a chip tester, check that U10 and U11 are working correctly
- missing parts of the graphics point more to problems with B1 and B2
- corrupted graphics point more to problems with A1-A4
- music missing/wrong sounds:
- sounds are contained in the M1 ROM
- check that the M1 ROM contains valid data
- check for solder bridges on M1, U8, U9 and U10 (On U10 pin 1-8 are used for address decoding, double check for short circuits and dodgy connections)
- if you use revision 1 of the char board check that you swapped pin 2 and 3 of U10
- if your EPROM programmer contains a chip tester, check that U8, U9 and U10 are working correctly.
If you get open flames use a fire extinguisher, then hide the evidence.
If that doesn't work I'm stumped. Those are the things I would try. Double-check for solder bridges and dodgy chips.
I can always jazz it up latter...
")