CURRENT PRICING
Full System 24 Multi
$225.00 w/eproms
$205.00 w/o eproms
Repro Floppy Controller $150.00
Important information:
Games aren't preloaded in the multi, users must download romsets by themselves then burn the eproms.
1) (Long) Introduction
This System uses either floppies or romboards to load games or both for Bonanza Bros.
It's not JAMMA but a System 16 to JAMMA adapter works fine.
It's mid-res, thus 24kHz.
The multi kit allows to play all floppy based games, included encrypted ones which I have decrypted, from a floppy emulator device.
Romboard based games are supported on a daughterboard that plugs in any romboard, whatever the security chip installed (but one must be present as it's also used for bank switching). Romboard based games have been patched to circumvent the protection.
Supported games from the floppy emulator:
- Bonanza Bros (W), patched - requires a romboard too
- Crack Down (W), decrypted
- Dynamic Country Club (U), decrypted
- Gain Ground (W), decrypted
- Hot Rod (Turbo 3P, W, set 2) - requires analog I/O board to boot
- Hot Rod (4P, J, rev C) - requires analog I/O board to boot
- Quiz Syukudai wo Wasuremashita (J), decrypted
- Rough Racer (J), decrypted - requires analog I/O board to boot
- Scramble Spirits (W)
-Jumbo Ozaki Super Masters Golf (W), decrypted
Supported games from the romboard:
- Bonanza Bros, patched - requires the floppy controller too
- Quiz Ghost Hunter, patched
- Quiz Mekurumeku Story, patched
- Quiz Rouka ni Tattenasai, patched - requires 3/4p I/O board to boot
- Tokoro San no MahMahjan, patched
- Tokoro San no MahMahjan 2, patched
- Dynamic Country Club (W), patched
To enjoy the whole library you need:
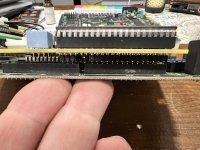
- A motherboard with a standard 68000 CPU installed for the second CPU, if the FD1094 is installed like in the picture below, pull it and install a standart 68000 CPU (original one is rated 10Mhz)

- a floppy controller (plugs underneath the motherboard), with cables of course (data and power):


- a romboard (plugs on top of the motherboard):

- Also some games require extra hardware for controls:
* 834-6510 analog I/O board for Hot Rod and Rough Racer

* 3/4p I/O board (plugs on the smaller connector of the motherboard just like on System 18 or 32) for Quiz Rouka ni Tattenasai
* and probably some specific hardware for the mah-jong games
With a motherboard and the floppy controller you can play:
- Crack Down (W), decrypted
- Dynamic Country Club (U)
- Gain Ground (W), decrypted
- Hot Rod (Turbo 3P, W, set 2) - requires analog I/O board to boot
- Hot Rod (4P, J, rev C) - requires analog I/O board to boot
- Quiz Syukudai wo Wasuremashita (J), decrypted
- Rough Racer (J), decrypted - requires analog I/O board to boot
- Scramble Spirits (W)
-Jumbo Ozaki Super Masters Golf (W), decrypted
With a motherboard and a romboard you can play:
- Quiz Ghost Hunter, patched
- Quiz Mekurumeku Story, patched
- Quiz Rouka ni Tattenasai, patched - requires 3/4p I/O board to boot
- Tokoro San no MahMahjan, patched
- Tokoro San no MahMahjan 2, patched
- Dynamic Country Club (W), patched
With a motherboard, a floppy controller and a romboard you can play all listed games above plus Bonanza Bros.
2) How to install
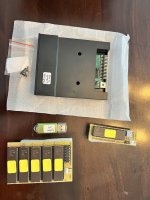
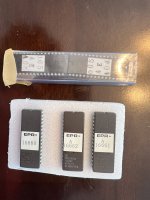
The kit is composed of:
- a USB floppy emulator with upgraded firmware
- a USB stick
- a small board that plugs in the motherboard
- a bigger board that plugs in the romboard or a complete custom romboard
- jumper cables to interconnect the 2 boards from the kit
To install the small board on the motherboard first pull IC1 and IC2, then install the board like this (better pics to come):

The bigger board plugs in the romboard like this, again all ROMs have to be pulled first.
Jumpers have to be set like this:
- J2/J3/J7/J9 = closed
- J1/J4/J5/J6/J8 = open
- J10/J11 = 1-2
If you instead requested a custom romboard with your kit just plug it on the CN2 connector of the motherboard where original romboards plug. There are no jumpers on the custom romboard (everything is already hardwired properly).

Boards interconnection is simple, left pin with left pin, middle pin with middle pin and... right pin with right pin. You can't damage anything if you do it wrong but games won't boot.

The USB floppy emulator plugs in place of the original floppy drive:

Dipswitches allow to select game loader:
DIP 1/2/3 ---- loader
000 ---- Dynamic Country Club (rom based)
100 ---- Hot Rod (floppy)
010 ---- Quiz Ghost Hunter (rom based)
110 ---- Tokoro San no MahMahjan (rom based)
001 ---- Tokoro San no MahMahjan 2 (rom based)
101 ---- Quiz Mekurumeku Story (rom based)
011 ---- Quiz Rouka ni Tattenasai (rom based)
111 ---- All floppy based games except Hot Rod
Floppy image selection is made by using the two buttons on the front panel of the floppy emulator (-/+), segment display shows selected image (3 digit number), you have few seconds to change image on boot up (3s maybe?):
- 000 = Bonanza Bros (W)
- 001 = Crack Down (W)
- 002 = Dynamic Country Club (U)
- 003 = Gain Ground (W)
- 004 = Hot Rod (Turbo 3P, W, set 2)
- 005 = Hot Rod (4P, J, rev C)
- 006 = Quiz Syukudai wo Wasuremashita (J)
- 007 = Rough Racer (J)
- 008 = Scramble Spirits (W)
- 009 = Jumbo Ozaki Super Masters Golf (W)
[EDIT]
31/07/2108: Added 2 pics to show how pins must be aligned on the motherboard and romboard and how to plug the floppy emulator
[EDIT 2]
Dynamic Country Club is now also available from the romboard for those not having a floppy drive controller (altough repro is available from @Mitsurugi-w) or wanting to cut loading times.
[EDIT 3]
A custom romboard can now be ordered with the kit for those not having an original romboard or as an upgrade.
SOME PICTURES COURTESY OF @XtraSmiley
Full System 24 Multi
$225.00 w/eproms
$205.00 w/o eproms
Repro Floppy Controller $150.00
Important information:
Games aren't preloaded in the multi, users must download romsets by themselves then burn the eproms.
1) (Long) Introduction
This System uses either floppies or romboards to load games or both for Bonanza Bros.
It's not JAMMA but a System 16 to JAMMA adapter works fine.
It's mid-res, thus 24kHz.
The multi kit allows to play all floppy based games, included encrypted ones which I have decrypted, from a floppy emulator device.
Romboard based games are supported on a daughterboard that plugs in any romboard, whatever the security chip installed (but one must be present as it's also used for bank switching). Romboard based games have been patched to circumvent the protection.
Supported games from the floppy emulator:
- Bonanza Bros (W), patched - requires a romboard too
- Crack Down (W), decrypted
- Dynamic Country Club (U), decrypted
- Gain Ground (W), decrypted
- Hot Rod (Turbo 3P, W, set 2) - requires analog I/O board to boot
- Hot Rod (4P, J, rev C) - requires analog I/O board to boot
- Quiz Syukudai wo Wasuremashita (J), decrypted
- Rough Racer (J), decrypted - requires analog I/O board to boot
- Scramble Spirits (W)
-Jumbo Ozaki Super Masters Golf (W), decrypted
Supported games from the romboard:
- Bonanza Bros, patched - requires the floppy controller too
- Quiz Ghost Hunter, patched
- Quiz Mekurumeku Story, patched
- Quiz Rouka ni Tattenasai, patched - requires 3/4p I/O board to boot
- Tokoro San no MahMahjan, patched
- Tokoro San no MahMahjan 2, patched
- Dynamic Country Club (W), patched
To enjoy the whole library you need:
- A motherboard with a standard 68000 CPU installed for the second CPU, if the FD1094 is installed like in the picture below, pull it and install a standart 68000 CPU (original one is rated 10Mhz)
- a floppy controller (plugs underneath the motherboard), with cables of course (data and power):
- a romboard (plugs on top of the motherboard):
- Also some games require extra hardware for controls:
* 834-6510 analog I/O board for Hot Rod and Rough Racer
* 3/4p I/O board (plugs on the smaller connector of the motherboard just like on System 18 or 32) for Quiz Rouka ni Tattenasai
* and probably some specific hardware for the mah-jong games
With a motherboard and the floppy controller you can play:
- Crack Down (W), decrypted
- Dynamic Country Club (U)
- Gain Ground (W), decrypted
- Hot Rod (Turbo 3P, W, set 2) - requires analog I/O board to boot
- Hot Rod (4P, J, rev C) - requires analog I/O board to boot
- Quiz Syukudai wo Wasuremashita (J), decrypted
- Rough Racer (J), decrypted - requires analog I/O board to boot
- Scramble Spirits (W)
-Jumbo Ozaki Super Masters Golf (W), decrypted
With a motherboard and a romboard you can play:
- Quiz Ghost Hunter, patched
- Quiz Mekurumeku Story, patched
- Quiz Rouka ni Tattenasai, patched - requires 3/4p I/O board to boot
- Tokoro San no MahMahjan, patched
- Tokoro San no MahMahjan 2, patched
- Dynamic Country Club (W), patched
With a motherboard, a floppy controller and a romboard you can play all listed games above plus Bonanza Bros.
2) How to install
The kit is composed of:
- a USB floppy emulator with upgraded firmware
- a USB stick
- a small board that plugs in the motherboard
- a bigger board that plugs in the romboard or a complete custom romboard
- jumper cables to interconnect the 2 boards from the kit
To install the small board on the motherboard first pull IC1 and IC2, then install the board like this (better pics to come):
The bigger board plugs in the romboard like this, again all ROMs have to be pulled first.
Jumpers have to be set like this:
- J2/J3/J7/J9 = closed
- J1/J4/J5/J6/J8 = open
- J10/J11 = 1-2
If you instead requested a custom romboard with your kit just plug it on the CN2 connector of the motherboard where original romboards plug. There are no jumpers on the custom romboard (everything is already hardwired properly).
Boards interconnection is simple, left pin with left pin, middle pin with middle pin and... right pin with right pin. You can't damage anything if you do it wrong but games won't boot.
The USB floppy emulator plugs in place of the original floppy drive:
Dipswitches allow to select game loader:
DIP 1/2/3 ---- loader
000 ---- Dynamic Country Club (rom based)
100 ---- Hot Rod (floppy)
010 ---- Quiz Ghost Hunter (rom based)
110 ---- Tokoro San no MahMahjan (rom based)
001 ---- Tokoro San no MahMahjan 2 (rom based)
101 ---- Quiz Mekurumeku Story (rom based)
011 ---- Quiz Rouka ni Tattenasai (rom based)
111 ---- All floppy based games except Hot Rod
Floppy image selection is made by using the two buttons on the front panel of the floppy emulator (-/+), segment display shows selected image (3 digit number), you have few seconds to change image on boot up (3s maybe?):
- 000 = Bonanza Bros (W)
- 001 = Crack Down (W)
- 002 = Dynamic Country Club (U)
- 003 = Gain Ground (W)
- 004 = Hot Rod (Turbo 3P, W, set 2)
- 005 = Hot Rod (4P, J, rev C)
- 006 = Quiz Syukudai wo Wasuremashita (J)
- 007 = Rough Racer (J)
- 008 = Scramble Spirits (W)
- 009 = Jumbo Ozaki Super Masters Golf (W)
[EDIT]
31/07/2108: Added 2 pics to show how pins must be aligned on the motherboard and romboard and how to plug the floppy emulator
[EDIT 2]
Dynamic Country Club is now also available from the romboard for those not having a floppy drive controller (altough repro is available from @Mitsurugi-w) or wanting to cut loading times.
[EDIT 3]
A custom romboard can now be ordered with the kit for those not having an original romboard or as an upgrade.
SOME PICTURES COURTESY OF @XtraSmiley
Attachments
Last edited:


")
