Finisterre
Professional
Having recently gotten an aircraft joystick working [34], I wanted to move on to a driving wheel example so I could play Crazy Taxi.
I didn't want to try to find a retro Mad Catz MC2 wheel like [31] or a "RoadStar" wheel as shown 8:15 into the following video:
Instead I went to my local MicroCenter and picked up a $99 ThrustMaster T80 branded as "Thrustmaster Ferrari 458 Italia Racing Wheel for Xbox 360"
http://www.thrustmaster.com/en_US/products/t80-ferrari-488-gtb-edition
http://www.microcenter.com/product/375238/ferrari_458_italia_racing_wheel_for_xbox_360
I had pregamed a little bit trying to figure out if the steering mechanism was based on a potentiometer... I previously made the mistake of opening up a wheel that wound up having optical sensors inside and didn't want to do that again. The bit that sold me was finding a post that said "They put a light oil on the steering potentiometer", along side random quality complaints. https://forums.forzamotorsport.net/...t_thrustmaster-458-spider-wheel-problems.aspx
Cheap wheel with a potentiometer for steering, locally available!? Sold!

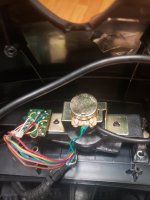
Opening the wheel was trivial, I was quite pleased to be greeted by a 3 wire bundle combing off the back of the wheel. This would be my first analog input source.

I wound up snipping the connectors (including the ones for the *remote* pedal connection) and hard wiring the pots to the USB cable (using shield for ground).
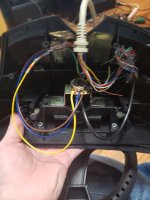
The pedals had a similar potentiometer system, to which I also hardwired into the USB cable. Using shield I had enough wires for voltage, ground, and the 3 pots (steering, brake, gas).

There was a blank cut out that I snipped to accommodate the snipped pedal wire.

Be careful with the gears on the potentiometer's upon reassembly. If you notice things not working you've likely bumped them out of place.
You will 100% have to configure the "volume" of your potentiometers, they will NOT be using the proper min / max values. Go into the Game Test menu, and then the "Volume Setting" menu. If this is wrong you won't be able to steer, or press the gas, or brakes.
 \
\
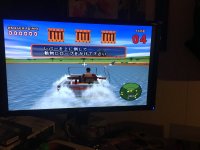
If all goes well you are on your way to some Jambo Safari or Crazy Taxi action. I have a few more things to figure out to get the remaining inputs working, but I'm driving for now! My kid will be thrilled with just this. Now is it the most sensitive in the world? NOPE! Does it work? YUP! You may need to play with the sweet spot in ranges for min / max, *full* range may not be the best idea. Getting the sensitivity just right can be tricky.

What about the buttons you say? Well I ran across this article laying out how everything uses a shift register, etc. I could make this a larger project and get all the rest of the buttons working, and converted to the appropriate Sega inputs, but for now we get basic functionality!. http://rr-m.org/blog/hacking-a-thrustmaster-tx-rw-gaming-wheel-with-arduino-uno-part-1/
You should note that currently there is no reverse gear button / stick input mapped, but I did add coin and start on the DB25.
 \\
\\
My plan for reverse is to possibly use the potentiometer on the steering wheel.

I didn't want to try to find a retro Mad Catz MC2 wheel like [31] or a "RoadStar" wheel as shown 8:15 into the following video:
Instead I went to my local MicroCenter and picked up a $99 ThrustMaster T80 branded as "Thrustmaster Ferrari 458 Italia Racing Wheel for Xbox 360"
http://www.thrustmaster.com/en_US/products/t80-ferrari-488-gtb-edition
http://www.microcenter.com/product/375238/ferrari_458_italia_racing_wheel_for_xbox_360
I had pregamed a little bit trying to figure out if the steering mechanism was based on a potentiometer... I previously made the mistake of opening up a wheel that wound up having optical sensors inside and didn't want to do that again. The bit that sold me was finding a post that said "They put a light oil on the steering potentiometer", along side random quality complaints. https://forums.forzamotorsport.net/...t_thrustmaster-458-spider-wheel-problems.aspx
Cheap wheel with a potentiometer for steering, locally available!? Sold!
Opening the wheel was trivial, I was quite pleased to be greeted by a 3 wire bundle combing off the back of the wheel. This would be my first analog input source.
I wound up snipping the connectors (including the ones for the *remote* pedal connection) and hard wiring the pots to the USB cable (using shield for ground).
The pedals had a similar potentiometer system, to which I also hardwired into the USB cable. Using shield I had enough wires for voltage, ground, and the 3 pots (steering, brake, gas).
There was a blank cut out that I snipped to accommodate the snipped pedal wire.
Be careful with the gears on the potentiometer's upon reassembly. If you notice things not working you've likely bumped them out of place.
You will 100% have to configure the "volume" of your potentiometers, they will NOT be using the proper min / max values. Go into the Game Test menu, and then the "Volume Setting" menu. If this is wrong you won't be able to steer, or press the gas, or brakes.
\If all goes well you are on your way to some Jambo Safari or Crazy Taxi action. I have a few more things to figure out to get the remaining inputs working, but I'm driving for now! My kid will be thrilled with just this. Now is it the most sensitive in the world? NOPE! Does it work? YUP! You may need to play with the sweet spot in ranges for min / max, *full* range may not be the best idea. Getting the sensitivity just right can be tricky.
What about the buttons you say? Well I ran across this article laying out how everything uses a shift register, etc. I could make this a larger project and get all the rest of the buttons working, and converted to the appropriate Sega inputs, but for now we get basic functionality!. http://rr-m.org/blog/hacking-a-thrustmaster-tx-rw-gaming-wheel-with-arduino-uno-part-1/
You should note that currently there is no reverse gear button / stick input mapped, but I did add coin and start on the DB25.
\\My plan for reverse is to possibly use the potentiometer on the steering wheel.
Attachments
Last edited: