Hey guys,
I've completed my NES2JAMMA project and installed it in one of my cabs.
https://www.arcade-projects.com/forums/index.php?threads/nes2jamma.2779/
While I was building the prototype, due to the size of the PCB copper plate I used, I made two")
Since I won't be in need of another NES in a cab, I just wanted to share my other prototype with someone who wants to put a NES in an arcade cab.
However, please keep these in mind;
1) You need a NES which can output RGB video (French NES or RGB modded NES). Stock NES consoles output only composite video which this circuit cannot simply use...
2) Your arcade power supply in your cab should output enough powerful 12V to feed both this circuit and NES. This is not an issue if you feed your NES with its own regular power adapter rather than feeding through this circuit.
3) NES controller buttons are hard mapped. Which means, B is Jamma Button 1, A is Jamma Button 2, SELECT is Jamma Button 3, START is Jamma Start. There is NO appropriate button on NES which can be mapped to Jamma coin signal. So this PCB is "Free Play" ONLY
4) This is a prototype project! Please do NOT expect a factory produced product. I'm just sharing my home-made spare prototype with another fellow hobbyist
5) I have tested this with a RGB modded US NES (NTSC) front loader and a French region PAL NES and regularly using the other one in my cab for about a month or so without any issues. However, this is the only test I could possibly do and please do not expect any more level of warranty or support")
So, if you are happy with the above remarks, how about $120 shipped? I can ship it securely with standard international shipment which includes a tracking number. My packages normally get delivered to, say, UK within 2 weeks, to US 2-3 weeks.
Since this is not a commercial offer, just sharing my spare prototype, I kindly request Paypal friends & family OR just cover the Paypal fees yourself...
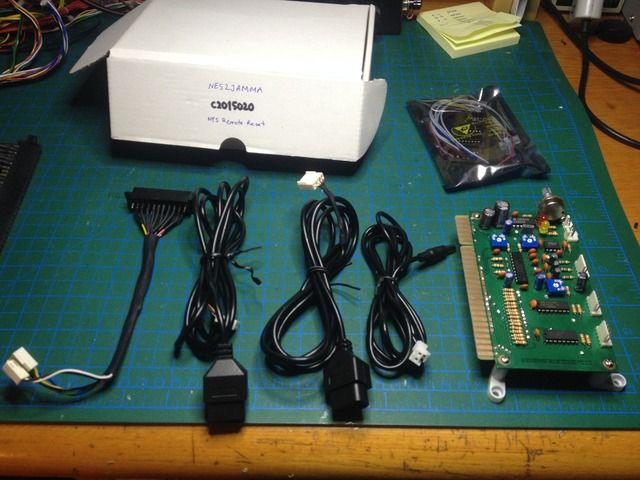
Anyway, package contents:
1 x NES2JAMMA Prototype PCB: This is the PCB you insert to your JAMMA connector.
2 x Controller Cables: Extension cables which one end plugs to the NES2JAMMA PCB other end plugs to your NES.
1 x Female SCART adapter cable: This is mainly for EU guys. If you already have the standart French region NES, you already have the standard Male SCART cable which you connect it to this. Also if your NES is modded with NESRGB kit and bought the SCART cable for it, you can connect that cable to this adapter. However, if you custom modded your NES, you have to connect your R, G, B, Sync & GND cables directly to the PCB.
1 x Power cable for NES: This cable is to power your NES from this PCB (i.e. from your Arcade PSU). As I said, if your 12V is not enough power, you may see darker/flickering video. In that case, just do NOT use this cable and power your NES separately with its own adapter.
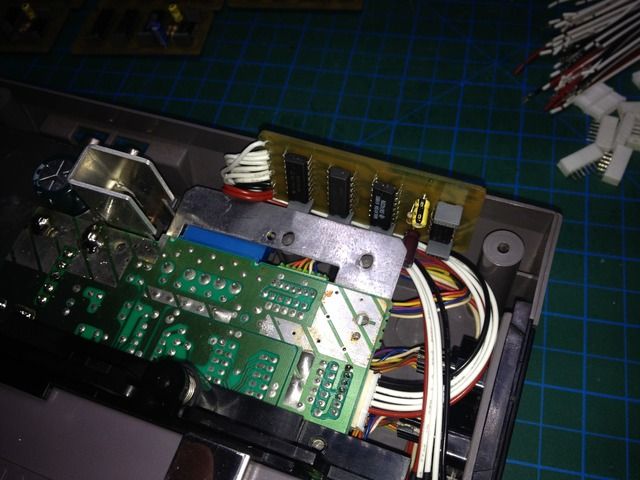
1 x NES Remote Reset Circuit: I also included a NES remote reset circuit to the package (which is my older project) which you might find it useful. With this, you can reset NES by pressing Start + Button 1 + Button 2 and Button 3. Why you might need this? Obviously if you plug a Krikzz Everdrive, you need to reset NES to return to the game select menu. There is no "soft" reset mechanism for Krikzz Everdrive N8. That circuit serves its purpose smoothly. Installation is simple. You just have to solder the pink wire to NES CIC chip leg 9. After that, you just unplug the NES Player 1 connector and plug it to this circuit and plug the other connector to NES player 1 connector. To install this obviously you have to open up your NES.
NES Remote Reset Circuit Installation:

I've completed my NES2JAMMA project and installed it in one of my cabs.
https://www.arcade-projects.com/forums/index.php?threads/nes2jamma.2779/
While I was building the prototype, due to the size of the PCB copper plate I used, I made two
Since I won't be in need of another NES in a cab, I just wanted to share my other prototype with someone who wants to put a NES in an arcade cab.
However, please keep these in mind;
1) You need a NES which can output RGB video (French NES or RGB modded NES). Stock NES consoles output only composite video which this circuit cannot simply use...
2) Your arcade power supply in your cab should output enough powerful 12V to feed both this circuit and NES. This is not an issue if you feed your NES with its own regular power adapter rather than feeding through this circuit.
3) NES controller buttons are hard mapped. Which means, B is Jamma Button 1, A is Jamma Button 2, SELECT is Jamma Button 3, START is Jamma Start. There is NO appropriate button on NES which can be mapped to Jamma coin signal. So this PCB is "Free Play" ONLY
4) This is a prototype project! Please do NOT expect a factory produced product. I'm just sharing my home-made spare prototype with another fellow hobbyist
5) I have tested this with a RGB modded US NES (NTSC) front loader and a French region PAL NES and regularly using the other one in my cab for about a month or so without any issues. However, this is the only test I could possibly do and please do not expect any more level of warranty or support
So, if you are happy with the above remarks, how about $120 shipped? I can ship it securely with standard international shipment which includes a tracking number. My packages normally get delivered to, say, UK within 2 weeks, to US 2-3 weeks.
Since this is not a commercial offer, just sharing my spare prototype, I kindly request Paypal friends & family OR just cover the Paypal fees yourself...
Anyway, package contents:
1 x NES2JAMMA Prototype PCB: This is the PCB you insert to your JAMMA connector.
2 x Controller Cables: Extension cables which one end plugs to the NES2JAMMA PCB other end plugs to your NES.
1 x Female SCART adapter cable: This is mainly for EU guys. If you already have the standart French region NES, you already have the standard Male SCART cable which you connect it to this. Also if your NES is modded with NESRGB kit and bought the SCART cable for it, you can connect that cable to this adapter. However, if you custom modded your NES, you have to connect your R, G, B, Sync & GND cables directly to the PCB.
1 x Power cable for NES: This cable is to power your NES from this PCB (i.e. from your Arcade PSU). As I said, if your 12V is not enough power, you may see darker/flickering video. In that case, just do NOT use this cable and power your NES separately with its own adapter.
1 x NES Remote Reset Circuit: I also included a NES remote reset circuit to the package (which is my older project) which you might find it useful. With this, you can reset NES by pressing Start + Button 1 + Button 2 and Button 3. Why you might need this? Obviously if you plug a Krikzz Everdrive, you need to reset NES to return to the game select menu. There is no "soft" reset mechanism for Krikzz Everdrive N8. That circuit serves its purpose smoothly. Installation is simple. You just have to solder the pink wire to NES CIC chip leg 9. After that, you just unplug the NES Player 1 connector and plug it to this circuit and plug the other connector to NES player 1 connector. To install this obviously you have to open up your NES.
NES Remote Reset Circuit Installation:
 would be awesome if you would upload the PCB file to
  ) but as I stated in my project post, if you want it, just PM me and I can send the ExpressPCB file to you