Hello, aficionados!
Let's try ChatGPT to translate my topic on Neo Arcadia:
I’m excited to introduce a brand-new project involving our beloved (New) Astro City in partnership with takumi.
Here’s the deal:
Many of you have already used my services for maintaining your power supplies and monitor chassis. Whether it’s a cap kit or a repair, our machines are over 30 years old, and I always strive to improve their reliability.
And as you all know, one of the biggest threats to electronics is operating temperature.
Whether in the past or today, manufacturers always take cooling and heat dissipation into account (thermal paste, ventilation, aluminum or copper heatsinks, etc.).
That’s precisely why the expected lifespan of a capacitor, for example, is always tied to an operating temperature (85°C, 105°C, etc.). And you’ll see, this is no small detail!
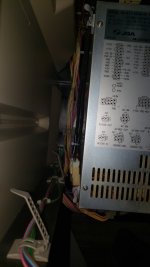
After performing numerous cap kits on Nanao MS9 chassis over the past two years, I noticed that the main heatsink heats up extremely fast—almost excessively so.
Upon closer inspection, this heatsink is responsible for dissipating the heat generated by key components of our monitor chassis (the LA for vertical deflection, the flyback transistor, the MOSFET, etc.).
However, our arcade cabinets lack an efficient cooling system relative to their operating temperatures, which often leads to the premature failure of these critical components (not to mention the flyback transformer, which becomes porous and starts leaking).
Since takumi is a fellow arcade enthusiast and a neighbor, we discussed this issue after recapping his chassis and came up with an idea to improve the situation.
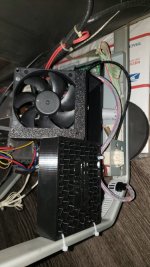
Equipped with high-performance 3D printers, we designed a complete active cooling system for Astro / New Astro .
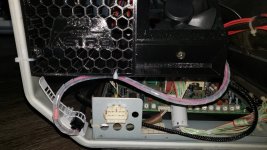
This system consists of a two-part mount where we attach a fan precisely where it’s needed: the hottest part of the heatsink and the flyback transformer.
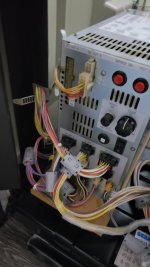
The fan comes with an AMP connector for seamless plug-and-play installation with Sega power supplies (Astro, New Astro, NVS4000 models).
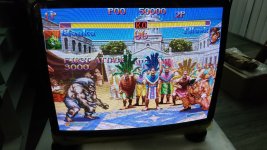
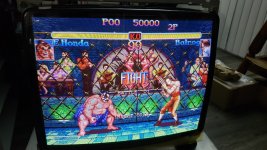
Now, onto the pictures:

The test environment was a typical setup: the arcade cabinet had been running for approximately 45 minutes in a room of about 20–25m².


We tested everything last week when it was quite cold outside. [mention]takumi[/mention]’s room isn’t heated, yet with his Astro, PC, and MVS U4 running, the room temperature shot up to over 26°C!
Then, we plugged in the fan, closed the machine, and waited 15–20 minutes before taking new temperature measurements. And…


To ensure we provided the best solution, we tested several fans:
We ultimately settled on a SUNON fan, which offers a great balance between low noise and the expected performance. Realistically, it’s hard to get below a 40°C reduction anyway.
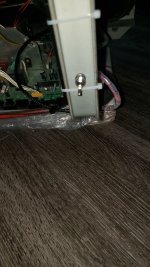
All you need to do is screw a provided nut onto the frame at a designated spot that is already prepared to accommodate the setup no modifications to your cabinet required[/u][/b]. Then, simply plug the connector into the power supply.
 60€ + Shipping (To be arranged, worldwide)


The product is ready and we have some spare parts available.
There is Only Black color available at the moment.
If you're interested, sign up here, and I'll personally send you a message with the next steps.
Let's try ChatGPT to translate my topic on Neo Arcadia:
I’m excited to introduce a brand-new project involving our beloved (New) Astro City in partnership with takumi.
Here’s the deal:
Many of you have already used my services for maintaining your power supplies and monitor chassis. Whether it’s a cap kit or a repair, our machines are over 30 years old, and I always strive to improve their reliability.
And as you all know, one of the biggest threats to electronics is operating temperature.
Whether in the past or today, manufacturers always take cooling and heat dissipation into account (thermal paste, ventilation, aluminum or copper heatsinks, etc.).
That’s precisely why the expected lifespan of a capacitor, for example, is always tied to an operating temperature (85°C, 105°C, etc.). And you’ll see, this is no small detail!
After performing numerous cap kits on Nanao MS9 chassis over the past two years, I noticed that the main heatsink heats up extremely fast—almost excessively so.
Upon closer inspection, this heatsink is responsible for dissipating the heat generated by key components of our monitor chassis (the LA for vertical deflection, the flyback transistor, the MOSFET, etc.).
However, our arcade cabinets lack an efficient cooling system relative to their operating temperatures, which often leads to the premature failure of these critical components (not to mention the flyback transformer, which becomes porous and starts leaking).
Since takumi is a fellow arcade enthusiast and a neighbor, we discussed this issue after recapping his chassis and came up with an idea to improve the situation.
Equipped with high-performance 3D printers, we designed a complete active cooling system for Astro / New Astro .
This system consists of a two-part mount where we attach a fan precisely where it’s needed: the hottest part of the heatsink and the flyback transformer.
The fan comes with an AMP connector for seamless plug-and-play installation with Sega power supplies (Astro, New Astro, NVS4000 models).
Now, onto the pictures:
The Testing Procedure:
The test environment was a typical setup: the arcade cabinet had been running for approximately 45 minutes in a room of about 20–25m².
- The cabinet was completely closed, including all doors.
- Temperature measurements were taken directly on the aluminum heatsink at multiple points, recording the maximum temperature observed.
We tested everything last week when it was quite cold outside. [mention]takumi[/mention]’s room isn’t heated, yet with his Astro, PC, and MVS U4 running, the room temperature shot up to over 26°C!
Then, we plugged in the fan, closed the machine, and waited 15–20 minutes before taking new temperature measurements. And…
The Testing Process:
To ensure we provided the best solution, we tested several fans:
- First, an industrial no-name fan we had on hand. It delivered excellent results but was excessively loud. Paired with a CPS, the arcade cabinet practically took off from how powerful the airflow was.
- Next, we tried a Noctua fan—quiet, but disappointing in terms of performance. At best, it reduced the temperature by 20°C, and that’s being optimistic.
- Then, we tested beQuiet! Again, quiet but not powerful enough.
The Final Choice:
We ultimately settled on a SUNON fan, which offers a great balance between low noise and the expected performance. Realistically, it’s hard to get below a 40°C reduction anyway.
Here’s what we’re offering:
We take care of assembling everything securing the parts together, installing the fan, soldering the cables, and crimping the AMP connector. It's completely plug-and-play.All you need to do is screw a provided nut onto the frame at a designated spot that is already prepared to accommodate the setup no modifications to your cabinet required[/u][/b]. Then, simply plug the connector into the power supply.
Pricing:
60€ + Shipping (To be arranged, worldwide)The product is ready and we have some spare parts available.
There is Only Black color available at the moment.
If you're interested, sign up here, and I'll personally send you a message with the next steps.
Last edited: