You are using an out of date browser. It may not display this or other websites correctly.
You should upgrade or use an alternative browser.
You should upgrade or use an alternative browser.
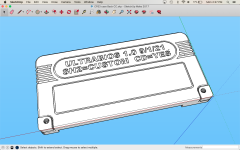
3D printed case for CPS3 cart (remix of Twistedsymphony awesome work)
- Thread starter hatmoose
- Start date
msamiullah
Grand Master
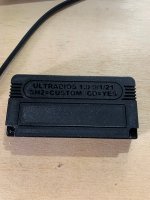
Love the PS1 type grey colorTurned out pretty well. Thanks for the shell solution guys. Gonna do a textured shell for the ultra bios. Probably in Black PLA:CF.
msamiullah
Grand Master
This is awesome, what screws I am supposed to use on it ?Hi Everyone;
@twistedsymphony did an astonishingly awesome CPS3 bios cart and released here https://www.thingiverse.com/thing:1690059
Edit; Updated to "v3" based on feedback and advances in printer tech - strongly suggest you use the file
"CPS Case remix V3.zip" instead of the older versions. Leaving V1 and V2 here just in case.
If you want one of these then bit-district is the place to get them - I lust after the mirror finish he can produce, but alas that kind of manufacturing it is way beyond my capability.
https://bit-district.com/arcade.html
My OCD was acting up and I wanted a spot for the labels, as well as for the cart to be labeled with the version and features of the bios so I didnt forget, so I adjusted as follows
If you want an epic ultrabios sticker like this one I think @djsheep may still have a few
Remixed STL's are attached with kind permission (CPS3 cart revised.zip)
hatmoose
Enlightened
Pretty much any short-ish M3 screw of suitable length should do it - I used 6mm because thats what I had laying around.
This one would be ideal because it cuts its own thread
https://vi.aliexpress.com/item/1005006246834180.html
Or this one
https://vi.aliexpress.com/item/1005006392155265.html
This one would be ideal because it cuts its own thread
https://vi.aliexpress.com/item/1005006246834180.html
Or this one
https://vi.aliexpress.com/item/1005006392155265.html
msamiullah
Grand Master
M3X4mm should be fine aye?This one would be ideal because it cuts its own thread
https://vi.aliexpress.com/item/1005006246834180.html
hatmoose
Enlightened
If I was ordering new ones I'd be getting M3X6mmM3X4mm should be fine aye?
msamiullah
Grand Master
ThanksIf I was ordering new ones I'd be getting M3X6mm
msamiullah
Grand Master
I got the M3X6mm screws and think these are bit smaller and I had someone ship me a cartridge with 6mm screws and the plastic snapped off in the transit. I ordered the M3X8mm screws and these are better fit as these are the same size as the original screws in the CPS3 OEM cartridges.If I was ordering new ones I'd be getting M3X6mm
Last edited:


