

grendelrt
Enthusiast
- Joined
- Jul 21, 2015
- Messages
- 150
- Reaction score
- 144
Found a post on Facebook Vewlix group a while back and saved it , so thanks to the user Tuan Do on FB! His design totally! Figured I would share it here because I had not seen it anywhere else when searching and its a really great solution. Entire mount is around 45 bucks my cost and I feel its got a great advantage to a lot of mounts that the depth of the monitor does not matter, which is an issue with some newer OLED monitors I know because of the increased thickness. To be clear if you are not a DIY person or want a factory like mount, you should probably go Hadouken or FrancoB for a quality product.
You need two mount peices to make the full mount and a drill bit for metal.
Vesa adapter 200x100
https://www.amazon.com/dp/B07KB4J9C2
VIVO Height Adjustable 17 to 32 inch Single Monitor Articulating Wall Mount
https://www.amazon.com/dp/B08NTP4P28?th=1
I have also upload my Jig I used to drill the holes here, just pre drill the holes in the mount with a pilot hole size, something really small, then use the pilot hole to drill the hole for the included screws. There are some counter sunk screws included with the mounts that fit perfect and are long enough. Double check my jig first, who knows if there is variance, but the jig was dead center on mine.
Jig: https://www.printables.com/model/1665525-vewlix-custom-monitor-mount-drill-jig
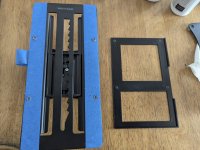
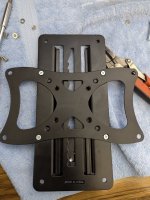
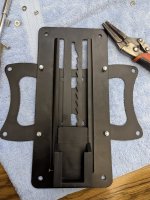
Mount to the backplate of the vewlix with the long M6 bolts that came with the mount, youll need to get washers. Then do the same on the other side. Next you can try the included spacer to see where it lines up , mine was perfect with the included, but if not you can use washers or a 3D print to add until you get where you need to be. This part can take a bit to adjust out. For the height, find the spot on the vertical ladder mount that is closet then adjust using the back nuts on the other side of the back plate to get it perfect.
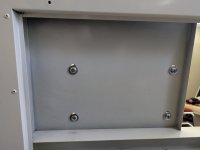
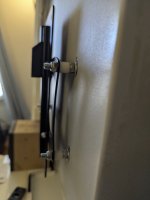
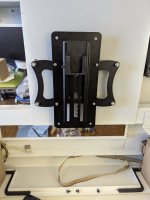
For the monitor frame I had the wrong monitor in my Diamond blue so the frame was the one with out the corner braces. I used the full large frame and the outer frame together. This is the part where it becomes the users choice, I didnt want glass, so I left it out. If you want glass I would prob get some rubber or foam compress in between and then adjust the mount depth on the spaces. I also put a couple finish nails in the speaker boxes to make sure the mount cant press on the monitor too hard, may not be necessary, piece of mind. The height adjust amount is on a ball and can swivel around, so you can tilt and rotate as needed.
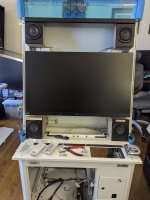
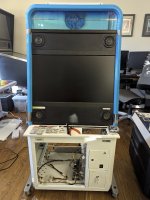
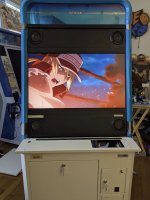
I am running a MSI 1440P IPS now, I do run a OLED in my Vertical Chewlix and thickness was a worry there, but dont think it will be an issue here. The only issue you may have is if you go full frame its pretty hard to get to a bottom mount button for menu on the monitor, but you can just remove the sides and frame to get to it still, not the monitor. So config as much as you can before putting it in.
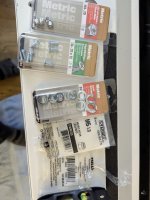
Random nuts and stuff I got, I prob wouldn't do the lock washers and just normal next time with locking nuts.
Go get em

You need two mount peices to make the full mount and a drill bit for metal.
Vesa adapter 200x100
https://www.amazon.com/dp/B07KB4J9C2
VIVO Height Adjustable 17 to 32 inch Single Monitor Articulating Wall Mount
https://www.amazon.com/dp/B08NTP4P28?th=1
I have also upload my Jig I used to drill the holes here, just pre drill the holes in the mount with a pilot hole size, something really small, then use the pilot hole to drill the hole for the included screws. There are some counter sunk screws included with the mounts that fit perfect and are long enough. Double check my jig first, who knows if there is variance, but the jig was dead center on mine.
Jig: https://www.printables.com/model/1665525-vewlix-custom-monitor-mount-drill-jig
Mount to the backplate of the vewlix with the long M6 bolts that came with the mount, youll need to get washers. Then do the same on the other side. Next you can try the included spacer to see where it lines up , mine was perfect with the included, but if not you can use washers or a 3D print to add until you get where you need to be. This part can take a bit to adjust out. For the height, find the spot on the vertical ladder mount that is closet then adjust using the back nuts on the other side of the back plate to get it perfect.
For the monitor frame I had the wrong monitor in my Diamond blue so the frame was the one with out the corner braces. I used the full large frame and the outer frame together. This is the part where it becomes the users choice, I didnt want glass, so I left it out. If you want glass I would prob get some rubber or foam compress in between and then adjust the mount depth on the spaces. I also put a couple finish nails in the speaker boxes to make sure the mount cant press on the monitor too hard, may not be necessary, piece of mind. The height adjust amount is on a ball and can swivel around, so you can tilt and rotate as needed.
I am running a MSI 1440P IPS now, I do run a OLED in my Vertical Chewlix and thickness was a worry there, but dont think it will be an issue here. The only issue you may have is if you go full frame its pretty hard to get to a bottom mount button for menu on the monitor, but you can just remove the sides and frame to get to it still, not the monitor. So config as much as you can before putting it in.
Random nuts and stuff I got, I prob wouldn't do the lock washers and just normal next time with locking nuts.
Go get em
Last edited:

