trashedcabs
Grand Master
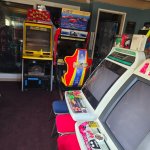
I wanted to share a maybe slightly controversial conversion I finished earlier this year. After nearly 6 months of trying to get a local seller to agree to a lower price I picked up a US Race TV cabinet in the dead of winter. When I went to pick it up the seller's wife was very nice, but as soon as the husband came out he became very aggressive when he saw me pull up in a 26 foot box truck and drive on to his lawn to make a turn around in a really tight driveway. Not fun to deal with alone at night in freezing weather! Some people, especially those in Europe, might be wondering why convert an uncommon game like Race TV to Outrun 2. In North America, the most common cabinet we got Outrun 2 in was a wooden Sega USA refrigerator box abomination, which ironically I had as my first cabinet ever. Importing a Japanese or Chinese cabinet was out of the question due to high freight cost, so I decided to do the next best thing and convert another Sega driver that used the metal frame body. Race TV is also quite frankly not a very fun game IMO.
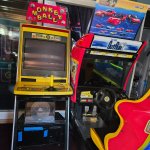
When I picked it up I saw one of the side plastics was badly damaged, and the wiring had been poorly hacked up thanks to an operator who ran this at a local Round Table Pizza and also a roller rink. It had a brand new Wei-ya monitor installed which I stole for another game.
Also, check out the 1600v 10A rated industrial stop button used for a credit button! Most overkill boomer button I've seen yet.


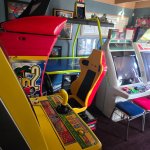
I stripped the whole thing down and started cleaning the insides. It wasn't too dirty. I also replaced the broken pedal box CCFL by using some scrap LED strips and a piece of scrap metal. While it was stripped down I flipped it over and installed brand new locking omnidirectional casters and removed the levelers entirely.


I was worried about finding the side plastics and seat, but one of my local friends happened to conveniently have extras he sold to me at cost. Thanks again Joe! This saved me a ton of time. The seat is from a JP LeMans 24 conversion that was parted out and was EXTREMELY dirty.
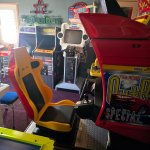
With the seat roughly in place I hit up the thrift store and found a computer subwoofer to replace the anemic Sega one. Since the Race TV cab was missing a rear audio amp, I decided to also use the computer speaker outputs to amplify the gullbox seat speakers. I extended the remote pot wires up to the test/service panel and drilled a hole to mount it so the volume can be controlled without removing the seat.


I really wanted the LCD conversion to be as factory-looking as possible. Most conversions I saw online removed the bezel entirely and left the raw red plastic side panels visible from the inside which I wasn't happy about. To improve on this, I decided to carefully cut the bezel and design a custom piece to fill the top gap. This fill piece would also act as a "speaker bar" of sorts, and would hide the speakers which were now mounted above the monitor. The fill pieces were 3D printed, then epoxied into place and later painted to match. I think if I did it again, I would take the time to properly fill it, sand it down, and paint the entire surround so it looks seamless. The bar itself comprised of a few 3D printed pieces which slipped over 4 wooden dowels, then glued into place and wrapped in speaker grille cloth. The monitor was an old Toshiba Chunithm monitor which was given away after an upgrade to 120hz. Later, I had a piece of glass custom cut to cover it which really made it feel OEM.
Around this time I also received a packaged from Olly at Arcade Art Shop, as well as an Initial D topper bracket which I quickly wire wheeled and sprayed black. The cabinet was definitely coming together. An OEM header assembly was sourced from a member on here. I can't remember who sold it to me but thanks again!


When I picked it up I saw one of the side plastics was badly damaged, and the wiring had been poorly hacked up thanks to an operator who ran this at a local Round Table Pizza and also a roller rink. It had a brand new Wei-ya monitor installed which I stole for another game.
Also, check out the 1600v 10A rated industrial stop button used for a credit button! Most overkill boomer button I've seen yet.
I stripped the whole thing down and started cleaning the insides. It wasn't too dirty. I also replaced the broken pedal box CCFL by using some scrap LED strips and a piece of scrap metal. While it was stripped down I flipped it over and installed brand new locking omnidirectional casters and removed the levelers entirely.
I was worried about finding the side plastics and seat, but one of my local friends happened to conveniently have extras he sold to me at cost. Thanks again Joe! This saved me a ton of time. The seat is from a JP LeMans 24 conversion that was parted out and was EXTREMELY dirty.
With the seat roughly in place I hit up the thrift store and found a computer subwoofer to replace the anemic Sega one. Since the Race TV cab was missing a rear audio amp, I decided to also use the computer speaker outputs to amplify the gullbox seat speakers. I extended the remote pot wires up to the test/service panel and drilled a hole to mount it so the volume can be controlled without removing the seat.
I really wanted the LCD conversion to be as factory-looking as possible. Most conversions I saw online removed the bezel entirely and left the raw red plastic side panels visible from the inside which I wasn't happy about. To improve on this, I decided to carefully cut the bezel and design a custom piece to fill the top gap. This fill piece would also act as a "speaker bar" of sorts, and would hide the speakers which were now mounted above the monitor. The fill pieces were 3D printed, then epoxied into place and later painted to match. I think if I did it again, I would take the time to properly fill it, sand it down, and paint the entire surround so it looks seamless. The bar itself comprised of a few 3D printed pieces which slipped over 4 wooden dowels, then glued into place and wrapped in speaker grille cloth. The monitor was an old Toshiba Chunithm monitor which was given away after an upgrade to 120hz. Later, I had a piece of glass custom cut to cover it which really made it feel OEM.
Around this time I also received a packaged from Olly at Arcade Art Shop, as well as an Initial D topper bracket which I quickly wire wheeled and sprayed black. The cabinet was definitely coming together. An OEM header assembly was sourced from a member on here. I can't remember who sold it to me but thanks again!
")