What's new

Replacing UltraSIMMs DIP Switches

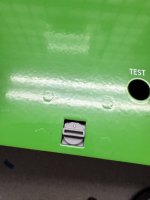
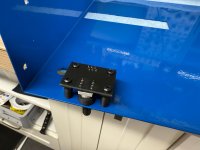
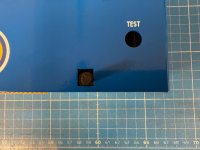
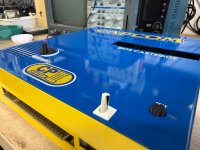
Hi Folks - have any of you tested this with the jasen case? At least for MINE, the rotary switch is a tad too big to fit in the hole....

I can still build these, but I don't think I will be able to use it... which makes me sad...
thats too bad man,
 
I haven't put it in the case yet but I also am a bit of a heathen so I will mod the case if need be.
Which is a bit risky obviously.
Selector > Dips
 
8.8 x 9.8
Yikes. You'll be shaving more than 1mm off of one dimension. I don't think you'll get out of this without expanding the hole in the case even with the slightly smaller switch.

Alignment can be fixed in any existing boards by expanding the mounting holes to allow for it to shift around as needed. The only electrical traces run directly between the switch and connector.
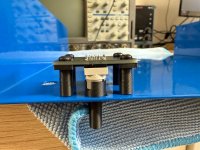
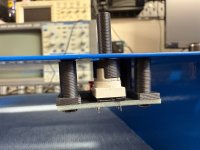
Ok - I will try this - I think I can use some washers to make the selector fit just below the hole, so it might be usable.
 
Ok - with some washers to lift it a little, and some holes moved down - it's good enough I think.... at the 0 position and 4 position its a little tight, but works fine.

I now am going to build a little 3dprinted jig so I can drill the new holes in the right place.
 

Attachments

  • IMG_0426.jpg
    IMG_0426.jpg
    95.9 KB · Views: 31
  • IMG_0427.jpg
    IMG_0427.jpg
    92.9 KB · Views: 31
I received my selector a couple days ago. Thanks a lot for shipping around the world!

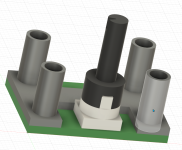
I had/have the same issue with the selector and tinkered around with a 3D-Printing solution (took way too long and way too many iterations) .

Two variants crossed my mind:
  1. extend the selector and have it kind of nice looking, but live with the current implementation / positions
  2. move the cable outside and add a nice case for the selector. That solution was kind of "meh" since it would not look thaaaaat nice (or i figure something nice out). This way i went with solution one first and if this does not work wll i will work on an external solution

Fusion360_7T7vAfmAki.png

IMG_7512.JPGIMG_7511.JPGIMG_7513.JPGIMG_7522.JPGIMG_7528.JPGIMG_7529.JPG

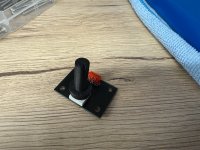
  • The extension knob is currently working, but not 100% perfect since i am limited by dimensions
  • currently the knob can shift on the selector, since it does not grip all around. This is due the space limits of the case (the knob itself is to close to the outer edge and you wouldn't be able to close the case if it was any larger)
  • I thought about glueing the extension to the selector, but i am not there yet :D
  • The selector is kinda glimsy to use - Will add more grip in a future version
  • maybe @twistedsymphony can create a pcb where the knob itself is position like 3-4mm more to the center. That would center the knob in the case hole more and i could add a better version of the knob itself
  • the position marker is not really visible - Can be done with multicolorprint or some other fancy stuff. Not really a problem for now.
  • The lower portion of the knob should not scratch on your case - If it does let me know and i will publish an alternate version
I am still trying to figure out all the positions of the knob. Does any body have the binary info of the knob itself? - i will create a label for my knob (but place it somewhere on the case.. since the space around the knob is limited) Edit: I found the label on the 2nd page of this topic. Have to turn the label 180° :D - Thanks! - Edit2: ignore the following photo. Placed my knob 180° in the wrong direction *facepalm*

IMG_7532.jpg

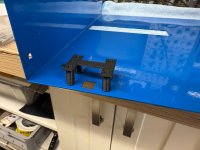
Iterations :D (not all since i started collecting later on) :

IMG_7525.JPG

Offtopic: Are there really no 3D Prints/extensions for Volume and the button (Reset or whatever it is) for the CPS3 Multi/jason case?
 

Attachments

Last edited:
I received my selector a couple days ago. Thanks a lot for shipping around the world!

I had/have the same issue with the selector and tinkered around with a 3D-Printing solution (took way too long and way too many iterations) .

Two variants crossed my mind:
  1. extend the selector and have it kind of nice looking, but live with the current implementation / positions
  2. move the cable outside and add a nice case for the selector. That solution was kind of "meh" since it would not look thaaaaat nice (or i figure something nice out). This way i went with solution one first and if this does not work wll i will work on an external solution

Fusion360_7T7vAfmAki.png

IMG_7512.JPGIMG_7511.JPGIMG_7513.JPGIMG_7522.JPGIMG_7528.JPGIMG_7529.JPG

  • The extension knob is currently working, but not 100% perfect since i am limited by dimensions
  • currently the knob can shift on the selector, since it does not grip all around. This is due the space limits of the case (the knob itself is to close to the outer edge and you wouldn't be able to close the case if it was any larger)
  • I thought about glueing the extension to the selector, but i am not there yet :D
  • The selector is kinda glimsy to use - Will add more grip in a future version
  • maybe @twistedsymphony can create a pcb where the knob itself is position like 3-4mm more to the center. That would center the knob in the case hole more and i could add a better version of the knob itself
  • the position marker is not really visible - Can be done with multicolorprint or some other fancy stuff. Not really a problem for now.
  • The lower portion of the knob should not scratch on your case - If it does let me know and i will publish an alternate version
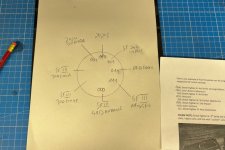
I am still trying to figure out all the positions of the knob. Does any body have the binary info of the knob itself? - i will create a label for my knob (but place it somewhere on the case.. since the space around the knob is limited) Edit: I found the label on the 2nd page of this topic. Have to turn the label 180° :D - Thanks!

IMG_7532.jpg

Iterations :D (not all since i started collecting later on) :

IMG_7525.JPG

Offtopic: Are there really no 3D Prints/extensions for Volume and the button (Reset or whatever it is) for the CPS3 Multi/jason case?

I did create a new version of the PCB that has it shifted up by maybe 2mm - it should allow an install that is centered. Once I get the boards, if they are good - I will upload the gerbers here.
 
Overhauled my above design and it is working for me nice.
  • Altered the design of the selector attachment completly. Secured on the selector with nail polish (easy to remove but keeps it more stable), Added a cap to it to secure it more in place. Painted the position black (not my best job)
  • Added a volume knob with a hole cap
  • Added a test button extension.
  • i started with all prints in black, but the position on the selector was hard to see on a black version, this is way i switched to white. Not sure if i reprint all in he same color (white? yellow?), since this is working for my now
  • Will print and attach the selector label later today
Can share the files later (have to export all files again and package those nicely)


IMG_7537.JPG
 
Back
Top