I seeThat's right. I guess it's because of the speaker boxes.
Last edited:
I seeThat's right. I guess it's because of the speaker boxes.
Bookmarked! ThanksAlso is this where you get your nuts and bolts?
https://en.saima.co.jp/
or here:
https://saima-shop.com/?srsltid=AfmBOoqhnTZzMkbTJF8-yVurnJKpNjTBNtXcqT5cET3s5Jpb-PLFCe60
No worries. @erzane mentioned it in his thread so I went looking. I bought about $65 worth of stuff from this place last month but haven’t heard a thing back. I wanted to get some nicer hardware for the Aero and this place had everything I needed but they’ve gone dark on me.Bookmarked! Thanks
I'm doing blind researches on the web but most of the time the manufacturer (or a ref. number) is indicated on the part itself or in the manual so it's easier to go back up the thread in this case. If you find a supplier for a specific part it may happens, if you're lucky, that the same supplier is selling another part in the same website. I found the hinge like this. Then I take a closer look and try to get in touch with the supplier in order to ask him for a confirmation. That way Sugatsune confirmed that they were dealing with Sega at that time. Stuffs like that hahahLovely commitment to the restoration @erzane. I’m impressed with some of the info you have on obscure parts. Where do you get the info like who made the original parts?
Feel free to write to hamaguchi@saima.co.jp. I always deal with him and everything is fineN
No worries. @erzane mentioned it in his thread so I went looking. I bought about $65 worth of stuff from this place last month but haven’t heard a thing back. I wanted to get some nicer hardware for the Aero and this place had everything I needed but they’ve gone dark on me.
https://www.japanmotonuts.com/
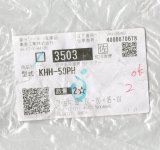
> Casters (601-6151-01) are from Nansin (KHH-50PH)Good to see you still chipping away on this. Can you tell us where you got the leg levellers and castors from please @erzane? I’m interested in some for my aero resto.
Welcome !! Thanks for your interest and kind commentIncredible work @erzane, thank you for sharing the details on your process. Great sleuthing on the manufacturers that Sega used 30 years ago too! It’s amazing that some of these parts are still available new and I really appreciate your attention to detail.

I ordered them from Sugatsune Europe. They were very fast and I get the goods without any problem but if you're in Australia I doubt they will enter in consideration... Maybe you can check by Rakuten. Ive ordered a lot from them also. I think they have these leg adjusters...Just an update if that’s okay @erzane - I’ve been in touch with Sugatsune and they contacted their Oceania distributor who is B2B only. They suggested I contact Sega, but I explained this was futile. They’re going to see what they can do from Japan, so any details on how you got yours will be great.