What's new

FS Sold: Nanao MS8-26 Aero City Monitor $250 - Boston, MA

For Sale

cpsystem3

Enthusiast
Joined
Dec 3, 2015
Messages
90
Reaction score
162
Location
Boston, MA
The monitor has been sold

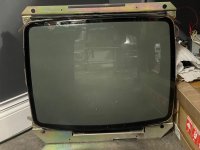
I’ve got a spare Nanao MS8-26 complete monitor in fully working condition for sale.

The good:
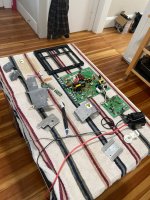
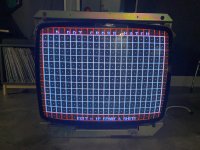
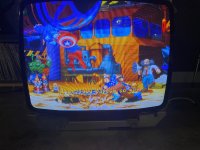
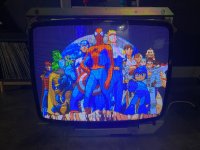
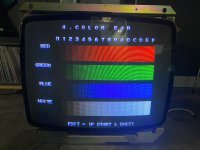
*The MS8-26 chassis has been deep cleaned, recapped, rebuilt and fully dialed in. It works perfectly fine and looks great.
*Zero burn-in that I can detect
*Comes with a 2-prong AC power harness and a Degauss push button harness
*Tube has been deep cleaned
*Yoke has been dialed in

The bad:
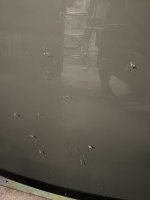
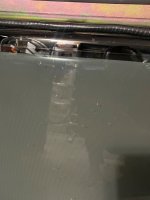
*The tube has several glass chips in the face. They are not too deep and barely noticeable when running. A free glass polishing kit is included. It consists of an orbital buffer, buffing pads and ceramic oxide to do a DIY buffing job. While I cannot guarantee the results, I do personally feel the chips can be buffed out based on other restorations I’ve seen.

Price: $250
Location: Medford, MA (just outside of Boston)
Pickup only

Thanks for looking!
 

Attachments

  • IMG_7501.jpeg
    IMG_7501.jpeg
    411.7 KB · Views: 103
  • IMG_3106.jpeg
    IMG_3106.jpeg
    243.4 KB · Views: 97
  • IMG_3105.jpeg
    IMG_3105.jpeg
    329.7 KB · Views: 97
  • IMG_3103.jpeg
    IMG_3103.jpeg
    259.7 KB · Views: 95
  • IMG_7630.jpeg
    IMG_7630.jpeg
    471.5 KB · Views: 102
  • IMG_7581.jpeg
    IMG_7581.jpeg
    486.1 KB · Views: 85
  • IMG_7555.jpeg
    IMG_7555.jpeg
    421.2 KB · Views: 85
  • IMG_7522.jpeg
    IMG_7522.jpeg
    425 KB · Views: 77
  • IMG_7516.jpeg
    IMG_7516.jpeg
    356.2 KB · Views: 93
Last edited:
That price is good for the chassis alone.

I have used the same kit to get worse damage out of a tube before, just have to make sure to take your time and wear a respirator when you do the work. Happy to share any other tips with whoever is the buyer.

GLWS!
 
That price is good for the chassis alone.

I have used the same kit to get worse damage out of a tube before, just have to make sure to take your time and wear a respirator when you do the work. Happy to share any other tips with whoever is the buyer.

GLWS!
Sorry to derail a bit, but I would love to see your tips on this process as I have a couple nice no burn monitors that need basically the exact same thing doing to them!

As for this monitor, all I can say having bought a lot of Aeros and other 25/26 cabs recently in Japan is that monitors with this level of burn and overall good emissions are pretty hard to find! Combine that with a recapped chassis and it's a super solid deal for whoever gets it. If it was in Japan I'd buy it right away.

Not too much of a derail because the future owner of this tube can also benefit from this info!

1 - Get a glass scratch removal kit like this one https://www.amazon.com/dp/B007CJJLIY?ref_=ppx_hzsearch_conn_dt_b_fed_asin_title_24
2 - Use a corded drill
3 - Grab yourself some NOVUS 3-2-1
4 - Wear a proper respirator like this 3M one https://www.amazon.com/3M-65021HA1-C-Household-Multi-Purpose-Respirator/dp/B002NMFLU2/

As for the process itself, you will need to remove the entire anti-static layer from the monitor, as the buffing will take it off anyway.

I work on removing the entire anti-static layer off first using an abrasive disc (blue in this case) and Novus 3.

Then while you have a blue pad and Novus 3 loaded, start attacking the damaged areas, ensuring you are polishing larger than needed. Be consistent with your pressure and movement, and be cautious not to go too deep as it will cause divots in the tube.

After you are satisfied with the removal switch to a green pad and do another pass of Novus 3. Then wipe your tube face down with a cloth and switch to a fresh green pad (do not cross contaminate the novus material). Same as before, steady movements, steady pressure. Mr. Miyagi has been training us for this moment.

Once satisfied, switch to a black polish pad and novus 1. Wipe the glass and go again.

When you are all finished give it a wipe down and inspect. Remember that minor imperfections will likely not be visible when the tube is on. So test, see how it looks, and if something is messed up, repeat starting with Novus 3.

Hope this helps!

Edit: here are some pics of a tube I buffed in 2020. This one had some pretty deep carvings in it. Unfortunately, I went a little too hard and left a divot in the tubeface. It's impossible to see when the tube is running and I am still using this tube in one of my Egrets today.

PXL_20201028_205720264.jpgPXL_20201106_032551741.jpgPXL_20201106_044201811.jpg

Now back to the sale.
 
Last edited:
Sorry to derail a bit, but I would love to see your tips on this process as I have a couple nice no burn monitors that need basically the exact same thing doing to them!

As for this monitor, all I can say having bought a lot of Aeros and other 25/26 cabs recently in Japan is that monitors with this level of burn and overall good emissions are pretty hard to find! Combine that with a recapped chassis and it's a super solid deal for whoever gets it. If it was in Japan I'd buy it right away.

Edit: I misread the previous post and realized after the fact it was regarding polishing process, not my rebuild process. I decided to leave the info here anyways.

////

To preface, I 100% don’t advocate this for your ‘average user’ to follow as a guide. But, this is what I do when I rebuild a chassis.

First step, I fully disassemble the chassis, desolder the heat shields, flyback, daughter boards and neck card interconnects. After that I desolder all electrolytic capacitors and inspect for and touch up any loose components. After that, I give everything a good wash. I start with flux remover on the solder side to remove any flux residues, followed by a tap water rinse. From there I use simple green, give it a gentle scrub with a nylon brush, tap water rinse, distilled water spray down post rinse. I shake off all excess water and let the boards air dry. From there I install new caps all around (yes even the filter cap). I also like to do a new Vreg and HOT on the MS8’s since the parts are cheap and I’ve seen so many failed ones. I also apply new thermal compound where needed while I’m at it. I also desolder completely and Resolder the crt socket. Generally speaking patch any traces or damaged areas up. Below is a photo detailing my process midway through, post cleaning.

Hope this information inspires, but again please do not use it as a guide.
 

Attachments

  • IMG_0234.jpeg
    IMG_0234.jpeg
    535.6 KB · Views: 58
Last edited:
yeah I'd totally pick up the chassis and yoke as a spare at that price.. I actually have nice tube for it ! need a spare for my aero and swing.
hit me up if you decide to sell that separately.
 
yeah I'd totally pick up the chassis and yoke as a spare at that price.. I actually have nice tube for it ! need a spare for my aero and swing.
hit me up if you decide to sell that separately.
Word man. I’ve got a few local homies that expressed interest. If that doesn’t work out I’ll holler.
 
Back
Top