SugarFreeCandy
Beginner
Hi all.
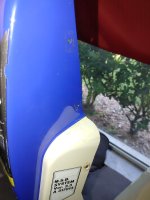
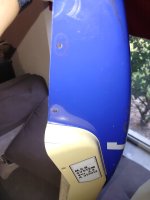
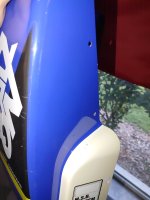
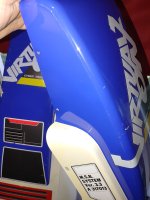
I'm currently working on restoring a VO twin cabinet. It's missing most of the internals, but it has the controls, a couple of 360s, two monitors, and one set of pc peakers. I'm elated to have it and look forward to mostly restoring the cabinets one day. I have bought most of the fasteners so they can be replaced and am still on the lookout for parts. So it begins...
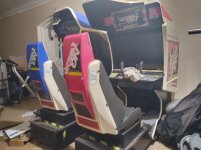
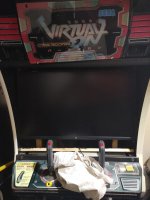
MISSING:
Access Panel, Lower x2 *
Access Panel, Monitor x2 *
Art, Characters x2 ∅
Art, Instructions x2 ∅
Flooring, Front x2 ∅
Game Board x2?
Harnesses x2?
Manual x1
Monitor (MS9, Medium Res) x2
Monitor Glass x2
Monitor Glass Frame x2
PSU x2?
Seat, Slider Stop Spring x2 (possibly the stop or stoppers too)
Sega Model 2 x2?
Speakers, Amp x2 ∅
Speakers, Top x4 ∅ 130-5112 (8 ohm 2w)
Speakers, Side x4
Speaker Grill, Side x4
*=will make myself
∅=might make myself/upgrade
ADDING:
Art
-Black and yellow striped taping (1-1/2" width)
Fasteners
-Base to sides x24 (5/16-18 x 1-3/4 hex bolt Grade 5 - at least 3/4" non threaded, split washer, 1" washer)
-Base hinge, rear x8 (10-32 x 3/8 Phillips truss bolt, washer)
-Divider bar x4 (10-32 x 1-1/2 Phillips truss bolt, washer) *unsure what's stock. It could be a lot shorter, but I like having it engaged while outside of the bar cavity it's in. Excess length does increase breakage chance.*
-Levelling feet *not sure on dimensions, but they need to be replaced*
-Marquee x8 (10-32 x 3/4 truss bolt, M5 washer, M5x15 white nylon washer) *Not sure what's stock. Added nylon washer to dampen metal washer and avoid scratches. I'm thinking of reverse mounting the bolts and having nuts on the outside so the marquee hangs on the bolts when not fastened. Makes accessing and servicing that area easier.*
-Power panel, rear bottom x8 (8-32 x 1/2 Phillips for easy access)
-Seat, back cover x22 (M4-0.7 x 12 flange bolt, M4x18 washer, M4x20 white nylon washer) *I couldn't find the oblong washer (1"x1/2") with dimples, so im using this set up. It might be possible to use economy t nuts and add dimples to those*
-Seat to base x8 (5/16-18 x 1-1/2 hex bolt Grade 8 - at least 1/2" non threaded, split washer, washer, nylon lock nut) *Stock has 2 split washers, but I wanted to avoid further gouging the sheet metal. Grade 8 for this because there's no risk of the bolt breaking and getting captured in the base like the sides.*
-Side panel x8 (1/4-20 x 1-1/2 Phillips truss head bolt, washer at or below 3/4" diameter)
Lighting
-Base perimeter
-Foot well
-Sides under art
-Rear
Speakers
-Amp (ZK TB21) *These seem to fit my requirements. I actually hope they're a bit underpowered so as not to overdrive the speakers. I plan to run them with a 12V 5A power supply.
-Subwoofer, Underseat 4" x2 (Still looking for a good replacement; haven't tested what's present, but doubtful it's in good shape)
-Speakers, Top x4 (not hopeful in finding these so I am looking to get 3" speakers)
Also posted on Museum of the Game: https://forums.arcade-museum.com/threads/virtual-on-cyber-troopers.565581/
RESOURCES:
https://www.oratan.com/forum/index.php
General franchise and machine overview: https://forums.arcade-museum.com/th...l-on-releases-and-cabinet-differences.320567/
Panel and stick info: https://www.arcade-projects.com/threads/custom-virtual-on-panel-oct-15th-2022-updated.7072/
Getting started, lube: https://www.arcade-projects.com/threads/virtual-on-ot-what-do-i-need-to-play.2024/
Sold, sub replacement/monitor repair: https://forums.arcade-museum.com/threads/sega-virtual-on.483104/
Sub recommendation, general Sega: https://www.ukvac.com/forum/threads/sega-racing-cab-subwoofer.74686/
Sticks talk: https://www.arcade-projects.com/threads/virtual-on-oratorio-tangram-repo-panels.8174/
Japanese version in US: https://forums.arcade-museum.com/threads/virtual-on-cyber-troopers-set.412911/
VOOT Stick breakdown: https://www.arcade-projects.com/thr...k-breakdown-for-reporduction-replacement.142/
Online manual: https://backup.segakore.fr/sauservice/Manuals/Virtual On Folder/VOhtml/VO0.html
Repurposing console sticks, conforming arcade sticks: https://www.arcade-projects.com/threads/virtual-on-oratorio-tangram-repo-panels.8174/
Rubber stopper replacement: https://forums.arcade-museum.com/threads/virtual-on-joysticks.547807/
Restore, internals: https://forums.arcade-museum.com/th...ades-virtual-on-going-under-the-knife.342012/
Restore, OT upgrade: https://forums.arcade-museum.com/threads/virtual-on-om-twin-restoration.268523/
Restore, seat backs from UK: https://forums.arcade-museum.com/threads/virtual-on-twin-restoration.235936/
Restore, speaker recommendations: https://forums.arcade-museum.com/threads/cyber-troopers-virtual-on-95-sega-twin-restoration.516179/
Different stock panels: https://www.arcade-projects.com/threads/virtual-on-panels.20988/post-321452
Owner's thread, more resources: https://www.arcade-projects.com/threads/virtual-on-appreciation-owners-thread.21247/
Flooring material: https://forums.arcade-museum.com/threads/virtual-on-flooring-material.524759/
Version info: https://www.arcade-projects.com/threads/virtual-on-finally-down-and-up.20647/post-316640
Controls per cab: https://forums.arcade-museum.com/threads/wtb-sega-cyber-troopers-virtual-on-coin-tower.516245/
Compatible games: https://www.arcade-projects.com/threads/games-to-play-with-a-virtual-on-panel.25742/
I'm currently working on restoring a VO twin cabinet. It's missing most of the internals, but it has the controls, a couple of 360s, two monitors, and one set of pc peakers. I'm elated to have it and look forward to mostly restoring the cabinets one day. I have bought most of the fasteners so they can be replaced and am still on the lookout for parts. So it begins...
MISSING:
Access Panel, Lower x2 *
Access Panel, Monitor x2 *
Art, Characters x2 ∅
Art, Instructions x2 ∅
Flooring, Front x2 ∅
Game Board x2?
Harnesses x2?
Manual x1
Monitor (MS9, Medium Res) x2
Monitor Glass x2
Monitor Glass Frame x2
PSU x2?
Seat, Slider Stop Spring x2 (possibly the stop or stoppers too)
Sega Model 2 x2?
Speakers, Amp x2 ∅
Speakers, Top x4 ∅ 130-5112 (8 ohm 2w)
Speakers, Side x4
Speaker Grill, Side x4
*=will make myself
∅=might make myself/upgrade
ADDING:
Art
-Black and yellow striped taping (1-1/2" width)
Fasteners
-Base to sides x24 (5/16-18 x 1-3/4 hex bolt Grade 5 - at least 3/4" non threaded, split washer, 1" washer)
-Base hinge, rear x8 (10-32 x 3/8 Phillips truss bolt, washer)
-Divider bar x4 (10-32 x 1-1/2 Phillips truss bolt, washer) *unsure what's stock. It could be a lot shorter, but I like having it engaged while outside of the bar cavity it's in. Excess length does increase breakage chance.*
-Levelling feet *not sure on dimensions, but they need to be replaced*
-Marquee x8 (10-32 x 3/4 truss bolt, M5 washer, M5x15 white nylon washer) *Not sure what's stock. Added nylon washer to dampen metal washer and avoid scratches. I'm thinking of reverse mounting the bolts and having nuts on the outside so the marquee hangs on the bolts when not fastened. Makes accessing and servicing that area easier.*
-Power panel, rear bottom x8 (8-32 x 1/2 Phillips for easy access)
-Seat, back cover x22 (M4-0.7 x 12 flange bolt, M4x18 washer, M4x20 white nylon washer) *I couldn't find the oblong washer (1"x1/2") with dimples, so im using this set up. It might be possible to use economy t nuts and add dimples to those*
-Seat to base x8 (5/16-18 x 1-1/2 hex bolt Grade 8 - at least 1/2" non threaded, split washer, washer, nylon lock nut) *Stock has 2 split washers, but I wanted to avoid further gouging the sheet metal. Grade 8 for this because there's no risk of the bolt breaking and getting captured in the base like the sides.*
-Side panel x8 (1/4-20 x 1-1/2 Phillips truss head bolt, washer at or below 3/4" diameter)
Lighting
-Base perimeter
-Foot well
-Sides under art
-Rear
Speakers
-Amp (ZK TB21) *These seem to fit my requirements. I actually hope they're a bit underpowered so as not to overdrive the speakers. I plan to run them with a 12V 5A power supply.
-Subwoofer, Underseat 4" x2 (Still looking for a good replacement; haven't tested what's present, but doubtful it's in good shape)
-Speakers, Top x4 (not hopeful in finding these so I am looking to get 3" speakers)
Also posted on Museum of the Game: https://forums.arcade-museum.com/threads/virtual-on-cyber-troopers.565581/
RESOURCES:
https://www.oratan.com/forum/index.php
General franchise and machine overview: https://forums.arcade-museum.com/th...l-on-releases-and-cabinet-differences.320567/
Panel and stick info: https://www.arcade-projects.com/threads/custom-virtual-on-panel-oct-15th-2022-updated.7072/
Getting started, lube: https://www.arcade-projects.com/threads/virtual-on-ot-what-do-i-need-to-play.2024/
Sold, sub replacement/monitor repair: https://forums.arcade-museum.com/threads/sega-virtual-on.483104/
Sub recommendation, general Sega: https://www.ukvac.com/forum/threads/sega-racing-cab-subwoofer.74686/
Sticks talk: https://www.arcade-projects.com/threads/virtual-on-oratorio-tangram-repo-panels.8174/
Japanese version in US: https://forums.arcade-museum.com/threads/virtual-on-cyber-troopers-set.412911/
VOOT Stick breakdown: https://www.arcade-projects.com/thr...k-breakdown-for-reporduction-replacement.142/
Online manual: https://backup.segakore.fr/sauservice/Manuals/Virtual On Folder/VOhtml/VO0.html
Repurposing console sticks, conforming arcade sticks: https://www.arcade-projects.com/threads/virtual-on-oratorio-tangram-repo-panels.8174/
Rubber stopper replacement: https://forums.arcade-museum.com/threads/virtual-on-joysticks.547807/
Restore, internals: https://forums.arcade-museum.com/th...ades-virtual-on-going-under-the-knife.342012/
Restore, OT upgrade: https://forums.arcade-museum.com/threads/virtual-on-om-twin-restoration.268523/
Restore, seat backs from UK: https://forums.arcade-museum.com/threads/virtual-on-twin-restoration.235936/
Restore, speaker recommendations: https://forums.arcade-museum.com/threads/cyber-troopers-virtual-on-95-sega-twin-restoration.516179/
Different stock panels: https://www.arcade-projects.com/threads/virtual-on-panels.20988/post-321452
Owner's thread, more resources: https://www.arcade-projects.com/threads/virtual-on-appreciation-owners-thread.21247/
Flooring material: https://forums.arcade-museum.com/threads/virtual-on-flooring-material.524759/
Version info: https://www.arcade-projects.com/threads/virtual-on-finally-down-and-up.20647/post-316640
Controls per cab: https://forums.arcade-museum.com/threads/wtb-sega-cyber-troopers-virtual-on-coin-tower.516245/
Compatible games: https://www.arcade-projects.com/threads/games-to-play-with-a-virtual-on-panel.25742/
Last edited: