This thread will no longer be updated. I've consolidated all of my add-on boards into a single thread at:
https://www.arcade-projects.com/threads/new-stereo-kick-harness-add-on-boards-everten.16347/
All are available for purchase at https://www.tindie.com/stores/everten
Everten Taito F3 IO Board
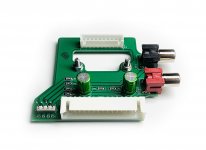
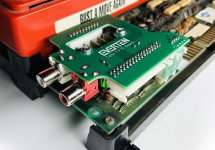
Adds line-level stereo RCA connectors and a CPS2 kick harness to the Taito F3. No soldering required. The IO board mounts directly to the audio heat sink and connects to the AA connector via wire harness. The kit includes everything you need.
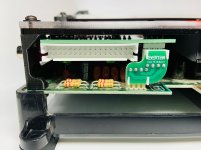
For those with the Lions3 or other cases, there is an optional add-on to allow easier access to the jumper at JP3 which is for changing between joystick and spinner controls. The spinner switch add-on includes an onboard switch and a secondary wire harness that plugs into JP3.
The kit is compatible with the Lions 3 F3 multi case using a modified left riser. The left riser is available for purchase as an add-on or you can download the STL and print it yourself. Details and STL download link can be found at the bottom of this post.
Also works well with the @twistedsymphony F3 Multi LCD Holster.


Installation Instructions: https://www.arcade-projects.com/attachments/everten_taito_f3_io_board_installation-pdf.48225/
Please read the entire installation instructions prior to installation. DO NOT remove the screws from the IO board. There are extra screws included to assist with threading the heat sink.
If the audio sounds unbalanced or is only coming out of one speaker you must check the balance adjustment in the service menu. It is common for the balance to need adjustment when changing games using the multi cart.
Lions 3 Everten F3 Left Riser
STL file available here:
https://www.thingiverse.com/thing:4622867
Requires 2 x #4-40 x 0.135" heat-set threaded inserts. Example:
https://www.amazon.com/gp/product/B07BH5X252/ref=ppx_yo_dt_b_search_asin_title?ie=UTF8&psc=1
You can attempt to extract the threaded inserts from the original left riser, but I have not tried this so use your own judgement.
It is also help to have the Heat-Set Insert Installation Tip and compatible soldering iron. Example:
https://www.amazon.com/gp/product/B078K72615/ref=ppx_yo_dt_b_search_asin_title?ie=UTF8&psc=1
Original post:
https://www.arcade-projects.com/threads/new-stereo-kick-harness-add-on-boards-everten.16347/
All are available for purchase at https://www.tindie.com/stores/everten
Everten Taito F3 IO Board
Adds line-level stereo RCA connectors and a CPS2 kick harness to the Taito F3. No soldering required. The IO board mounts directly to the audio heat sink and connects to the AA connector via wire harness. The kit includes everything you need.
For those with the Lions3 or other cases, there is an optional add-on to allow easier access to the jumper at JP3 which is for changing between joystick and spinner controls. The spinner switch add-on includes an onboard switch and a secondary wire harness that plugs into JP3.
The kit is compatible with the Lions 3 F3 multi case using a modified left riser. The left riser is available for purchase as an add-on or you can download the STL and print it yourself. Details and STL download link can be found at the bottom of this post.
Also works well with the @twistedsymphony F3 Multi LCD Holster.
Installation Instructions: https://www.arcade-projects.com/attachments/everten_taito_f3_io_board_installation-pdf.48225/
Please read the entire installation instructions prior to installation. DO NOT remove the screws from the IO board. There are extra screws included to assist with threading the heat sink.
If the audio sounds unbalanced or is only coming out of one speaker you must check the balance adjustment in the service menu. It is common for the balance to need adjustment when changing games using the multi cart.
Lions 3 Everten F3 Left Riser
STL file available here:
https://www.thingiverse.com/thing:4622867
Requires 2 x #4-40 x 0.135" heat-set threaded inserts. Example:
https://www.amazon.com/gp/product/B07BH5X252/ref=ppx_yo_dt_b_search_asin_title?ie=UTF8&psc=1
You can attempt to extract the threaded inserts from the original left riser, but I have not tried this so use your own judgement.
It is also help to have the Heat-Set Insert Installation Tip and compatible soldering iron. Example:
https://www.amazon.com/gp/product/B078K72615/ref=ppx_yo_dt_b_search_asin_title?ie=UTF8&psc=1
Original post:
I'm starting to design a board to add stereo RCA connectors to the Taito F3. Similar to the ST-V board here.
I realize the audio will need to be attenuated if I tap the S connector. However, this is new territory for me. I'm trying to learn the different methods used to accomplish this without compromising the audio quality. The resistor divider seems simple and widely used, but is it desirable? If anyone with experience in this area is able to chime in it would be appreciated.
I want to make sure this is compatible with @twistedsymphony and @Lions3 case designs.
My initial thoughts are to mount the board on top of the audio heat sink. It looks like I can squeeze 2 RCA connectors over there and use a wire harness to the S connector. The design below would just fit to right of the left riser and under the top acrylic of the Lions 3 case. It should also clear the LCD housing. Hard to get the alignment to look right in the overlay, but you get the idea.

This is all subject to change, just getting some ideas out there.
I realize the audio will need to be attenuated if I tap the S connector. However, this is new territory for me. I'm trying to learn the different methods used to accomplish this without compromising the audio quality. The resistor divider seems simple and widely used, but is it desirable? If anyone with experience in this area is able to chime in it would be appreciated.
I want to make sure this is compatible with @twistedsymphony and @Lions3 case designs.
My initial thoughts are to mount the board on top of the audio heat sink. It looks like I can squeeze 2 RCA connectors over there and use a wire harness to the S connector. The design below would just fit to right of the left riser and under the top acrylic of the Lions 3 case. It should also clear the LCD housing. Hard to get the alignment to look right in the overlay, but you get the idea.
This is all subject to change, just getting some ideas out there.
Attachments
Last edited:


