Hadouken Arcade
Professional
It’s been a while since there has been an update.
Currently (Nov.29.2022) bracket is out of stock at my webpage, but I plan to place an order ASAP once I have the updated drawings. Lead time is usually 5-6 weeks, so I expect it’ll be available Mid-February.
I apologize for the hold up. I hope to maintain the webpage more often but cab importing eats up so much of my time.
This next design will be non-drill version. At the beginning of the design, I was hesitated to use the original M3 screw size but since I have confirmed enough installation myself (roughly 20 cabs so far), I’m more comfortable switching to M3.
I’m also adding screw holes for Orange/D Black vewlix. Existing design will work but monitor selection is limited since it eats up additional 10mm thickness compare to installing on other vewlix model. It was close from not fitting.
The bracket can also be used for Chewlix for lower price since it only needs 2 parts instead of 3. Documentation will follow up which Chewlix can use this.
I'm also creating another optional part to secure the glass in the monitor frame for L, F, FC, orange and diamond black. This will also address the monitor glass being able to push in on the corner.
Main posting
Currently (Nov.29.2022) bracket is out of stock at my webpage, but I plan to place an order ASAP once I have the updated drawings. Lead time is usually 5-6 weeks, so I expect it’ll be available Mid-February.
I apologize for the hold up. I hope to maintain the webpage more often but cab importing eats up so much of my time.
This next design will be non-drill version. At the beginning of the design, I was hesitated to use the original M3 screw size but since I have confirmed enough installation myself (roughly 20 cabs so far), I’m more comfortable switching to M3.
I’m also adding screw holes for Orange/D Black vewlix. Existing design will work but monitor selection is limited since it eats up additional 10mm thickness compare to installing on other vewlix model. It was close from not fitting.
The bracket can also be used for Chewlix for lower price since it only needs 2 parts instead of 3. Documentation will follow up which Chewlix can use this.
I'm also creating another optional part to secure the glass in the monitor frame for L, F, FC, orange and diamond black. This will also address the monitor glass being able to push in on the corner.
Batch #3 Rev. C is ready to order.
Update for Rev. C
List (Click)


Update for Rev. C
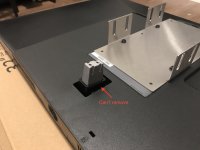
- Center area of the main bracket has been cutout to accommodate monitors with un-removable monitor stand neck.
List (Click)
Updates for Rev. B (batch #2)


- Design package has been submitted and currently waiting quotes from the vendor.
- Material has been changed to stainless 1.5 mm from aluminum 2 mm. Previous material aluminium is perfectly fine. Just making it more heavy and sturdy but comes with a price.
- Weight has been substantially increased to about 15 lb from 5 lb. Total weight with off the shelf monitor assembly should be in similar range to early Vewlix model monitor which is 30 lb.
- Two types of VESA brackets are now available. 100 x 100 and 200 x 100. I figured not everybody has the tools to cut a stainless steel plate if needed.
- Instead of tap-thru on the main bracket, PEM nut will be installed. If somebody manages to bugger the thread, I can't help you on that.
- M6 flange nut will be replaced to nylon nut (still tentative) - much harder to tighten and untighten.
Main posting
Hi, I finally came up with a design that will fit just about any monitor into a vewlix. I had to scrap several designs since it wasn't good enough.
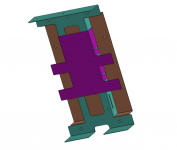
Bracket plate (purple) will be installed on the monitor VESA mount and the main bracket (mint) will push down the monitor to the case. Cover (yellow) will be installed on top of the assembly. Purple plate can be relocated depending on the monitor VESA mount location.


Click pictures to expand.
Will work with:
32" (31.5) Flat monitor - tested monitor list will follow up
VESA style: 200 X 100, 200 X 200 and 100 X 100
Verified Vewlix stock Monitor:
$210 + shipping
Add $10 if your monitor is TA32H07SF-C
If you need more than one, PM me.
Where to purchase:
Here (link) - WIP
Plan on maintaining stock at all time.
Skill level required:
Beginner to moderate with patient
Manual will be provided and updated if necessary.
Tool required:
Anodized aluminum. Light weight baby! by Ronnie
Manufactured from AS9100 certified vendor
Improvement over the last design:
The old design had a minor issue where the glass will go in when corners are pushed from the outside. This happens when the monitor is “hanging” on the bracket instead of pushing down the case by the bracket. This was my pet peeve and hardest thing to solve in order to make the bracket universal but in the same time compatible with all vewlix stock monitor.
About this bracket:
Bracket was designed with these in mind:
Easy to install with minimum modification, screen rotatable without worrying monitor falling out and re-usability with different monitors
PS
It is possible to use on Chewlix but this will require some modification.
Bracket plate (purple) will be installed on the monitor VESA mount and the main bracket (mint) will push down the monitor to the case. Cover (yellow) will be installed on top of the assembly. Purple plate can be relocated depending on the monitor VESA mount location.
Click pictures to expand.
Will work with:
32" (31.5) Flat monitor - tested monitor list will follow up
VESA style: 200 X 100, 200 X 200 and 100 X 100
Verified Vewlix stock Monitor:
- P32L150 - 1080P, Vewlix diamond
- T32H07S(KA) - 720P, F
- TA32H07SF-C - 720P, C (Red) - need additional corner brackets
- TY320CPG-3 - 720P, L and AMI
- MT3232A2 - 720P, VS
$210 + shipping
Add $10 if your monitor is TA32H07SF-C
If you need more than one, PM me.
Where to purchase:
Here (link) - WIP
Plan on maintaining stock at all time.
Skill level required:
Beginner to moderate with patient
Manual will be provided and updated if necessary.
Tool required:
- Phillips screwdriver - size for M3, #4-40 and equivalent
- Drill size 4mm and equivalent
- Countersink bits - optional
Anodized aluminum. Light weight baby! by Ronnie
Manufactured from AS9100 certified vendor
Improvement over the last design:
The old design had a minor issue where the glass will go in when corners are pushed from the outside. This happens when the monitor is “hanging” on the bracket instead of pushing down the case by the bracket. This was my pet peeve and hardest thing to solve in order to make the bracket universal but in the same time compatible with all vewlix stock monitor.
About this bracket:
Bracket was designed with these in mind:
Easy to install with minimum modification, screen rotatable without worrying monitor falling out and re-usability with different monitors
PS
It is possible to use on Chewlix but this will require some modification.
Progress:
1/13/20
I'm getting 3 prototypes. Drawings have been sent to manufacturer. Two for me one for Cereth.
1/13/20
I'm getting 3 prototypes. Drawings have been sent to manufacturer. Two for me one for Cereth.
Update: 8/23/19
Prototype bracket has arrived. Fit-check done. See #64
Update: 8/6/19
Designed a bracket so it can be used on L, L AMI, F and FC (or C) See #60
Update: 7/20/19
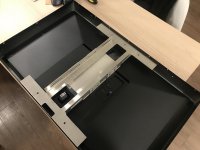
I've designed a bracket to secure the monitor inside the case. See #36
Prototype bracket has arrived. Fit-check done. See #64
Update: 8/6/19
Designed a bracket so it can be used on L, L AMI, F and FC (or C) See #60
Update: 7/20/19
I've designed a bracket to secure the monitor inside the case. See #36
This is severely outdated. 1/13/20
-------------------
Hello, I’ve been looking into replacing outdated Vewlix Sanwa monitor to modern display. I’ve been brainstorming for a while and finally decided to do it. This is not a final version but to proof my concept. Any improvement and suggestion are welcome. I need suggestion on preventing the monitor from shifting inside the monitor frame. For now, I’ve used foam blocks. A temporary bandage patch.
I used LG monitor 32MP58HQ. Any equivalent model will work. I was going try to use the LG monitor VESA mount but I had to remove the chassis due to clearance.
The required modification will be extending the backlight and remote button harness. It’s not a common connector that I can recognize. The wire gauge felt like 26 or 28. You “can” screw down the video board like what I did (half-ass) and call it a day. However, I would strongly recommend securing down the board with your preference.
Some small steps have been omitted for simplicity.
Yes, what you see behind the glass is dirt that have been accumulated for a long time.
No Taito original parts have been harmed
View attachment 19399
View attachment 19390
View attachment 19391
View attachment 19392
View attachment 19393
View attachment 19394
View attachment 19395
View attachment 19396
View attachment 19397
View attachment 19398
-------------------
Hello, I’ve been looking into replacing outdated Vewlix Sanwa monitor to modern display. I’ve been brainstorming for a while and finally decided to do it. This is not a final version but to proof my concept. Any improvement and suggestion are welcome. I need suggestion on preventing the monitor from shifting inside the monitor frame. For now, I’ve used foam blocks. A temporary bandage patch.
I used LG monitor 32MP58HQ. Any equivalent model will work. I was going try to use the LG monitor VESA mount but I had to remove the chassis due to clearance.
The required modification will be extending the backlight and remote button harness. It’s not a common connector that I can recognize. The wire gauge felt like 26 or 28. You “can” screw down the video board like what I did (half-ass) and call it a day. However, I would strongly recommend securing down the board with your preference.
Some small steps have been omitted for simplicity.
Yes, what you see behind the glass is dirt that have been accumulated for a long time.
- Disassemble. Separate the glass vewlix monitor
- Remove all components on Vewlix chassis
- Tape down the glass on vewlix monitor frame
- Remove 3 screws behind U shape cover on LG monitor (missing photo)
- Disassemble LG monitor
- Carefully disconnect the LVDS ribbon and backlight harness.
- Remove LG monitor chassis
- Put disassembled LG monitor into vewlix monitor frame
- Put foams to prevent monitor shifting inside the frame
- Install vewlix chassis to frame
- Relocate the LG monitor video board onto vewlix chassis
- Put foam blocks between LG monitor and chassis - you want the foam to be just enough to push down the monitor.
- Connect all modified harness and HDMI cable and etc.
- Close cover (missing photo)
No Taito original parts have been harmed
View attachment 19399
View attachment 19390
View attachment 19391
View attachment 19392
View attachment 19393
View attachment 19394
View attachment 19395
View attachment 19396
View attachment 19397
View attachment 19398
Attachments
Last edited:


