I've finally released the files to 3D print your own ST-V multi-cart housing. ")


If you want to use this with an original game there is an alternate front cover without the cut outs for the ST-V Multicart. The "bump" on the front of the cartridge has been removed to make for easier printing but this also means that this housing will not fit any game who's PCB uses a socketed EPROM in this area as there likely wont be enough clearance.(I haven't checked personally but it doesn't look like it would fit)
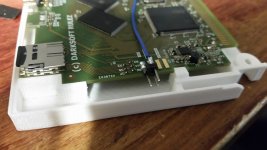
The Multi-Cart front cover has 3 cutouts designed to accommodate the jumper header, card slot, and reset/audio wires on a Darksoft ST-V Multi-cart. The jumper header opening should be large enough for a remote jumper or LCD selector ribbon cable.
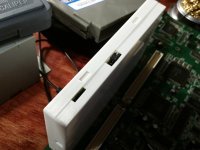
For the reset wire and sound effects output on the multi-cart I recommend soldering a header along the side to route these pins to the side opening as shown in the photos below.


BUY ONE FROM ME HERE: https://bit-district.com/sega-st-v-multi-cart-housing.html
FILES TO PRINT YOURSELF HERE: http://www.thingiverse.com/thing:1786140
----------------
If you want a housing for the matching STV Multi-Selector LCD more info on that can be found here: 3D Printed Sega ST-V Multi LCD Selector Case
----------------
I've also made a label that features logos for all of the ST'-V's Joystick&Button games that you can download on the thingiverse page or here on the forum: ST-V Multi Cart Label
I used the English language logo when available, the games are ordered by their English language name and each logo has a series of boxes below it that you can color in to specify the jumper setting for that game.

If you want to use this with an original game there is an alternate front cover without the cut outs for the ST-V Multicart. The "bump" on the front of the cartridge has been removed to make for easier printing but this also means that this housing will not fit any game who's PCB uses a socketed EPROM in this area as there likely wont be enough clearance.(I haven't checked personally but it doesn't look like it would fit)
The Multi-Cart front cover has 3 cutouts designed to accommodate the jumper header, card slot, and reset/audio wires on a Darksoft ST-V Multi-cart. The jumper header opening should be large enough for a remote jumper or LCD selector ribbon cable.
For the reset wire and sound effects output on the multi-cart I recommend soldering a header along the side to route these pins to the side opening as shown in the photos below.
BUY ONE FROM ME HERE: https://bit-district.com/sega-st-v-multi-cart-housing.html
FILES TO PRINT YOURSELF HERE: http://www.thingiverse.com/thing:1786140
----------------
If you want a housing for the matching STV Multi-Selector LCD more info on that can be found here: 3D Printed Sega ST-V Multi LCD Selector Case
----------------
I've also made a label that features logos for all of the ST'-V's Joystick&Button games that you can download on the thingiverse page or here on the forum: ST-V Multi Cart Label
I used the English language logo when available, the games are ordered by their English language name and each logo has a series of boxes below it that you can color in to specify the jumper setting for that game.
Attachments
Last edited:
