What's new
Joined
Sep 1, 2018
Messages
255
Reaction score
234
Location
Ohio
@Finisterre and I have been working on some netboot alternatives. Basically ways to make it a little easier to accomplish, i.e. automation.

One way we've explored is using the travel router class of network devices, such as a tplink tl-mr3040 or a tl-mr3020, plugged into a netdimm and run them in bridge mode. This can work off your home router, if it can dhcp properly. See: Details on how to use the "REMOTE" (DHCP) setting with a NetDIMM to get a "GOOD" Network Test

@Finisterre coded up a ruby web application that will poll the dhcp leases file and auto populate a drop down so you can push games based on active dhcp'd netdimms. All of this was combined with an asus tinkerboard and a local network was built for linking cabs and/or just general mass netbooting. Asus tinkerboard serves up an access point that the tl-mr3020's are auto configured to connect to. A web app is served up by the asus tinkerboard. One can join the AP with a phone/tablet/laptop/computer, then just push games out. The same functionality exists off the ethernet port on the asus tinkerboard. There are a lot more details here (like assigning multiple IP addresses to a network interface due to the fact that games auto assign different IPs to platforms like the Chihiro) but that is a little background to get us here.

So, @Finisterre and I were talking recently and he suggested a solution where you could just swap out sd cards and auto load a new game. This would be akin to the CF readers, but over ethernet. We talked a bit about it, then let it marinate.

Well, insomnia is a motherfucker and I couldn't sleep last night. So I banged it out in a couple hours.

Here you go:


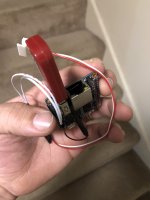
I'm currently working out a few kinks, but it should be ready to go soon. So hopefully I'll be posting an sd card image soon or steps on how to recreate it. To accomplish what occurred in the video you'll need these:

***See second post below.***

A pi0 (I am using a W in the video, will test on a regular ass pi0) - $5 at microcenter
A power cord for the pi0 - regular ass microUSB cable
A usb network adapter - these start at about $4 on amazon, locally probably more like $10
A micro sd card - any size over 2gb will work. - 8bg can be had for ~$5 on amazon
A regular ass network cable - you do not need a cross over cable

So you are looking at <$20 here. Plus a netdimm. (for all caveats related to netdimms, see @twistedsymphony thorough post here: How to Net-boot NAOMI/Tri-Force/Chihiro Using Pi-Force Tools)

The scripts I wrote looks in a specific folder, takes the file in that folder, and pushes it to the netdimm. To change games you would put the .bin in the appropriate folder on the sd card, shove it in the pi0, then let it boot up. Or just have a stack of sd cards are deck ready to go.
 
Last edited:
======================
FAQ/Future Updates holder
======================
Most recent version: 0.4
*** Dev moved to orangepi zero:
https://www.aliexpress.com/item/New...nt-board-beyond-Raspberry-Pi/32761500374.html
https://www.amazon.com/Orange-Pi-Single-Board-Computer/dp/B0773HFXCY

Current download link:
https://mega.nz/#!I3RQWS7K!Nin10cKHL9MByfAOW6W97XvL4udBG6dW7w6wlJSUgPU (orangle pi zero)

======================
Changelog:
v0.4
- the platform has been moved to orangepi zero. The rpi0 usb was just way too unstable.
- auto load game from USB stick added
- write image to sd card, load game on USB, boot orangepi and Naomi.

v0.3
- added ROMS file to fat32 partition - can now add roms via windows
- modification that speeds up process for finding host and sending rom.
- only sends first game found in ROMS folder
- image got larger, so now zipped

v0.2
- dnsmasq now draws from pool of 3 ip address.
- script cycles thru IPs until it finds a live host then netboots game.

======================
Old versions:
v0.3: https://mega.nz/#!5vpBjCAa!vvo3COe26BIprnVvUH2BLfC0q8pPJ7cC22mFS0JXOew (r pi0)
v0.2: https://mega.nz/#!M2AkGC6R!hUwq6Ka6v3i2Wg-e74PkJMIlncDfxnstLTYUfWgZUY0 (r pi0)

======================
FAQ
Why? There are already several netboot solutions?
Some men see things as they are and say why? I dream things that never were and say why not? - Edward Moore Kennedy

No seriously, why?
Because fuck people trying to charge $150 for a netboot solution. Also, this can be a multi game solution with additional work.

===For orangepi zero===
What do I need to use this?
1) orange pi zero (see link above)
2) A USB stick to hold a game (can be from 1GB+)
3) An sd card - anything over 2gb should work. The faster the better.
4) A network cable - crossover NOT required.
5) A way to power your orangepi zero - A suggestion is using CN12, but you can power it anyway you like.

How do I use this thing?
0) Set netdimm network config to remote. NOT static IP.
1) Download the sd card image from the mega link.
2) Burn the image to your sd card - I like etcher (https://www.balena.io/etcher/), but use whatever you want.
3) Copy your game(one game) bin the USB flash stick root directory.
4) Put the sd card into the orangepi zero, plug in the USB stick, and plug the network cable into the orangepi and netdimm.
5) Power on the Naomi 1/2 and pi zero.

How do I change games?
1) Remove the USB stick
2) Copy your game(one game) bin the USB flash stick root directory.
3) Delete the previous game. Only the first game on the USB stick will be used
4) Plug the USB stick back into the orangepi zero.
5) Power cycle the orangepi zero.The Naomi 1/2 should reboot shortly and start the new game. If the Naomi was off, turn it on with the orangepi.


===For raspberry pi0===
What do I need to use this?
1) A pi zero - I am using a Pi Zero W V1.1 and a pi3 mobel B V1.2
2) A USB network adapter - either a micro USB one, or you will need a USB adapter. (or built in with pi3)
3) An sd card - anything over 2gb should work. The faster the better.
4) A network cable - crossover NOT required.
5) A way to power your pi zero - A suggestion is using CN12, but you can power it anyway you like. Even a portable battery pack would likely do.

How do I use this thing?
0) Set netdimm network config to remote. NOT static IP.
1) Download the sd card image from the mega link.
2) Burn the image to your sd card - I like etcher (https://www.balena.io/etcher/), but use whatever you want.
3) Copy your game(one game) bin into the ROMS folder on the BOOT partition. (This is the only partition visible in Windows)
4) Put the sd card into the pi zero and plug the network cable into the pi and netdimm.
5) Power on the Naomi 1/2 and pi zero.

How do I change games?
1) Power down the pi zero(if not already), remove the sd card.
2) Copy a new game(one game) bin into the ROMS folder on the BOOT partition. (This is the only partition visible in Windows)
3) Delete the previous games. Only the first game in the ROMS folder will be used
4) Put the sd card back into the pi zero and plug the network cable in to the pi and netdimm.
5) Power on the pi zero. The Naomi 1/2 should reboot shortly and start the new game. If the Naomi was off, turn it on with the pi.

To do: as of May 23, 2019
- add fat partition for windows usage
- GPIO switch for game selection - multi game functionality
- Clean up random things.
- Get USB hot swapping working
- Test for triforce and chihiro
- Test on Orange Pi
- Install script to make multi-platform
 
Last edited:
Alright, here is an update with download link at the bottom.

********NOTE**********
The main partition is ext, so Windows users won't be able to copy their rom to the sd card(unless you can mount ext fs.) That is on my list to fix for next round.
********NOTE********** Fixed in v0.3

This was tested on a N1 and a N2, fwiw.

1) get an sd card. A 2gb sd leaves you with about 600MB of space. Image is now over 2gb from v0.3 onward. (Use a 8gb or larger just to be safe.) That should get you all games for N1, N2, AW, and maybe even Chihiro. Anything sdcard larger is a shoe-in.
2) Write image to sd card. (dd, etcher, etc)
3) Mount the sd card and place your bin in /home/pi/pi0-netboot/RomBINS (ROMS folder in the fat32 BOOT partition)on the sd card
4) Put sd card in pi zero. And power it on. The first boot resizes the partition. Wait a minute or two, then cycle it. (No longer required)
5) Plug in network cable. Power on naomi and pi0.

Note: Either power both Naomi and pi0 at the same time, or Naomi first, then pi0.
Note2: The linux install is set to auto expand the full system to the size of the sd card. This can/may be changed moving forward. (it has in v0.3)

File: version 0.2
https://mega.nz/#!M2AkGC6R!hUwq6Ka6v3i2Wg-e74PkJMIlncDfxnstLTYUfWgZUY0
(Newer version avaible in comment #2)

The pi0 boots in ~35 seconds. A Naomi1 boot time until ready for netboot is ~50 seconds. My N2 felt a little longer, but I didn't time it. The pi0 boots, serves up an IP, gets the file name from /home/pi/pi0-netboot/RomBINS (ROMS folder), then pushes it out with an upload tool to an IP that was dhcp'd earlier.

Enjoy.
 
Last edited:
Nice work. this looks like an excellent option for those who want their machines to run in single game mode; a function that none of the other netboot setups really did.
 
Has anyone had a chance to test this? I know it works on my setup, but curious if it does in fact work on others. Who knows, I could have fucked up the image or something.

If you need help getting started or you are getting hung up on something, let me know!
 
Nice work. this looks like an excellent option for those who want their machines to run in single game mode; a function that none of the other netboot setups really did.
The idea, at least, was to have multiple sd cards. Want a different game, swap the sd card out. It's just as easy to that do with piforcetools and pi with a lcd plate. This was an attempt to eliminate some of that. Cost and perhaps a little bit of time. I realize most people have 1 or 2 naomi based systems. This would scale really well for multi cab collections.

The pi (zero included) has gpio. I don't think it would be difficult to attach some switches and coding something up so that it could play 2xnumber_of_dipswitch games. Think multibios dipswitch selection.

I am open to suggestions, so toss them out if anyone has one.
 

Attachments

  • image.jpg
    image.jpg
    8.9 KB · Views: 52
Or possibly set the SD card up to look for a named folder on a USB drive to load the game from then instead of having change the game on the sd card you could just pull the USB stick and move which ever game you want into that named folder and keep the others handy on the USB stick in another folder ready to go.
 
Actually worked on that successfully over the weekend with @fsckewe. The Orange Pi Zero facilitates this quite nicely. Not so much on the Raspberry flavor.

We are working on an installer now, you bring the device and pick the flavor, we provide you with options!

USBmount Debian package helps us do exactly what you asked.
 

Attachments

  • 9E68B82E-A654-44F1-931E-CE86FC3B1654.jpeg
    9E68B82E-A654-44F1-931E-CE86FC3B1654.jpeg
    515.5 KB · Views: 75
So I’ve been rolling with this setup for a few days, a few bugs need ironed out, but it seems stable. I’ve got both a Chihiro and a Naomi 1 in use now.
 

Attachments

  • 4046819A-5302-4FF4-9A53-688B753B0CDE.jpeg
    4046819A-5302-4FF4-9A53-688B753B0CDE.jpeg
    567.4 KB · Views: 78
Finisterre -
How does it work?
Can you have multiple roms on the SD card?
Is it possible to manage roms in Windows?
 
Last edited:
Finisterre -
1) How does it work?
2) Can you have multiple roms on the SD card?
3) Is it possible to manage roms in Windows?
1) Finisterre is working on making a system where you plug in a usb stick and it will send that game. Pull the stick out, put a new game on it, put it in, it pushes the game. Without having to turn the pi off. This will be on the orange pi. This project is probably moving that way as the pi zero usb bus is quite flaky.

2) We are working on a multi rom solution that works with this, most likely on a usb stick. Perhaps dip switches, perhaps something else. Been busy as fuck.

3) Yes. The usb stick solution will take fat32(windows), ext(linux), and even hfs(osx). I've just provided an updated for the current pi0/3 solution so you can add roms via windows. See above.
 
I cannot get it to work.
- formating to fat32
- image file via etcher
- added one rom in "roms"
2019-01-02-15-11-00.jpg
-Usb stick after image, i can see all partions.

I see leds on rpi on the ethernet and usb stick
 
The version posted in the 2nd comment does not utilize a usb stick yet. Just follow these directions:

How do I use this thing?
1) Download the sd card image from the mega link.
2) Burn the image to your sd card - I like etcher (balena.io/etcher/), but use whatever you want.
3) Copy your game(one game) bin into the ROMS folder on the BOOT partition. (This is the only partition visible in Windows)
4) Put the sd card into the pi zero and plug the network cable into the pi and netdimm.
5) Power on the Naomi 1/2 and pi zero.

Also, the netdimm needs to be setup in remote and NOT a static IP. Hope that helps.
 
So I got my hands on a build from @fsckewe and @Finisterre and built out one these set ups!

I can say as someone who does not switch games very often, I love this set up. No logging into a remote device, not tinkering with an LCD display ... you delete the file, copy the new one, and plug it on. You leave the thumb drive in the Orange Pi Zero and you can shut it off and boot or whatever without having to set the game every time. it takes about four minutes to go through the whole process including deleting, copying to the point of being able to play.

Here is a short video of me fumbling with it. I am by no means a professional film maker so please forgive me.

https://drive.google.com/file/d/1VpuQ5TimxgDrfhe-RPNVN08MQfSK2cQg/view?usp=sharing
 
thanks for the update and feedback @Dreygor

I need to update OP and notes. As you can see in the video, dev has shifted to orangepi. Much more stable platform. And usb option was sorted out by @Finisterre
 
@Dreygor I keep a stack of usb sticks with specific games on them, labeled. I just swap em out as needed. It works out to be pretty simple!
 
Back
Top