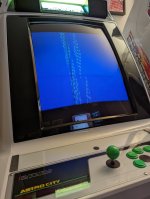
I just got a NAC. The monitor (MS8 ) worked at the seller yesterday and when it got picked it up today, every PCB I have end up with an image like this. The seller had an IGS PGM to test with and so do I. My PGM works fine in my Blast. I'm not familiar with CRTs at all.
You are using an out of date browser. It may not display this or other websites correctly.
You should upgrade or use an alternative browser.
You should upgrade or use an alternative browser.
- Thread starter DRI374
- Start date
It happened to mine as well before. Here is what I did to fix it:
- Check the V and H hold from remote board under the CP.
- Make sure the Blue-Red and Brown-Yellow wires that coming from the yoke are tightly placed on the chassis jumpers.
- Lastly, which I doubt this is the case with your monitor is to check whether the flyback cap is attached firmly to the tube or not (must be discharged first).
Good luck.
I checked the connections and the pots change the picture when I twist them. While trying to get the distortions as stable as I could, a sound emitted from the monitor and a different distorted image filled the entire screen. Twisting the v/h holds further finally stabilized the picture. I let it be on for 30-40 minutes, powered it off and then back on, I'm back to square one with the same picture as above.- Check the V and H hold from remote board under the CP.
This ceremony seems somewhat repeatable as the picture will "snap" in sync at a certain cross-section of v/h-hold and then I have to do the final adjustments to get the picture in place.
Everything I can visually inspect seems to be seated properly.- Make sure the Blue-Red and Brown-Yellow wires that coming from the yoke are tightly placed on the chassis jumpers.
Above my pay grade. But thanks for the tip.- Lastly, which I doubt this is the case with your monitor is to check whether the flyback cap is attached firmly to the tube or not (must be discharged first).
- Lastly, which I doubt this is the case with your monitor is to check whether the flyback cap is attached firmly to the tube or not (must be discharged first).
Good luck.
Above my pay grade. But thanks for the tip.
(While I agree this isn't the problem with your tube, )
This is quite literally the simplest, most important, and very first step in learning CRT repair. It's just a suction cup with some metal hinges that keep it placed inside the tube. For your own safety, it's pretty important that you learn how to properly discharge a tube before you consider doing any kind of repairs; which, tiny tweaks to a remote board don't really qualify as. While you shouldn't be *constantly* discharging for no reason and scraping away at the underside of the anode: If anything needs to be done with the neck board or chassis, you desperately need to learn how to discharge first and foremost. General cleaning inside the cab and moving the cab around is one thing, but lets say you need to eventually disconnect the chassis to send off for repair for something that's ACTUALLY "Above your pay grade", you WILL need to learn how to discharge.
I can pretty repeatedly turn pots down for v/h size and hold and twist v-hold until it syncs (?) and then I can twist all pots into position until I have a perfect picture. Any ideas why it can't fully sync by its own on power up? Another sighting is that a Pandora's Box have no issues all of a sudden and comes on perfectly every time.I'm back to square one with the same picture as above.
a Pandora's Box have no issues all of a sudden and comes on perfectly every time.
I doubt this is the case since when you fiddled with the holds, you did get a picture, and not only did it boot the game, but you don't appear to have any scrambled graphics either, however: have you measured your voltages at the edge & on the board while under load? If not, you should. Not the hottest idea to be testing with games you might not want to lose if you don't even know what voltage you're sending to the board.
good enough guess that you /are/ in 15khz and not med-res since you did eventually get a picture with a plain-jane jamma game, so that's not an issue.
Could very well be a cold solder joint somewhere either on the chassis or on your remote board that may need a reflow. Could just be in need of a cap kit as well; though to be honest, with the general age of these machines, a cap kit should almost always be on the "must do first" list to be considered a quality well-maintained machine. There have been cases of missing colors that have been solved by a good once-over reflow; little work that does a lot of good. I doubt it's an issue of a loose or worn cable since you're saying you can repeat the issue via adjusting the pots- a loose or half-connected cable wouldn't give you a stable image via adjusting pots, so I'm inclined to believe it's either a bad joint or a bad component (which again, it's definitely time for new caps anyways if it's never been serviced).
You have to be willing to safely pull the monitor chassis and it inspect it for bad solder joints. Learning to service old electronics is a must if you’re going to own a CRT-based arcade cabinet. I don’t know of any techs who do house calls.
I've rebuilt rectifier boards and power driver boards in pinball machines a couple times over the last 10 years. New capacitors, replacing ICs and reflow solder joints is not a problem. It's the CRT tube that is the big unknown for me and I need to study/read up on a few things. Pulling the chassis from the cab I have no problem with either (well, my back does...)You have to be willing to safely pull the monitor chassis and it inspect it for bad solder joints. Learning to service old electronics is a must if you’re going to own a CRT-based arcade cabinet.
I've not done any of this, the cab is in my office and didn't bother staging in my shop since I thought this would be a plug and play ordeal (it worked fine with an IGS PGM when I looked at it at the seller's and that's what I was going to run it with for the next couple of months at least).have you measured your voltages at the edge & on the board while under load?
NEON_Arcade
Student
Out of curiosity, do you have your cab on a 120v to 100v stepdown? I know the debate rages on to this day as to their usefulness or necessity, but I have a MS8 that had some intermittent sync/curl problems that were completely eliminated by using a 100v stepdown after finding nothing else wrong with the monitor voltages.
I bring this up because as a tech, whenever I move a working cabinet from one place where it worked to another where it doesn't, if nothing physically fell off during the trip, I'm going to start looking at what might be causing the problem outside of the game.
I bring this up because as a tech, whenever I move a working cabinet from one place where it worked to another where it doesn't, if nothing physically fell off during the trip, I'm going to start looking at what might be causing the problem outside of the game.
The monitor chassis is just the driver board for the CRT.It's the CRT tube that is the big unknown for me and I need to study/read up on a few things. Pulling the chassis from the cab I have no problem with either (well, my back does...)
Here is a video on how to safely discharge a CRT and here is a video on general safety around CRTs. After pulling the monitor chassis out, you should check for bad capacitors and cold solder joints. Images that improve when a monitor “warms up” or after movement usually have bad solder joints.
GeekMan1222
Grand Master
Getting into CRT repair is a complete rabbit hole of a journey, theres alot going on in these chassis boards to create a rasterized image in a vacuum tube.
That said if your into electronics repair its a pretty interesting journey though too.
I will second Kikaso about solder joints. There are quite alot of them and from experience of importing and shipping cabs quite frequently I can attest to things getting rattled and lose from transport even cables. Temperature changes especially during the winter may also have pushed a dried failing capacitor to its limits.
There are so many things that can possibly go on you really just kind of have to dig into it and narrow the issues down to the circuits involved and such and test there, that at least is the proper way to work on these.
If your having issues with your V/H hold then I would go through and double check anything involving that stuff. So check your remote board solder joints on the mechanical cable connections, the pots (these could be old or dirty too), check the remote board cable going from the remote to the chassis (maybe move it around a tad while the chassis is on see if the image reacts), then work your way into the chassis pcb.
Keep your wits about you, these 29" tubes run in the 20,000 V range on the anode of the CRT. (The anode being the red cable from the FlyBack with the suction cup and the back of the tube where that attaches.)
When the tube is energized you can think of it a bit like a large capacitor, the anode supplies a massive DC voltage to the tube to energize it to help with driving the electrons or w/e that are shot out from the electron guns from the neck of the tube. There's metal springs and straps in the corners of the tube this is the main ground for the CRT tube.
The tube needs to be discharged when working on it, some monitors will have a bleed off circuit but that is besides the point, if you never removed this stuff you SHOULD learn how to do a discharge and should do one.
If you never worked around HV tubes you really need to watch a few videos discussing CRT safety so you get an idea to know when and where you can touch, always work with one hand too please.
I worked around enough of them its not really scary to handle and work inside them while the tube is on or off but you HAVE to respect the CRT's HV especially while it is running and know where you put your hands and where they can go.
Otherwise you will get a possible massive bite if you are just haphazardly poking your hands around in these things.
Good luck with the repair work, if you have to send it off to someone for some reason I have had good results with Sharp Image Repair in the US.
Yes. I've learned a lot the last few weeks.The monitor chassis is just the driver board for the CRT.
For the folks who likes closure, the seller of the cab managed to hustle a recapped MS8 chassis from his friend that I bought. The seller also offered to do the chassis swap as I'm not ready to get into this at this time. The old chassis I had an email exchange over with Sharp Image Repair and they said they can fix it. I'm going to send that in and have as backup.
Thanks all for the willingness to help and the links provided by @kikaso!
