What's new

Taito Spinner repro idea (FreeCAD)

mukiex

Student
Joined
Oct 1, 2019
Messages
27
Reaction score
39
Location
Oakland
I've always been in love with the design of the knob for the Taito spinner, but AFAIK, there's nothing available online that comes close. (yes, I own 2 of the Egret Mini trackball/spinner controllers).

On top of that, that actual knob uses a roll pin instead of a screw-in clamp, so even if I had a pair of those in pristine condition, I couldn't trivially use it on a modern rotary controller, let alone any other custom project.

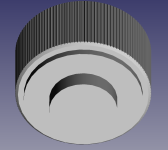
So I've been using calipers and FreeCAD with a spinner knob I picked up to try to replicate the dimensions/shape of the knob.

The only PITA is the grooves. Matching the shape is one thing but initially I didn't even know how many grooves there were.

I couldn't find any data online for this knob, so I took the one I had and... basically measured it by hand with my phone's macro camera, some painter's tape, and a ballpoint pen to drop a marker at each groove.

https://imgur.com/a/WHKfl51

Went around the whole thing and counted it by hand and I've got: 126 grooves.

1bIOOcY.jpeg


Does that look right? Are there any obvious mistakes? I counted by basically using triangle shapes for binary counting (red was 1, dark blue 2, cyan 4, and yellow for 8 grooves) with some green rectangles to cordon on the groove I marked with ball point.

I couldn't find anything online with "taito spinner" and "126" on Google, so either I got the number wrong or nobody's ever counted. The image showing my work is 8K and at the bottom of the IMGur album I linked.

Eventually I'd like to have an STL that you can drop into a resin/PLA printer and then glue or solder-press in the metal inset, or even model in/print the inset and comission a lost material casting with aluminum.

In any event, the dimensions and groove count match so far. Now I need to figure out how to add insets to the top for the color disc XD

TaitoSpinnerModel.png


Edit:

Took some close-up shots of the physical knob: https://imgur.com/a/ErcMfvG
 
Last edited:
Quick update: figured out lofting, can get a more accurate ridge shape, just need to figure out how to get the dimensions on those.

For context, the real thing:

1752721757456.jpeg


Current test shape. 3mm holes, I'm gonna try to 3D print a couple at the library and then install some M2/D3/L3 heated inserts this weekend.

1752724954545.png
 

Attachments

  • 1752721678387.png
    1752721678387.png
    70.4 KB · Views: 13
  • 1752721733954.png
    1752721733954.png
    65.1 KB · Views: 11
Last edited:
If I may make a suggestion, the thing that feels so good about the Taito spinner knob is how freaking heavy they are. When you play with them your movements have a lot of precision because of that. They just feel premium.

Even if you print those with 100% infill they'll never feel as good. You might want to consider creating space in the center of the knob where you can add metal weights to it to make it feel heavier. I've done this before in 3d printed parts that needed to feel heavier and it made a world of difference. If I were doing what you're doing I'd definitely add metal weights inside.
 
Last edited:
If I may make a suggestion, the thing that feels so good about the Taito spinner knobs is how freaking heavy they are. When you play with them your movements have a lot of precision because of that. They just feel premium.

Even if you print those with 100% infill they'll never feel as good. You might want to consider creating space in the center of the knob where you can add metal weights to it to make it feel heavier. I've done this before in 3d printed parts that needed to feel heavier and it made a world of difference. If I were doing what you're doing I'd definitely add metal weights inside.
That is an awesome suggestion. That's definitely on the agenda after I try the test print today. I can probably put a nice nut inset on the top, and it would be well hidden by the color metal plate that usually goes into these. Any specific nut types that would be recommended?

I made a quick tool in blender for installing the heated brass insert. Trying a pair of 2.5 and 3mm variants of the knob at my local library, with different orientations to see if one prints better than the other. If these work, weighting is definitely the next step. Would lower the amount of PLA needed in the body too.

1752766392908.png
 
Rather than a nut I would probably make a recess to hold a stack of low denomination coins. Nuts do not have that much mass but a stack of the largest diameter coins that would fit would probably give you the most mass/bang for your buck, pun somewhat intended ^^
 
On a related note, what solutions are people using for the top plate, e.g. the one with the color or decal?

edit: forgot about the arcade museum thread, will probably ask there too
 
Last edited:
Just to try and save you some time but I can say with almost 100% certainty that this is the orientation you want to print these in. If I understood your earlier comment correctly as well as the image you posted.

1752766392908.jpg
 
Just to try and save you some time but I can say with almost 100% certainty that this is the orientation you want to print these in. If I understood your earlier comment correctly as well as the image you posted.

1752766392908.jpg

I legitimately appreciate that. The side ones were actually the fall-back, as I assumed these would be good, but also at the time I wasn't sure if I was gonna print them "hollow" (e.g. with the top already as part of the shape and with no top inset for a weight) so the side ones were added in case the support structure for that sub-1mm inset left me with a mess.

Again, appreciate it ^_^. Will hopefully have print result photos tonight or tomorrow.
edit: miscalculated the print time (4 knobs will take longer than I can reserve to print, made some optimizations), will try again on Saturday
 
Last edited:
Initial testing.

1752967177584.jpeg


1752967185642.jpeg


1752967200610.jpeg


West: Maaan, all that talk and I didn't listen XD. Decided at the last second while slicing that I didn't wanna deal with supports in the weight well and made a mess underneath instead. But fighting the support tree was less than pleasant in any scenario.

Right off the bat, the hole is 11.1 or so mm, as I forgot about the adapter ring on the real thing. I might try to print a couple adapter rings myself, one for a rotary encoder and one for the 8mm GRS spinner knob (shown above)

Anyhoo, with quarters this thing clocks in at about 75g, whereas the real thing is ~105g w/ the roll-pin-attached rod. And that's with 20% gyroid infill.

The 30mm discs come in tomorrow. Ideally I'd like to try for a resin version with the m2 holes modeled in, which thankfully freecad supports. Might also book a short session to get some adapter rings printed. I could do a couple with 3mm inset holes and a few with 2mm direct holes to see what works better. That would print much faster anyway on account of being much smaller.
 
So, I'll need to try another test print in the future, but this time I'm gonna try resin after a buddy of mine offered. Heck, I'd get my own but it's like $700 all-in (~$300 for the printer/washer and $400 for the vented/filtered mylar "grow tent")

But here's where that version stands:
  • Triple M2 screw holes (headless M2 screws were surprisingly easy to find online)
    • Screw holes built into the model (AFAIK resin doesn't like heated inserts)
  • 8mm rod hole (for GRS spinner)
  • Slight alterations to top disc holder (slightly wider, slightly deeper)
Will try messing with an FDM print at 0.1mm instead of 0.2mm in hopes that maybe it'll cut down on the mess near the knob grip, but realistically I'm probably gonna get better performance on resin.

1753139441071.png
1753139457176.png
1753139473251.png
 
Quick sidequest. I found someone had made an Arcade1up-style spinner that slots over the Egret II Mini on Thingiverse, and as they didn't seem to have any restrictions on remixes, I went ahead and adapted their knob attachment in Blender to work with my repro knob shape.

It's on there as a remix:

https://www.thingiverse.com/thing:7098062

I haven't tested it yet, gonna try that this weekend with another library PLA print, doing this and the tri-hole updates for the knob above (with the threads removed so I can try brass inserts again).

1753398851532.webp
1753399018715.png
 
All right, got another print run done:


1753490295743.png
1753490281535.png


So, a few lessons learned:

  1. Both models WOBBLED, and pretty badly, at first.​
    1. The Egret Mini version got fixed by basically clearing out any bumpiness on the inside​
    2. The other model doesn't have an easy fix, as I think the "well" for the spinning rod isn't deep enough. I should add another attachment, similar to how the actual arcade version had a shim cylinder. It should really be longer so there's less room for "wiggle".​
    3. In both cases, I need a clear segregation between the weight well and the rod/knob sections. The rod on the right literally tapped into the quarters at first.​
  2. Printing issues​
    1. The 0.2mm nozel is clearly incompatible with that grip texture. I kinda wanna get a resin printer, but while they're surprisingly cheap nowadays, the cure station + grow tent + venting + air filtering requirements so you don't accidentally kill yourself slowly seem to bump up the TCO quite a bit. Oh well, I'll look into it.​
    2. I screwed up and forgot to add supports, which basically made the inset for the top metal plate worthless; a buncha PLA fuzz that's hard to remove (maybe I could use a 30mm hole-cutting drill attachment to get rid of them by hand? I think I have one lying around somewhere)​
  3. Good stuff​
    1. Feels exactly like I hoped it would, minus the wobble​
    2. The little ramp tool I made to install the brass inserts still works great​

Edit:

Just to clarify: I've got quite a bit of room to play with at the bottom. Looking back, even the original had an extra shim between the knob and the rotary stick.
2nd edit: Also I've got some headless screws coming in, which should be easier to hide away in that bottom section XD

1753491542004.png
1753491663509.png
 
Last edited:
First resin test. First mistake I made was I forgot to add the extra inset on the top disc and a few other things, but this version came out great.

Once I check the one with the deeper inset on top and the slightly wider weight well/disc well, I'll update the thingiverse post with that version.

1754086782849.jpeg
1754086794295.jpeg


GRS-USB 8mm version also looks amazing. Haven't gotten my headless screws in yet but I'm not even sure I'll need them, the fit was super snug and sold. No wobble on that one, either..

1754086931254.jpeg
1754086957750.jpeg
1754086975973.jpeg
1754086988723.jpeg


Next test print:

- Deeper grip, current version too shallow (might be a printer limitation, but I'll find out here)
- Slightly wider metal disc well
- Slightly wider weight (quarters) well
- slightly wider knob well for the GRS version
- 1mm hole to keep the weights from getting stuck

And tomorrow I'll see how they look with a metallic paint job.
 
Back
Top