What's new

hatmoose

Champion
Joined
Mar 25, 2021
Messages
1,082
Reaction score
2,252
Location
New Zealand
Hi Everyone;

@twistedsymphony did an astonishingly awesome CPS3 bios cart and released here https://www.thingiverse.com/thing:1690059

If you want one of these then bit-district is the place to get them - I lust after the mirror finish he can produce, but alas that kind of manufacturing it is way beyond my capability.
https://bit-district.com/arcade.html

My OCD was acting up and I wanted a spot for the labels, as well as for the cart to be labeled with the version and features of the bios so I didnt forget, so I adjusted as follows
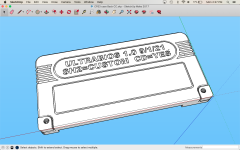
Screen Shot 2022-01-24 at 2.27.37 PM.pngScreen Shot 2022-01-19 at 8.39.39 PM.png

If you want an epic ultrabios sticker like this one I think @djsheep may still have a few
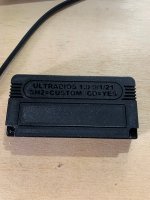
IMG_9515 (1).jpegIMG_9509.jpeg

Remixed STL's are attached with kind permission (CPS3 cart revised.zip)
 

Attachments

  • CPS3 cart revised.zip
    226.7 KB · Views: 139
Had a request from @tonyt76 for the same thing but blank on both sides like this
Screen Shot 2022-01-27 at 7.38.32 AM.png

File is attached (CPS3 case blank.zip)
 

Attachments

  • CPS3 case blank.zip
    155.6 KB · Views: 120
Haha, Twistedsymphony gave me some pro tips, but that is way beyond what I can ever hope to acheive.

Another thing that might be quite cool would be a resin printer with transparent or translucent media.
 
Sorry to disturb you bro
But do you maybe know where I could find metallic case or plexi skill protection plate for CPS3's multi?
Thx
 
Sorry to disturb you bro
But do you maybe know where I could find metallic case or plexi skill protection plate for CPS3's multi?
Thx
I was looking for the same thing just the other day. Trfightstick have stopped production, Jansens customs did one final run and are now sold out too (or they were when I checked)

The only thing I could find for sale new was this which looks cool, but I wanted something more metal
https://www.highflow.nl/behuizingen/cps3-acrylic-case.html?sl=en

Or eBay. For second hand.

Good luck in the search, if you do find something please please post about it so I can buy one too!
 
The only thing I could find for sale new was this which looks cool, but I wanted something more metal
https://www.highflow.nl/behuizingen/cps3-acrylic-case.html?sl=en

Good luck in the search, if you do find something please please post about it so I can buy one too!
Acrylic case...why not..it may interest me. I’d rather have a smoked plate and a Capcom's acronym in yellow and blue letters.

You're writing me looking for something more metal...are you interested in a CPS2 Jansens metallic case?
 
Acrylic case...why not..it may interest me. I’d rather have a smoked plate and a Capcom's acronym in yellow and blue letters.

You're writing me looking for something more metal...are you interested in a CPS2 Jansens metallic case?
Mainly CPS3 at the moment
 
The awesome @djsheep did a limited production run of them, all sold now but maybe he would do more? It is the sweetest thing, looks brilliant. This hobby really does not reward patience, if something is available buy it ASAP. Still kicking myself for missing out of the TRfightstick CPS3 shells...
 
I'm printing some of these cases out and I'm running into an issue with the back panel? It seems like it has some open edges and there's a hole that's not getting filled in by PrusaSlicer. What slicer is everyone else using and is this no problem for them?

I feel like I have been printing out these over and over and I thought one came out ok but I could be mistaking it with one of the original twistedsymphony design?

1658484133352.png

see how there's a darker green stripe along the top edge? Also one of the support columns looks dark green on the top? The original case back on the top right looks fine?
1658484216735.png


after I slice I get a hole in the case top for the blank back. What am I doing wrong? The original seems ok? It looks like the supports are being generated differently on the bottom left of the model as well?
1658484231488.png

I wasted a bunch of filament thinking it was something else... then I loaded up the file in the slicer again and took a closer look and the hole in the model was actually part of the design file?
 
Hmmm, that's weird - In answer to your question I did all the drawing in Sketchup (I know, I know) and the slicing/printing from Cura.
Cura is extremely tolerant of double skins and unbounded seams which sketchup is famous for, which is why I use it :)

I've never actually used Prusa slicer before but it does look really sweet, I'll see if I can replicate. That won't be for a day or so, got a birthday party to run. in the meantime Cura may not be as pretty, but it does work
 
I will try Cura. thank you for the quick response.

PrusaSlicer is an offshoot from Slic3r which you may have heard of? The interface is very similar.

I'm not really bound to one slicer over another but I do like using software that is open source. I believe Cura is also open source even though it's made by Ultimaker. I have used Cura before, but not with my Da Vinci Printers. I will experiment and let you know how it goes.
 
edit: I noticed that it looks like there's support structures built into the model? Where the screws go? based on looking at the images in the thread above it looks like it was introduced into the blank back specifically?

to follow up...

1658560371526.png


1658560389039.png

after slicing it did fill those holes up.
1658560599654.png

testing it out now...
 
Last edited:
Hi @KaPH33n!

I attempted to install @Mitsurugi-w 's repro board today with the case you printed up for me and am having some trouble getting it to clamp together.

It drops in and holds into the front piece just fine. Then when I try to bring the back piece on, the back panel standoffs are too tall (no room for the thickness of the board), or perhaps too thick if they're supposed to go into the holes of the board. Could you advise on if I'm doing something wrong?

Thank you!
-K
 
edit: I noticed that it looks like there's support structures built into the model? Where the screws go? based on looking at the images in the thread above it looks like it was introduced into the blank back specifically?

Have redrawn the front and both the backs, removed all the extra skins, and tested in Cura + Prusa, these new ones should slice with no errors.

The extra structures in the model were added to help with printing when sliced by Cura. Cura does not have granular support settings, it either supports everything attached to the base, or nothing. I normally just snap them off with a screwdriver to reveal the hole for the screw underneath. Happy to chop them back out if you want, let me know and I'll get it done

Let me check the support post question from @Kagaden now - I've only ever used the shell with genuine boards, not the repros. They might be a different thickness or something crazy, will have a look now
 

Attachments

  • CPS3 remix v2.zip
    297.3 KB · Views: 111
I've only got original boards, no repros, so hopefully this still helps with the fitting.

I tried this with both the @twistedsymphony original and the remix. There should be a tiny gap between the two halves of the shell, per the factory design. @Kagaden do the two halves of the shell fit together when there is no board inside?
IMG_1575.jpegIMG_1576.jpeg

The board should drop into the front shell and the two pegs up the top should go all the way through the holes in the board, so the top of the peg is flush with the top surface of the board. Then the other half of the shell should drop on and the top post should be pressing hard against the board which is flush with the peg. This locks everything into place really nicely. Its a sweet design!
IMG_1584.jpeg

The fit for the pegs to go through the holes is VERY snug - when I tried this with a freshly printed shell I had to press a little harder than I wanted to on a $300 device to get the peg into the hole.
IMG_1585.jpeg

I suspect what is happening is
either the top of the peg has printed slightly too wide, this often happens on my ender 3 pro if I set the infill higher than about 80%
or the hole in the repro board is slightly smaller than the one in the factory board (4mm in metric would be 3.96mm in imperial).
Either of these would cause the board to sit on top of the peg, instead of dropping onto it.

@Kagaden does that sound like what's happening here? If the two halves of the shell fit together when there is no board inside then this sounds like a problem with the holes in the board aligning with the pegs on the front of the shell. But I've never even SEEN a repro board before so that's just a guess, got a picture?
 
Started Printing the case front, the back with the fixes is now "in the oven" :D
I'll take some pics of that when done, both done on Prusa i3 Mk3
 

Attachments

  • 20220724_231354.jpg
    20220724_231354.jpg
    327.2 KB · Views: 78
  • 20220724_231402.jpg
    20220724_231402.jpg
    289.9 KB · Views: 74
Hi @KaPH33n!

I attempted to install @Mitsurugi-w 's repro board today with the case you printed up for me and am having some trouble getting it to clamp together.

It drops in and holds into the front piece just fine. Then when I try to bring the back piece on, the back panel standoffs are too tall (no room for the thickness of the board), or perhaps too thick if they're supposed to go into the holes of the board. Could you advise on if I'm doing something wrong?

Thank you!
-K
hrm, not sure what happened, but it should fit. I have a repro cps3 security cartridge I can test with. Let me make sure I can get it working/fitting here and then I'll send you another one if it's something I did.
 
Back
Top