ATAPI/IDE ODE Testing

80 gig file is original 30 gig file is the "bootleg" version.

the 80gig file can be trimmed down to about 2.4GB without any data loss.
Recommended trim size: 2436694016
 
hey Coren - did you get the HDD image off of archive.org?

80 gig file unzipped.

I think there is a character limitation - so I renamed mine from "NM00048 FUD1-HDD0-A (HDD).img" to "NM00048_FUD1-HDD0-A.hdd"

Matt
 
Yeah, `.hdd` should be fine for a hard disk file. Also try it without the autorun.txt file, just in case (the dongles have drivers on them as well as the game binary itself, so there's the chance for shenanigans on any given game).
 
A shameless plug - once this gets into wider distribution - for those with the programmable security dongle from a few years ago, this new IDE and BladeZX's board - I have the images all ready to go for the Rpi. that take into account what mode needs to be set, etc. Tested and ready.
 
(I hope this is not the wrong thread to post this - Didn't want to open a new topic )

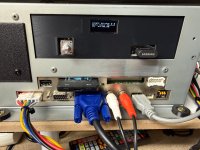
I am working on a V3 insert for the optional selector + display. Will publish the STLs as soon as i have fixed some minor annoyances.

Hope this will help someone :)
 

Attachments

  • IMG_8944.JPG
    IMG_8944.JPG
    212.3 KB · Views: 125
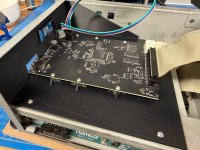
  • IMG_8941.JPG
    IMG_8941.JPG
    233.6 KB · Views: 120
(I hope this is not the wrong thread to post this - Didn't want to open a new topic )

I am working on a V3 insert for the optional selector + display. Will publish the STLs as soon as i have fixed some minor annoyances.

Hope this will help someone :)
Hi! :)

You’re just in time — I was about to post a message about this, as I don’t know anything about 3D printing.

I think we would need to create a PCB to integrate all the optional components: OLED display, rotary encoder, buttons A and B, LEDs X and Y, USB host, and maybe a Reset button.

This would allow it to be integrated into a support panel like yours. :thumbup:
 
Why do you need an additional PCB? - This would make it more complicated, no? (just for "a cleaner look"?)

And why do you need LEDs, Button A+B if you got the rotary encoder / display (serious question, am i missing something?)
 
Why do you need an additional PCB? - This would make it more complicated, no? (just for "a cleaner look"?)

And why do you need LEDs, Button A+B if you got the rotary encoder / display (serious question, am i missing something?)


I have a preference for something nice and stable, if we can have the choice. But that’s just my personal opinion.:)

Like this one, but more of an insertion inside than outside :thumbup:

img-3639-jpg.57902
 
I don't understand. - What you are showing is the Pi Multiselector which is an addon for the IDE V2 (and V3) - Why add another PCB (which does not add any more functionality and only extends)?

Why add another PCB and not add the components (Buttons, LED etc) directly to the 3d Printed file? - all connectivity is already given on the V3 PCB

... only what is missing is a reset button (i gues that is just a button connected to the motherboard?)

There are already 3D files for the Pi Multiselector (for V3) on this thread: https://www.arcade-projects.com/thr...de-v3-modifications-and-new-rpi-images.34778/ - If that is something you are looking for

As far as i understand the Pi Multiselector only adds a more "on the fly" key change behaviour to the setup - and my understanding is that there are solutions in the works where we dont need the pi selector any more)

 
I don't understand. - What you are showing is the Pi Multiselector which is an addon for the IDE V2 (and V3) - Why add another PCB (which does not add any more functionality and only extends)?

Why add another PCB and not add the components (Buttons, LED etc) directly to the 3d Printed file? - all connectivity is already given on the V3 PCB

... only what is missing is a reset button (i gues that is just a button connected to the motherboard?)

There are already 3D files for the Pi Multiselector (for V3) on this thread: https://www.arcade-projects.com/thr...de-v3-modifications-and-new-rpi-images.34778/ - If that is something you are looking for

As far as i understand the Pi Multiselector only adds a more "on the fly" key change behaviour to the setup - and my understanding is that there are solutions in the works where we dont need the pi selector any more)
It’s okay, you didn’t catch the subtlety of my idea. Everyone has their own way of working. Sorry for the inconvenience." :thumbup:
 
Sounds like my wife. :D - But it is okay i love her
(and of course i am joking ... she would never answer question mit "nah you didnt get it")

I am really interested in the "why?" and what exactly you want. So go ahead with your idea.
 
I have a preference for something nice and stable, if we can have the choice. But that’s just my personal opinion.:)

Like this one, but more of an insertion inside than outside :thumbup:

img-3639-jpg.57902
Hello there!
I have a question... why the 2nd memory card? is it storing the scores?

Thanks!!
 
Last edited:
Cannot get this working on a 246 with cobra. Put the 40gb file on a usb with exFAT and it passes through init but not all assets will load. The namco logo is just a black bar and it gets stuck on a white screen. Funny thing is that I can still go into settings. Tried with a working drive in the same cabinet and it works without issue. Grabbed the image directly from the working drive, too.
 
Back
Top