Baby's First Candy Cab - OK Baby Restoration

That’s a great tip, do you do anything to prevent it from flash rusting after removing the rust? My guess would be oil but I’m not sure how that would impact adhesion of rhe vinyl

You will need to seal the surface. The original panel is zinc plated--you could get it re-plated if you really want to be original. You could also just paint the panel, which is what Sega did.
 
I would kinda like to have an OK Baby as like a test cab especially because they are fairly low priced. Anyone have any bad experiences with these or a reason to stay away?
 
I would kinda like to have an OK Baby as like a test cab especially because they are fairly low priced. Anyone have any bad experiences with these or a reason to stay away?

Honestly they are not bad cabinets. They have some thoughtful design choices and are reasonably well made. Outside of the yellowing, the biggest issue is that almost all of them have been abused 10x worse than most other candies, so expect lots of wiring hacks, drilled holes, cracks, and other physical damage. The monitor is also pretty random what you get as it seemed to be up to the distributor as to what came with them. Most cabinets in Asia seemed to come with generic wei-ya universal chassis, but European cabinets came with polos. Bezels were offered for a wide range of monitor sizes.

I would say go for it if you don't mind a bit of a project!
 
Honestly they are not bad cabinets. They have some thoughtful design choices and are reasonably well made. Outside of the yellowing, the biggest issue is that almost all of them have been abused 10x worse than most other candies, so expect lots of wiring hacks, drilled holes, cracks, and other physical damage. The monitor is also pretty random what you get as it seemed to be up to the distributor as to what came with them. Most cabinets in Asia seemed to come with generic wei-ya universal chassis, but European cabinets came with polos. Bezels were offered for a wide range of monitor sizes.

I would say go for it if you don't mind a bit of a project!

Thank you for the detailed response!
 
Thank you for the detailed response!
Yeah, the biggest issue on mine is a hairline crack on the side from people sitting on the control panel. This is common in a lot of cabs but moreso on this. Plastic welding can fix this luckily. But one advantage is that because they’re ABS plastic they’re very light once the monitor and parts are removed.

And yeah, the monitor situation is kinda random. I’ve been looking for a trisync monitor/chassis to potentially replace it down the line just because I want the option but those are hard to come by.
 
Going to start buying the parts and looking at the control panel again. It’s a mess in there and the wires are all soldered in with big globs of solder. The original owners at least had some cable ties in there but since I’m going to have to remove the buttons anyway to clean the rust and they sound creaky as hell. It may be blasphemy but I am fascinated with the OSB-MX buttons that TheTrain made mainly because i like tweaking key switches and prefer to have something silent since i’m in a residential setting.

Not sure if there’s a good drop-in wire harness for a candy cab although I’m a fan of the job they did here:
View: https://youtu.be/nnKzI1L21ao?si=-S7sipmh2fWmOSSE


IMG_8702.jpeg
IMG_8703.jpeg
IMG_8706.jpeg
IMG_8704.jpeg
IMG_8707.jpeg
 
I need to find a good SVG of the logo, I think someone on here has one? I can try to ask the guy I got the decal from but understand if that’s technically original art.

Also the Decals came out great! Really happy. I need to remove the control panel and go at it with barkeepers buddy/sandpaper to fix the steel. Still need to buy replacement parts for this!
keep me posted on those hats, cause I am down to buy one if that logo works!
 
Some updates to this!

Finally tore the seal off this one. Pulled out the control panel and removed the decal with a heatgun. The rust was....bad.
rust1.jpg


rust2.jpg


Started taking the switches and buttons apart. Seems mostly like No-name from several companies: yatta, zhida and gorbo. A few buttons disintegrated instantly.
button2.jpg
button1.jpg
button 3.jpg
button 4.jpg

The sticks were Sanwa and thus worth saving, although I would like to replace the PCB with the newer silent Sanwa drop ins. I have heard mixed things about the compatibility of using the silent JLX PCBs with JLF sticks.
rust sanwa.jpg


This was going to need some severe rehab. I got a galon of evapo-rust and dunked every metal part in it. Evapo-rust rocks. It's not very toxic and slightly reusable. Here is what a part looks like when you partially submerge it: You can see the rust just slough off.

evaporust before and after.jpg


And here are the metal parts of the Sanwas.
sanwa derust.jpg


After some work I finally got it to a pretty good place. There's some heavy pitting so I hit it those parts with a proxxon and some 80 Grit wheels. More in the follow up.

panel derusted.jpg
 
Unfortunately at this point tragedy struck and the step to my backyard collapsed. I fractured my foot in at least 3 or 4 places and unfortunately I will need surgery. I was about to clearcoat the metal too. Pity! I am now healing up but that's going to be down the line.

Sanding.jpg

Left: before and after surfacing,
Right bottom of the control panel after resurfacing a bit.

But, before then I had also started to do some resurfacing on the very yellowed control panels. Mainly working with a sanding block and trying to get a clean prep surface for the panels before I vinyl dye. I highly recommend the Preppin' Weapon brand for this. Also the 3M sandpaper is apparently the really good stuff.

Since I am going to be painting this further, getting it all off wasn't ideal, but I wanted to remove the reflective clearcoat and buff out the major scratches. Filling in the big scratches with body filler before proceeding further.


osblp.jpg

Also, I got a bunch of buttons 3d printed from a friend in candy cab pink and green. I'm going with some OSBLPs. They're nice because they are quiet and low profile, which makes them great for having in your house. Going to start soldering the connectors on those.

I also removed the glass from the front of the cabinet, and will be slowly removing the electronics so I can just blast the cab in someone's garage or something. I may need someone's help for this because I'm currently on crutches or I may just send it out to a shop to get done, but I still intend on using vinyl dye for this.
 
hey, can you take a picture of your coin mech for your okbaby? trying to figure out what type I need
 
hey, can you take a picture of your coin mech for your okbaby? trying to figure out what type I need
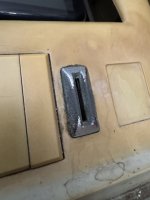
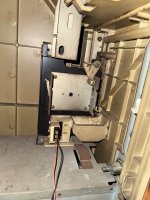
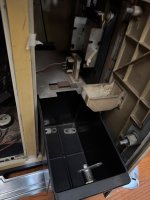
Sure but I have no idea if it functions, also it looks like a SAW movie in there
 

Attachments

  • IMG_0162.jpeg
    IMG_0162.jpeg
    104.1 KB · Views: 73
  • IMG_0163.jpeg
    IMG_0163.jpeg
    236.2 KB · Views: 67
  • IMG_0169.jpeg
    IMG_0169.jpeg
    372.2 KB · Views: 69
  • IMG_0164.jpeg
    IMG_0164.jpeg
    220.9 KB · Views: 70
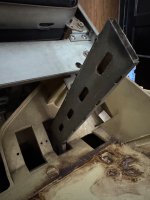
After about a month of recovery I am finally in a place where I have some mobility, so I'm back to the grind. Started removing the major components of the cabinet, including the monitor (thanks to a friend). I found a good replacement for the handle before I realized that you can just pull the entire thing out by the frame, so the handle is somewhat unnecessary. (I went with Kayak handles cut to size).

If you were wondering "what kind of monitor is this?" I have some news, it's a, uh, "FEG"? "EEG"? There may be a letter obscured and the sticker destroyed half of it. The Chassis is a Yatta Model 988, seems like a Wei-ya clone. Tube model seems to be A68AGA21X101 (there are exactlly 2 google hits for this). Threads on the Yatta are here and of course in this other OK Baby restoration thread. I still may try to track down a Nanao and make this trisync. If anybody has a lead on that I'd be all ears.

IDG_20250919_123250_998.jpg
IDG_20250919_123310_352.jpg
IDG_20250919_123412_479.jpg


Removed the PSU and have replaced it with the QP-150-3A, in the event that I want to try a naomi and maybe get @dewmansnk's PCB. The existing PSU seems fine but I trust MeanWell with my electronics and thus my life.

iso.jpg

The heaviest component in the entire cabinet is what I assume is the Isolation transformer. It is a big heavy evil box that looks like it comes from Hellraiser. The wire splices were lamentable so for now I've replaced those with Wago nuts. Given that this cabinet was originally in China but made in Taiwan , I don't know if the monitor would still require it, but if there's a way to put something cleaner and more modern in there I'd prefer it. Does anybody have any insight into that?

IDG_20250819_204756_675.jpg
IDG_20250901_131003_790.jpg

Vinyl dye works REALLY well. It flashes quick and the results are good, although I'm sort of at a crossroads as to what clearcoat to put ON the dye to protect it, as I've occasionally scuffed the control panel already. I could put a 2k on there but that's difficult, nasty. I may just go with a simple automotive 1k clear. What clearcoat have people used on their cabinets, and which would you recommend for durability?

IDG_20250918_183640_245.jpg


The MisterCade came in the mail, so I'm excited to set that up (Porkchop threw in a Mistercade Versus in there, which is nice if I decide to do this entire thing again or use it in a meetup!). Going to bring a friend over soon and paint this bad boy before it gets too cold. I also decided to go with SGF!'s nylon printed SGF MonKey B.U.T.T.s V2 and the silent Sanwa JLX's since this cabinet is domestic. I'm also reordering the vinyl for the control panel because I improperly applied it and it peeled away as a result. Going to remove it, primer it, then reapply when it gets here VERY carefully.
 
The Chinese chassis requires the iso transformer.

With that said, the stock one was causing serious scrolling issues in the picture for me. I replaced it in my ok baby with a triad iso from digi key
 
Back
Top