Papapishu
Beginner
Hello gamers,
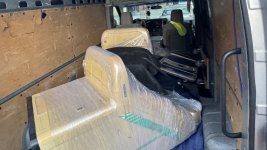
You may have seen this listing from @YubiParts, who imported a bunch of OK Babies and Astro Cities as project cabs in various states of repair. I decided to bite the bullet along with the thread and buy one, in part because I write about this stuff for a living, I had already recapped a CRT, and it was a thinly veiled excuse to write about the process of repairing a cab. I posted about it for the site I blog for/co-own cooperatively – Aftermath.

On another OK Baby thread someone encouraged me to start a thread where I document the process.
Here's where this thing is at: I have not turned it on except when we initially checked it out before buying. I wanna restore the shell first and work my way inward to the electronics. Here are my current plans for the baby.

1. Cleaning the shit out of it.
I did an initial pass when I got it home, but this thing needs a deep internal cleaning and I can only do that when I get the monitor out, which I want another person for. Already hit it with Simple Green but I may do a round with Purple Power.
2. The Power Supply Needs Replacing
One thing I know about this cab is that the PSU was acting funky, and frankly I would rather just put a new one in there. I have had great success with Meanwell in basically every other project I have used it in (particularly LED lighting, they are the budget PSU pick for basically every hobbyist project) so the list in SmokeMonster’s thread seems like a good place to start.
2. Redoing the shell – sanding, resurfacing and painting/vinyl dye
.jpg")
Initially I assumed that these things were yellow because they were in a smoke filled arcade, but what I figured out later is that this entire thing appears to be ABS plastic. Retr0briting, though effective, would be very cumbersome and apparently is not a permanent fix. Others have spray painted their babies with success. I have used Novus 3-2-1, and I will probably use this to prep the plastic before any major change in color.
But what I really want to investigate is Vinyl Dye. This Boarderstown thread and Twistedsymphony’s Taito Egret restoration thread seem to suggest this is a potentially good process for the baby, and I know that the cab comes apart fairly easily. That also just seems better for anything that could potentially experience physical stress.
3. Rewiring, new buttons, mod the stick.
The buttons on this thing have seen a lot of abuse, and so I am going to replace them. Seeing as I have a ton of keyboard parts in my house anyway, I will probably go with seimitsu alutimos. For the sticks, a new actuator and some Sanwa JLF Violets. Even if I kept the buttons I would have to redo the harness either way because this thing was not soldered well at all.
4. Fix the CPO, new decals
In addition to the buttons being mushy from years of abuse, the area around the sticks are rusted. I have some reproduction decals of the OK Baby coming on the way already from @joeks (I believe that's their name on here at least). Getting rid of that rust, repassivating, painting, and applying a new CPO is going to be a must.
5. Plastic welding or something similar.
A lot of the Babies were reinforced with external braces where the control panel met the body of the cabinet. This is an understandable stress point, as people would regularly sit on these things like idiots, causing it to flex and break. Mine has one of these ugly external braces, as well as a pretty substantial crack. This needs to either be plastic welded, or sealed using JB Plastic Weld. Maybe a bit of bondo or some kind of filler that works like plastic would be appropriate.
6. Replacing the monitor handle.
The baby has two handles that are used to remove the monitor, potentially for putting it in TATE. I don’t think there is a way to safely create a rotating mechanism for this due to the clearance on the kickstand, but one of the handles broke so finding a replacement should be a priority. Someone suggested a handle meant for an amplifier as a place to investigate. I will measure the holes and figure out if there’s an easy drop in replacement I can get at the hardware store..
6. Figuring out the monitor’s whole deal. See how the speakers hold up. Make plans accordingly.

I have not pulled the monitor out of this since I got it, but I have poked around there a bit with a flashlight. The tube seems to be some generic Chinese or Taiwanese tube I don’t recognize. My best guess is it’s a dual sync board. Once the PSU has been tested I will test the monitor out extensively and swap the tube if need be. If that happens I may just look for a Nanao MS29XX, because I would love to have this thing work at 31 khz for Naomi and even PC core stuff. If there is a comprehensive list of 15/24/31 compatible models, I’d love to see it.
7. MiSTerCade
No brainer, although I may also put a Naomi in there down the line. One of these days I hope someone does a core of the board that Osman/ Canon Dancer is on because I would love to have that running natively. I think a busted Joe and Mac Returns/Magical Drop donor PCB would be needed.
A friend of a friend has some spare tester boards so asking him to help out.
8. I guess play video games on it?
Is that legal?
9. Get a hat made.
I love the OK Baby logo, so if someone has a good SVG of that handy I can get a bunch made.
Anyway those are my plans. I am sure it will take ages. If anyone has any tips or is in the greater NYC area feel free to chime in.
You may have seen this listing from @YubiParts, who imported a bunch of OK Babies and Astro Cities as project cabs in various states of repair. I decided to bite the bullet along with the thread and buy one, in part because I write about this stuff for a living, I had already recapped a CRT, and it was a thinly veiled excuse to write about the process of repairing a cab. I posted about it for the site I blog for/co-own cooperatively – Aftermath.
On another OK Baby thread someone encouraged me to start a thread where I document the process.
Here's where this thing is at: I have not turned it on except when we initially checked it out before buying. I wanna restore the shell first and work my way inward to the electronics. Here are my current plans for the baby.
1. Cleaning the shit out of it.
I did an initial pass when I got it home, but this thing needs a deep internal cleaning and I can only do that when I get the monitor out, which I want another person for. Already hit it with Simple Green but I may do a round with Purple Power.
2. The Power Supply Needs Replacing
One thing I know about this cab is that the PSU was acting funky, and frankly I would rather just put a new one in there. I have had great success with Meanwell in basically every other project I have used it in (particularly LED lighting, they are the budget PSU pick for basically every hobbyist project) so the list in SmokeMonster’s thread seems like a good place to start.
2. Redoing the shell – sanding, resurfacing and painting/vinyl dye
Initially I assumed that these things were yellow because they were in a smoke filled arcade, but what I figured out later is that this entire thing appears to be ABS plastic. Retr0briting, though effective, would be very cumbersome and apparently is not a permanent fix. Others have spray painted their babies with success. I have used Novus 3-2-1, and I will probably use this to prep the plastic before any major change in color.
But what I really want to investigate is Vinyl Dye. This Boarderstown thread and Twistedsymphony’s Taito Egret restoration thread seem to suggest this is a potentially good process for the baby, and I know that the cab comes apart fairly easily. That also just seems better for anything that could potentially experience physical stress.
3. Rewiring, new buttons, mod the stick.
The buttons on this thing have seen a lot of abuse, and so I am going to replace them. Seeing as I have a ton of keyboard parts in my house anyway, I will probably go with seimitsu alutimos. For the sticks, a new actuator and some Sanwa JLF Violets. Even if I kept the buttons I would have to redo the harness either way because this thing was not soldered well at all.
4. Fix the CPO, new decals
In addition to the buttons being mushy from years of abuse, the area around the sticks are rusted. I have some reproduction decals of the OK Baby coming on the way already from @joeks (I believe that's their name on here at least). Getting rid of that rust, repassivating, painting, and applying a new CPO is going to be a must.
5. Plastic welding or something similar.
A lot of the Babies were reinforced with external braces where the control panel met the body of the cabinet. This is an understandable stress point, as people would regularly sit on these things like idiots, causing it to flex and break. Mine has one of these ugly external braces, as well as a pretty substantial crack. This needs to either be plastic welded, or sealed using JB Plastic Weld. Maybe a bit of bondo or some kind of filler that works like plastic would be appropriate.
6. Replacing the monitor handle.
The baby has two handles that are used to remove the monitor, potentially for putting it in TATE. I don’t think there is a way to safely create a rotating mechanism for this due to the clearance on the kickstand, but one of the handles broke so finding a replacement should be a priority. Someone suggested a handle meant for an amplifier as a place to investigate. I will measure the holes and figure out if there’s an easy drop in replacement I can get at the hardware store..
6. Figuring out the monitor’s whole deal. See how the speakers hold up. Make plans accordingly.
I have not pulled the monitor out of this since I got it, but I have poked around there a bit with a flashlight. The tube seems to be some generic Chinese or Taiwanese tube I don’t recognize. My best guess is it’s a dual sync board. Once the PSU has been tested I will test the monitor out extensively and swap the tube if need be. If that happens I may just look for a Nanao MS29XX, because I would love to have this thing work at 31 khz for Naomi and even PC core stuff. If there is a comprehensive list of 15/24/31 compatible models, I’d love to see it.
7. MiSTerCade
No brainer, although I may also put a Naomi in there down the line. One of these days I hope someone does a core of the board that Osman/ Canon Dancer is on because I would love to have that running natively. I think a busted Joe and Mac Returns/Magical Drop donor PCB would be needed.
A friend of a friend has some spare tester boards so asking him to help out.
8. I guess play video games on it?
Is that legal?
9. Get a hat made.
I love the OK Baby logo, so if someone has a good SVG of that handy I can get a bunch made.
Anyway those are my plans. I am sure it will take ages. If anyone has any tips or is in the greater NYC area feel free to chime in.