ImportantBet
Grand Master
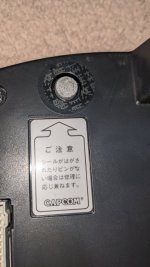
What bit size do you recommend?They technically pry apart but I put a small flathead into the C logo side of it and drill the other. Anything to keep the other end from spinning while you drill it should work fine.


I think I used a 3/16 and stepped up to 1/4, as long as you start center you should free it relatively quickly. The metal is soft so a fresh bit should be OK.What bit size do you recommend?
Good question, since you were able to mail in your dead boards and they would've had to open them up for the revival process.Is there any pictures of an official tool Capcom used?
As a lover of all things CPS2 also following with interest. I was not aware that such a thing existed, but logically it must. Capcom techs would not be hacking at these with hand tools.Is there any pictures of an official tool Capcom used?
I like your reasoning, though I must assume they had a supply of replacement bolts on hand.As a lover of all things CPS2 also following with interest. I was not aware that such a thing existed, but logically it must. Capcom techs would not be hacking at these with hand tools.