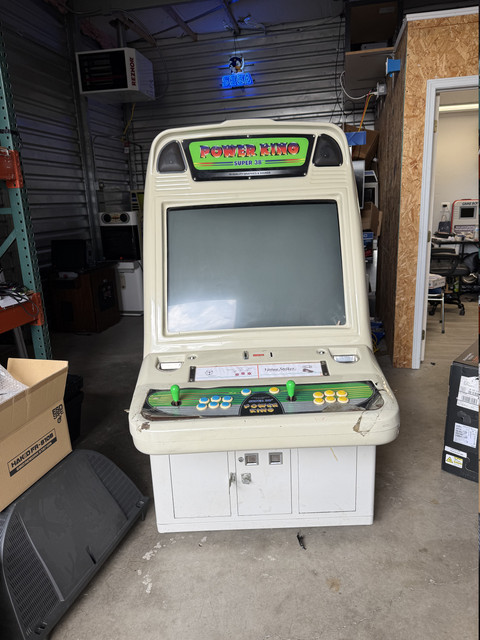
Fixing a Big Candy. OK Jumbo / Power King

hoagtech

Enlightened
Joined
Mar 28, 2019
Messages
2,019
Reaction score
3,267
Location
Bellingham WA
I saw this cab on the marketplace and always had a big screen addiction. The seller said the screen didn't work and it would not turn on.

I used CRST and got this big thing landed in my workshop.
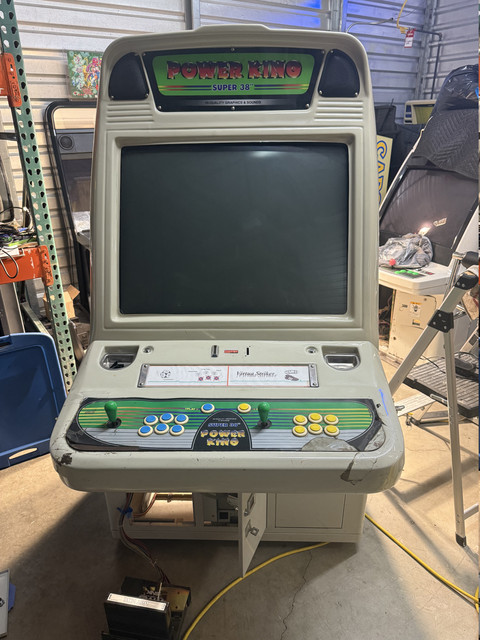


I wanted to start with all fuses and then supply voltages.

All closed circuits on the fuses.

It looks like they left this giant PSU in there. The Ac voltages and DC voltages were just fine but the fan failed. Ill put it aside for now as the other PSU had an isolation transformer and fuse tied into the circuit.


This is the one that is hooked up but I'm not sure if any of it is original.


I went to test the DC Jamma voltage and the connector just kinda flopped around. It felt like a limp handshake or a broken arm. after the connector off I confirmed these pins were barely hanging and flopping around worse than an N64 joystick in 2005.


The pins were held on by a thin layer of solder and the traces were ripped out.


I connected some bodge wires to the nearest circuit to close it and passed continuity.


Apon completion. I tested voltages on +/-5V, 12V and got 5.76V. -6.8V, and 11.1V. This PSU is out of tolerance and needs a recap. I tuned the +5 to 5.1 to run an image test on the chassis.

After firing it up. I got a feint neck glow and a teeny bit of static and was greeted by this lovely line in the center of my screen.


A sign of life?! I'll take it!

Time to remove the chassis and get it to the work bench. I noticed the tube had no degauss strap, only a DAG strap. Strange things.


This chassis is a Dong Woo 500S (tee hee).

The next step Is to create a capacitor map and test each cap on its way out for Cap and ESR to make sure my replacements are within range of the of the good caps I am replacing.


I'm hoping the general purpose Panasonic capacitors are both in stock and compatible on Digikey. Time to get to some relaxing documentation and desoldering.

Wish me luck and feel free to comment with inputs, opinions and tips.
 
Last edited:
Looking forward to this one. subscribed!
After firing it up. I got a feint neck glow and a teeny bit of static and was greeted by this lovely line in the center of my screen.
Vertical collapse!
might be a good idea to swap out the 2 IC's on the board (likely the deflection IC's) as well.
 
Oh cool I'm glad you got it! Mine arrived a few months back from the same seller and seems like you got the nicer of the two. Mine has cracks everywhere and freight was very much NOT kind to it. However, this was also the same idiot seller who packed my Daytona 2 marquee in a way where the entire weight was supported by the acrylic and it smashed to pieces.

Lucky you only having vertical collapse. My chassis would blow both fuses in a massive light show and would blow not just the HOT but also the power supply switching transistor even after a recap and replacing a ton of stuff. I didn't have time to diagnose further so I modified a K7400 I had spare.

This cabinet is hilarious. The construction is so poor compared to the OK Baby it's hard to believe they were made by the same company. Everything creaks and snaps when you move it, many pieces are held in with glue, even the pathetic "kickstands" to hold the bezel up are glued in. What I've gathered is that WeChe would manufacture the plastic bodies and then ship them flat packed to distributors who would assemble them with their own domestic electronics, which explains the sketchy linear power supply that looks straight out of the 70s.

Anyway I won't hijack your thread. This cabinet is a huge joke between my friends so I made a custom control panel for the greatest game of all time: Egg Venture.

IMG_3464.JPG

IMG_3235.JPG
 
Last edited:
Oh cool I'm glad you got it! Mine arrived a few months back from the same seller and seems like you got the nicer of the two. Mine has cracks everywhere and freight was very much NOT kind to it. However, this was also the same idiot seller who packed my Daytona 2 marquee in a way where the entire weight was supported by the acrylic and it smashed to pieces.

Lucky you only having vertical collapse. My chassis would blow both fuses in a massive light show and would blow not just the HOT but also the power supply switching transistor even after a recap and replacing a ton of stuff. I didn't have time to diagnose further so I modified a K7400 I had spare.

This cabinet is hilarious. The construction is so poor compared to the OK Baby it's hard to believe they were made by the same company. Everything creaks and snaps when you move it, many pieces are held in with glue, even the pathetic "kickstands" to hold the bezel up are glued in. What I've gathered is that WeChe would manufacture the plastic bodies and then ship them flat packed to distributors who would assemble them with their own domestic electronics, which explains the sketchy linear power supply that looks straight out of the 70s.

Anyway I won't hijack your thread. This cabinet is a huge joke between my friends so I made a custom control panel for the greatest game of all time: Egg Venture.

IMG_3464.JPG

IMG_3235.JPG
Thanks for the backstory and the context. I needed that. I hope I get it to a point where l have that option

It makes me feel less bad about slapping whatever in there if I need to.

Sorry to here about your freight. I hate it when that happens
 
Having also worked on trashedcabs OK Jumbo with them; I would definitely not try to save the original power supply. It's a frankly insane setup to use for something from the 90s. Toss in a modern switch mode PSU and while you're at it, add some Test and Service buttons because the original cab doesn't have them! This entire cabinet's construction is so hilariously insane.

It unironically does make for a great light gun game cab though. The big screen and height is honestly great for that.
 
Any progress on this monster?
Thanks for asking. I usually post on a positive note but this monitor is still giving me trouble but there is plenty of positives left to be had.

The Capacitors came in from Digikey and took about two weeks due to a backorder.

So I pulled each cap and recorded ESR and Capacitance with my ATLAS meter. They were generally 75% under rated capacitance and only one cap had a lower ESR rating used than the Rubycon I replaced it with. I noted in my excel map and finished recapping the chassis.


I then pulled what Google Lens Gemini told me was most likely the Vertical IC. The DBL2054D, Which was one of three components, but the other two were D1047 power transistor and there is a third 3 pin. I intend the test those transistors soon.

I pulled the old IC and repasted with a good Noctua thermal.


Before testing I decided to recap the PSU while I'm at it.

I resoldered the pins further down to anchor them and then applied a glue gun to seal the deal. The recap went very fast with only 6 caps to deal with.


My measurements were "Better" 5.06V, 12.1 V, and -7.51v. That -5V is still off so it might be the regulators on the heatsink but its certainly solid for typical 5v applications.


I was feeling great. Like nothing could go wrong lol...

Unfortunately. I was met with a "Much Brighter!" vertical collapse..


Something tells me Gemini misled me or I need more experience in diagnosing this kind of problem. I would love a hot tip or suggestion to further diagnose this. Suggest anything. I'll try it..

I have a secret in my back pocket but I'll save it for the end of the post and move onto to some fun tinkering.

The marquee light wasn't turning on so I managed to squeeze a wrench into the CP and loosened the lock nuts on the panel tangs holding the CP closed. I managed to undo them and drop the tangs and open it up.


The Light was loose and after screwing it in, it still worked, but it was on it's last legs and didn't put out very many lumens. Still a win though


Since I already fenagled the lock tangs off with no key. I decided to replace them. And with some washers and a slight bend, I was able to recycle the tangs onto new locks. It feels good to have working keys again.


And magically, I found the back lock floating on the bottom of the cab. Thank God the previous owner didn't throw it away. The same process worked like a charm and I was able to throw away the two wood screwed that randomly violated the ABS back shell and had a new lock set installed.


I noticed the CP was soldered directly to the Happ buttons and bat joysticks. I bought a cheap pack of terminal leads and will heat shrink them properly with terminal connectors. I have a drop from Paradise arcade with new Sanwa buttons, joysticks, and 5 pin wiring harnesses to get the feeling back.


To sum it up. It was a win with the locks and the light and a defeat on the vertical collapse. I do a have a secret weapon. I bought the same Dong Woo 500-S chassis from eBay for $15 so I can test parts and find problems through through dissimilar resistances.


Any advice is welcome and thanks for checking it out.
 
Last edited:
Nice to see other Jumbos! - Got my jumbo a couple months ago and sadly my chassis was beyond repair. Added a Arccoda Display to it and really happy with it. Still havent finished the build yet.
 

Attachments

  • IMG_0079.JPG
    IMG_0079.JPG
    223.9 KB · Views: 50
Nice to see other Jumbos! - Got my jumbo a couple months ago and sadly my chassis was beyond repair. Added a Arccoda Display to it and really happy with it. Still havent finished the build yet.

Would you mind getting some high quality images of the marquee, side art, and panel? I intend to replace my "super 38" art with the real Jumbo art at some point so I will repro that, but I need better photos than what's online.
 
Something tells me Gemini misled me or I need more experience in diagnosing this kind of problem. I would love a hot tip or suggestion to further diagnose this. Suggest anything. I'll try it..

That Daewoo vertical IC is a clone of the TDA1675A. Not sure if you replaced that IC or just repasted it but try the TDA1675A instead, it's a much higher quality part than the Daewoo.

Reflow the remote board header on the board, sometimes those can have breaks in them from people pulling on the cable. Failing that, look up the datasheet for the TDA1675A and start working back from the inputs and outputs of the chip and see if anything is broken. These old chassis don't have too many parts especially in the vertical section so it shouldn't be too time consuming.
 
Back
Top