
You are using an out of date browser. It may not display this or other websites correctly.
You should upgrade or use an alternative browser.
You should upgrade or use an alternative browser.
Home Arcade System
- Thread starter RGB
- Start date

I've just added some Power Supply Covers. There aren't many this time - https://rgbslab.com/
Thank you!
Could you tell me the part # for the connector used on the module end of the 3P4P harnesses?
It looks like it's some sort of 0.1" polarised connector but I'd like to make sure I use the right one for some harnesses so it latches in the module correctly.
It looks like it's some sort of 0.1" polarised connector but I'd like to make sure I use the right one for some harnesses so it latches in the module correctly.

plasticfactory
Champion
Robertguy09
Grand Master
I didn't even know this existed....I want one too lolAny chance these will be back in stock anytime soon?

HDemon
Grand Master
Tough to say :/ I still haven't received some crucial parts for the HAS as well as for the PSU covers (the power inlet thingy has long lead times). I will only re-open when I can offer the most popular stuff all at the same time. Hopefully soon@RGB Hi, when the shop reopens?

HDemon
Grand Master
Fingers crossed for fats comebackTough to say :/ I still haven't received some crucial parts for the HAS as well as for the PSU covers (the power inlet thingy has long lead times). I will only re-open when I can offer the most popular stuff all at the same time. Hopefully soon

Stokers
Professional

dillingerradio
Professional
Hiya!
Just wanted to post a question (or maybe a feature request?)
I'm absolutely loving my HAS v5. But, I noticed that the audio automatically cuts from the JAMMA edge if the 3.5 mm jack is in use. In many cases, the auto-shunt behavior is honestly nice. But, in some instances (like when recording direct play), this can be problematic, since using headphones or some other audio source on the 3.5 mm shunts the audio from the captured recording.
Is there a setting to disable JAMMA audio bypass on 3.5 mm detection? If not, would it be possible to add something like that to the firmware (at your convenience)?
Thanks again (for real, this thing is an incredible bit of kit- really lovely).
-Dillinger
Just wanted to post a question (or maybe a feature request?)
I'm absolutely loving my HAS v5. But, I noticed that the audio automatically cuts from the JAMMA edge if the 3.5 mm jack is in use. In many cases, the auto-shunt behavior is honestly nice. But, in some instances (like when recording direct play), this can be problematic, since using headphones or some other audio source on the 3.5 mm shunts the audio from the captured recording.
Is there a setting to disable JAMMA audio bypass on 3.5 mm detection? If not, would it be possible to add something like that to the firmware (at your convenience)?
Thanks again (for real, this thing is an incredible bit of kit- really lovely).
-Dillinger

Kreuz
Student
Bought one of the Basic covers for the Mean Well supplies, and I like it a lot. However, it seems to have a few minor design issues, at least with the RT85A I have.
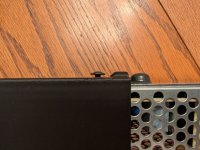
1) The center support bar is too tall by several millimeters. When fully installed, neither screw hole lines up and you have to tilt the cover to catch one or the other. Not ideal. I took a hobby saw and fixed this rather easily.
2) The included screws are too long. They thread in fine on the side, but they bottom out on the underside which prevents the PSU from sitting on the rubber feet. A slightly shorter screw will fix this.
The RT85A I have is a new one from Digi-Key, so I would assume its a reasonable current version. I have not tried this on any of the other Mean Well supplies.
Edit: Oops, forgot the image. I measured and it extends almost exactly 2mm from base to the edge of the integrated washer.
1) The center support bar is too tall by several millimeters. When fully installed, neither screw hole lines up and you have to tilt the cover to catch one or the other. Not ideal. I took a hobby saw and fixed this rather easily.
2) The included screws are too long. They thread in fine on the side, but they bottom out on the underside which prevents the PSU from sitting on the rubber feet. A slightly shorter screw will fix this.
The RT85A I have is a new one from Digi-Key, so I would assume its a reasonable current version. I have not tried this on any of the other Mean Well supplies.
Edit: Oops, forgot the image. I measured and it extends almost exactly 2mm from base to the edge of the integrated washer.
Attachments
Last edited:
Thank you for your feedback.
1) I will adjust the center support bar so that the cover fits the newer models.
2) I can see the Basic Power Supply assembly instruction is missing one step - the chassis screw must be unscrewed, otherwise it will block the bottom screw. The instructions will be updated.
1) I will adjust the center support bar so that the cover fits the newer models.
2) I can see the Basic Power Supply assembly instruction is missing one step - the chassis screw must be unscrewed, otherwise it will block the bottom screw. The instructions will be updated.
Hiya!
Just wanted to post a question (or maybe a feature request?)
I'm absolutely loving my HAS v5. But, I noticed that the audio automatically cuts from the JAMMA edge if the 3.5 mm jack is in use. In many cases, the auto-shunt behavior is honestly nice. But, in some instances (like when recording direct play), this can be problematic, since using headphones or some other audio source on the 3.5 mm shunts the audio from the captured recording.
Is there a setting to disable JAMMA audio bypass on 3.5 mm detection? If not, would it be possible to add something like that to the firmware (at your convenience)?
Thanks again (for real, this thing is an incredible bit of kit- really lovely).
-Dillinger
Thank you for your kind words!
The audio jack has a physical switch inside, it isn't controlled via the firmware, and it cannot serve as a secondary audio output. It was designed to provide an alternative audio output path so that audio doesn't go inside the same cable as the video signal (to eliminate the cross-talk interference from the CSync signal).

XtraSmiley
Legendary
@RGB, I have a question, and I might be doing something wrong. Awhile ago I set rapid fire level 6 on buttons 1 and 2. Now, I use the menu to change them to 0 (none) and hit save and exit via the menu button, but it reverts back to 6 for them both when I re-power the HAS. If I use the joystick start button, then it will save. Is this because when I first set the rapid fire I used the joystick to set the rapid fire, so now using the screen "save and exit" doesn't work? If so, is that something you want to change in the firmware or if not update in the instructions to be clear, or am I doing something wrong?
@RGB, I have a question, and I might be doing something wrong. Awhile ago I set rapid fire level 6 on buttons 1 and 2. Now, I use the menu to change them to 0 (none) and hit save and exit via the menu button, but it reverts back to 6 for them both when I re-power the HAS. If I use the joystick start button, then it will save. Is this because when I first set the rapid fire I used the joystick to set the rapid fire, so now using the screen "save and exit" doesn't work? If so, is that something you want to change in the firmware or if not update in the instructions to be clear, or am I doing something wrong?
Do you exit the remapping config menu with the BACK or MENU button? To save the change in the EEPROM, you need to exit the remapping config menu with the MENU button. If you exit with BACK, it will be just a temporary change. The Save & Exit option won't save it, it's for everything else but the remapping and rapid-fire. This might need a change in the future as it seems confusing, but I wanted to give the option to have a temporary rapid-fire/layout setting for a one-off need.
Edit: had a brain fart. So you do exit it with the MENU button.. This is strange, let me check here.
Edit2: Works here. When you're in the remapping configuration menu, the red led light up. If you leave with the MENU button, the config is saved and available after the power cycle. If you leave with the BACK, it's just a temporary change, it won't be retained.
Last edited:
XtraSmiley
Legendary
No, you are correct, I exit the rapid fire menu with the back button, but use the "save and exit" with the menu, witch of course you just explained doesn't work.Do you exit the remapping config menu with the BACK or MENU button? To save the change in the EEPROM, you need to exit the remapping config menu with the MENU button. If you exit with BACK, it will be just a temporary change. The Save & Exit option won't save it, it's for everything else but the remapping and rapid-fire. This might need a change in the future as it seems confusing, but I wanted to give the option to have a temporary rapid-fire/layout setting for a one-off need.
Edit: had a brain fart. So you do exit it with the MENU button.. This is strange, let me check here.
Edit2: Works here. When you're in the remapping configuration menu, the red led light up. If you leave with the MENU button, the config is saved and available after the power cycle. If you leave with the BACK, it's just a temporary change, it won't be retained.
Got it, OK, I'll obviously be fine now, but yeah, an update to make it less confusing might help. Of course, I'm the only one who's mentioned it so far, so maybe it's just me!
When I was planning this, I thought it would be just a little extra squizzed-in and that it would make sense - OK/MENU button = save, BACK = exit without saving. I mentioned this in the User Guide, but it's become quite extensive, so it's easy to miss :/
XtraSmiley
Legendary
Yeah, that part makes sense, but the "save and exit" not saving it is what confused me. It's all good. We've been doing some PVM game testing/playing and the only other thing so far has be Taito F2 won't sync with the PVM, so I'm trying to figure that out. I had it working before, so I'm sure it's something to do with the settings on the HAS. The stupid F2 long boards suck too b/c none of my JAMMA extenders fit easily on it. Yours works, but I have to take the plexiglass off, which is a pain.When I was planning this, I thought it would be just a little extra squizzed-in and that it would make sense - OK/MENU button = save, BACK = exit without saving. I mentioned this in the User Guide, but it's become quite extensive, so it's easy to miss :/
Oh well, as they say, 1st World Problems.